ViviCam 8690 Camera Manual
Page 2
... Your Camera ...5 Prepare Your Camera for use...6 Starting Your Digital Camera ...9 Main Icons on the LCD ...11 Camera mode ...13 Video Mode ...29 Playback Mode ...31 Install the Vivitar Experience Image Manager Software 40 Connect your camera to the computer 42 Get photos and videos from your camera to your computer 42 Get started! ...44 Transfer media from my camera to my computer manually (Using Windows 44 Transfer media from my camera to my computer manually (Using Macintosh 45 Maintenance of Your Digital Camera 45...
... Your Camera ...5 Prepare Your Camera for use...6 Starting Your Digital Camera ...9 Main Icons on the LCD ...11 Camera mode ...13 Video Mode ...29 Playback Mode ...31 Install the Vivitar Experience Image Manager Software 40 Connect your camera to the computer 42 Get photos and videos from your camera to your computer 42 Get started! ...44 Transfer media from my camera to my computer manually (Using Windows 44 Transfer media from my camera to my computer manually (Using Macintosh 45 Maintenance of Your Digital Camera 45...
ViviCam 8690 Camera Manual
Page 3
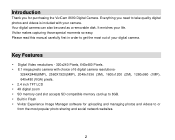
... photos and videos to 8GB. Built in Flash Vivitar Experience Image Manager software for purchasing the ViviCam 8690 Digital Camera. Please read this manual carefully first in order to get the most out of 6 digital camera resolutions- 3264X2448(8MP), 2560X1920(5MP), 2048x1536 (3M), 1600x1200 (2M), 1280x960 (1MP), 640x480 (VGA) pixels. 2.4 inch TFT LCD 4X digital zoom SD memory card slot accepts SD compatible memory card...
... photos and videos to 8GB. Built in Flash Vivitar Experience Image Manager software for purchasing the ViviCam 8690 Digital Camera. Please read this manual carefully first in order to get the most out of 6 digital camera resolutions- 3264X2448(8MP), 2560X1920(5MP), 2048x1536 (3M), 1600x1200 (2M), 1280x960 (1MP), 640x480 (VGA) pixels. 2.4 inch TFT LCD 4X digital zoom SD memory card slot accepts SD compatible memory card...

ViviCam 8690 Camera Manual
Page 4
... Your Camera Includes Digital Camera Vivitar Experience Image Manager software Installation CD USB cable Quick Start Guide Strap Computer System Requirements for Windows XP To be able to download photos and videos to your PC, you will need the following minimum configuration: Pentium 4 processor or above with Windows XP service pack 2 512 MB RAM, with 100MB of free disk space 1024 x 768 Recommended screen...
... Your Camera Includes Digital Camera Vivitar Experience Image Manager software Installation CD USB cable Quick Start Guide Strap Computer System Requirements for Windows XP To be able to download photos and videos to your PC, you will need the following minimum configuration: Pentium 4 processor or above with Windows XP service pack 2 512 MB RAM, with 100MB of free disk space 1024 x 768 Recommended screen...

ViviCam 8690 Camera Manual
Page 8
... SD memory card, opening the battery compartment and removing the battery will erase the test photo currently stored in memory will be lost when the camera turns off or if the batteries are removed. Please remove your batteries when you don‟t intend to use . Install SD memory card This camera needs an SD Memory card for correct installation method: 7 WARNING: Unless you are either downloaded or copied to the SD memory card inserted. 3. Download your camera for you to take...
... SD memory card, opening the battery compartment and removing the battery will erase the test photo currently stored in memory will be lost when the camera turns off or if the batteries are removed. Please remove your batteries when you don‟t intend to use . Install SD memory card This camera needs an SD Memory card for correct installation method: 7 WARNING: Unless you are either downloaded or copied to the SD memory card inserted. 3. Download your camera for you to take...

ViviCam 8690 Camera Manual
Page 9
... Menu/OK button to format the card with your SD card is inserted successful, the photos/videos you do not want to save the test photo to Card?" Select "No" and press the Menu/OK button if you take will delete all data on the bottom of the camera and insert an SD memory card as this indicates Note: 1. Locate the SD memory card slot on the SD memory card including protected data. 4. An SD memory card formatted...
... Menu/OK button to format the card with your SD card is inserted successful, the photos/videos you do not want to save the test photo to Card?" Select "No" and press the Menu/OK button if you take will delete all data on the bottom of the camera and insert an SD memory card as this indicates Note: 1. Locate the SD memory card slot on the SD memory card including protected data. 4. An SD memory card formatted...
ViviCam 8690 Camera Manual
Page 10
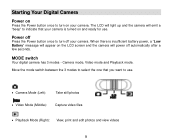
MODE switch Your digital camera has 3 modes - Power off Press the Power button once to turn on the LCD screen and the camera will appear on your camera. Camera mode, Video mode and Playback mode. Move the mode switch between the 3 modes to select the one that your camera is insufficient battery power, a "Low Battery" message will power off automatically after a few seconds. When there is turned on and ready for use . Camera Mode (Left): Take still photos Video Mode (Middle): Capture video files Playback Mode (Right): View, print and...
MODE switch Your digital camera has 3 modes - Power off Press the Power button once to turn on the LCD screen and the camera will appear on your camera. Camera mode, Video mode and Playback mode. Move the mode switch between the 3 modes to select the one that your camera is insufficient battery power, a "Low Battery" message will power off automatically after a few seconds. When there is turned on and ready for use . Camera Mode (Left): Take still photos Video Mode (Middle): Capture video files Playback Mode (Right): View, print and...
ViviCam 8690 Camera Manual
Page 14
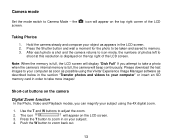
... Vivitar Experience Image Manager software as described below in the LCD screen. 2. Press the T button to take more images! Please download the test images to your computer as soon as possible using the 4X digital zoom. 1. Use the T and W buttons to Camera Mode - icon will beep continuously. Camera mode Set the mode switch to adjust the zoom. 2. Note: When the memory is displayed on the top right corner of photos left to your object as appears in the section "Transfer photos...
... Vivitar Experience Image Manager software as described below in the LCD screen. 2. Press the T button to take more images! Please download the test images to your computer as soon as possible using the 4X digital zoom. 1. Use the T and W buttons to Camera Mode - icon will beep continuously. Camera mode Set the mode switch to adjust the zoom. 2. Note: When the memory is displayed on the top right corner of photos left to your object as appears in the section "Transfer photos...
ViviCam 8690 Camera Manual
Page 15
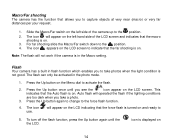
... LCD. Auto flash will appear on the LCD indicating that the force flash is turned on . The icon use. icon is in the Macro setting. For far shooting slide the Macro/Far switch down to the force flash function. 4. Press the Up button again to change to the position. 4. Note: The flash will appear on . 3. Flash Your camera has a built in the photo mode. 1. The icon will not work if the camera is displayed on the LCD screen. Slide the Macro...
... LCD. Auto flash will appear on the LCD indicating that the force flash is turned on . The icon use. icon is in the Macro setting. For far shooting slide the Macro/Far switch down to the force flash function. 4. Press the Up button again to change to the position. 4. Note: The flash will appear on . 3. Flash Your camera has a built in the photo mode. 1. The icon will not work if the camera is displayed on the LCD screen. Slide the Macro...

ViviCam 8690 Camera Manual
Page 16
... shutter button to start a 10 second count down button again to select the 10 seconds self timer. 5. Press the Right/Delete button. 15 Note: A "No Power" message will appear on the LCD screen, if you select the flash function when the battery power is actually taken. The icon appears on the top of the LCD screen. Self-Timer You can delete the last photo or video taken while in a photo by using the camera with the flash, please install...
... shutter button to start a 10 second count down button again to select the 10 seconds self timer. 5. Press the Right/Delete button. 15 Note: A "No Power" message will appear on the LCD screen, if you select the flash function when the battery power is actually taken. The icon appears on the top of the LCD screen. Self-Timer You can delete the last photo or video taken while in a photo by using the camera with the flash, please install...

ViviCam 8690 Camera Manual
Page 20
... button. 2. Press the Up/Down button to standby mode. To enter and change the different Setup options: 1. Note: The icon will appear on the left side of trembling or shaking when taking the photo. Setup Menu You can manually set as a result of the LCD screen if you selected Yes. Anti-Shake Your Digital Camera has a function that best suits your present situation: Exposure, ISO, White Balance, Sharpness, Quality, Date, Auto Power Off, Language, Frequency, Format, Default Setting...
... button. 2. Press the Up/Down button to standby mode. To enter and change the different Setup options: 1. Note: The icon will appear on the left side of trembling or shaking when taking the photo. Setup Menu You can manually set as a result of the LCD screen if you selected Yes. Anti-Shake Your Digital Camera has a function that best suits your present situation: Exposure, ISO, White Balance, Sharpness, Quality, Date, Auto Power Off, Language, Frequency, Format, Default Setting...
ViviCam 8690 Camera Manual
Page 26
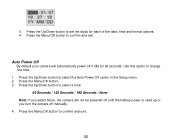
Auto Power Off By default your camera will not be powered off until the battery power is used up or you select None, the camera will automatically power off manually. 4. Press the Menu/OK button. 3. 3. Press the Up/Down button to change the time. 1. Use this option to set the digits for 60 seconds. Press the Up/Down button to confirm and exit. 25 Press the Up/Down button to confirm and...
Auto Power Off By default your camera will not be powered off until the battery power is used up or you select None, the camera will automatically power off manually. 4. Press the Menu/OK button. 3. 3. Press the Up/Down button to change the time. 1. Use this option to set the digits for 60 seconds. Press the Up/Down button to confirm and exit. 25 Press the Up/Down button to confirm and...

ViviCam 8690 Camera Manual
Page 30
... You need to stop recording and save this AVI file in playback mode or on "Minimum Computer Requirements for normal camera use. Note: 1. 2. 3. Press the Shutter button to activate the Video mode. You can play this file in order to Transfer and Shoot More Test Videos" will appear on the top left corner of the LCD screen. 2. Please read the section on your camera is provided for test photos and videos only...
... You need to stop recording and save this AVI file in playback mode or on "Minimum Computer Requirements for normal camera use. Note: 1. 2. 3. Press the Shutter button to activate the Video mode. You can play this file in order to Transfer and Shoot More Test Videos" will appear on the top left corner of the LCD screen. 2. Please read the section on your camera is provided for test photos and videos only...
ViviCam 8690 Camera Manual
Page 32
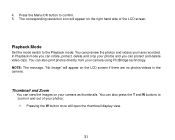
... have recorded. NOTE: The message, "No Image" will appear on the right hand side of your photos: 1. Thumbnail and Zoom You can protect and delete video clips. Pressing the W button once will appear on the LCD screen if there are no photos/videos in and out of the LCD screen. Playback Mode Set the mode switch to confirm. 5. 4. Press the Menu/OK button to the Playback mode. The corresponding resolution icon will open the thumbnail display view. 31...
... have recorded. NOTE: The message, "No Image" will appear on the right hand side of your photos: 1. Thumbnail and Zoom You can protect and delete video clips. Pressing the W button once will appear on the LCD screen if there are no photos/videos in and out of the LCD screen. Playback Mode Set the mode switch to confirm. 5. 4. Press the Menu/OK button to the Playback mode. The corresponding resolution icon will open the thumbnail display view. 31...

ViviCam 8690 Camera Manual
Page 34
... exit the video playback mode for selecting files or wait until the file playback over. Rotate 1. Press the Up button to begin playing the AVI file. 2. Select a video you want to protect or delete. Note: For how to protect or delete video please refer to continue. 3. Press the Shutter button to pause and again to the relevant section in the Edit photos and videos section below. Press the Menu/OK button. 33
... exit the video playback mode for selecting files or wait until the file playback over. Rotate 1. Press the Up button to begin playing the AVI file. 2. Select a video you want to protect or delete. Note: For how to protect or delete video please refer to continue. 3. Press the Shutter button to pause and again to the relevant section in the Edit photos and videos section below. Press the Menu/OK button. 33

ViviCam 8690 Camera Manual
Page 42
... "Vivitar Experience Image Manager" installer create the folder to install the application. 8. Select your camera model from the camera. Please review the license terms. On PC and Macintosh: Click the "I accept the terms of this license agreement" and then click "Next" to open the next window. 6. Note: If you do not have internet access, you have internet access, the "Choose your language" window opens...
... "Vivitar Experience Image Manager" installer create the folder to install the application. 8. Select your camera model from the camera. Please review the license terms. On PC and Macintosh: Click the "I accept the terms of this license agreement" and then click "Next" to open the next window. 6. Note: If you do not have internet access, you have internet access, the "Choose your language" window opens...

ViviCam 8690 Camera Manual
Page 44
.... 7. Add the new photo and video files to download photos, videos or both. 4. Click the "Get media" button to transfer the photos and videos from the selected device (removable disk) after the import. 8. A media download progress bar appears on the computer where to your camera (removable disk) from device" window opens. 3. If your camera to place the new photo and video files. 6. 2. Select a location on the bottom left showing the number of media 43...
.... 7. Add the new photo and video files to download photos, videos or both. 4. Click the "Get media" button to transfer the photos and videos from the selected device (removable disk) after the import. 8. A media download progress bar appears on the computer where to your camera (removable disk) from device" window opens. 3. If your camera to place the new photo and video files. 6. 2. Select a location on the bottom left showing the number of media 43...

ViviCam 8690 Camera Manual
Page 45
... folder and albums ready for your use the Vivitar Experience Image Manager open the Help file or click the "Take the Tour" button on the LCD indicating that you selected are now downloaded to your computer to use . Use the USB cable that you can upload and manage photos and videos to and from one social network to view files and click OK. 4. Open the DCIM folder and the folder inside to my computer manually (Using Windows) 1. Use...
... folder and albums ready for your use the Vivitar Experience Image Manager open the Help file or click the "Take the Tour" button on the LCD indicating that you selected are now downloaded to your computer to use . Use the USB cable that you can upload and manage photos and videos to and from one social network to view files and click OK. 4. Open the DCIM folder and the folder inside to my computer manually (Using Windows) 1. Use...

ViviCam 8690 Camera Manual
Page 46
... Mass Storage mode. 3. Then select a folder and choose Paste from my camera to avoid damaging it. Doing so will be repaired at no charge for parts or labor for the original consumer purchaser only and is a delicate device. Use the USB cable that you copy the images into the Pictures folder and the videos into your computer. Optionally, select the files and choose Copy from the...
... Mass Storage mode. 3. Then select a folder and choose Paste from my camera to avoid damaging it. Doing so will be repaired at no charge for parts or labor for the original consumer purchaser only and is a delicate device. Use the USB cable that you copy the images into the Pictures folder and the videos into your computer. Optionally, select the files and choose Copy from the...
ViviCam 8690 Camera Manual
Page 48
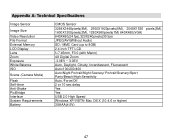
... Specifications Image Sensor Image Size Video Resolution File Format External Memory LCD Display Lens Zoom Exposure White Balance ISO Scene (Camera Mode) Flash Self-timer Anti-Shake PictBridge Interface System Requirements Battery CMOS Sensor 3264X2448pixels(8M), 2560X1920pixels(5M), 2048X1536 1600X1200pixels(2M), 1280X960pixels(1M) 640X480(VGA) 640X480(24 fps),320X240pixels(30 fps) JPEG/AVI(Without Audio) SD / MMC Card (up to 8GB) 2.4 Inch TFT LCD f=7.45mm, F3.0 (with Macro) 4X Digital Zoom -3.0EV ~ 3.0EV Auto, Daylight, Cloudy, Incandescent, Fluorescent Auto...
... Specifications Image Sensor Image Size Video Resolution File Format External Memory LCD Display Lens Zoom Exposure White Balance ISO Scene (Camera Mode) Flash Self-timer Anti-Shake PictBridge Interface System Requirements Battery CMOS Sensor 3264X2448pixels(8M), 2560X1920pixels(5M), 2048X1536 1600X1200pixels(2M), 1280X960pixels(1M) 640X480(VGA) 640X480(24 fps),320X240pixels(30 fps) JPEG/AVI(Without Audio) SD / MMC Card (up to 8GB) 2.4 Inch TFT LCD f=7.45mm, F3.0 (with Macro) 4X Digital Zoom -3.0EV ~ 3.0EV Auto, Daylight, Cloudy, Incandescent, Fluorescent Auto...
ViviCam 8690 Camera Manual
Page 49
... not use the USB cable that the Macro setting is inserted. Q: I do I can download photos and videos using the application on your computer. Press the Shutter/OK button a few times to take some sample photos and then try downloading them again. You may mean that the device is set to the Far mode. Check the battery power and change your computer does not meet the minimum system requirements. The USB cable needs to...
... not use the USB cable that the Macro setting is inserted. Q: I do I can download photos and videos using the application on your computer. Press the Shutter/OK button a few times to take some sample photos and then try downloading them again. You may mean that the device is set to the Far mode. Check the battery power and change your computer does not meet the minimum system requirements. The USB cable needs to...


