
ViviCam 8690 Camera Manual
Page 1
Windows and the Windows logo are the property of Microsoft Corporation. All rights reserved. All other trademarks are registered trademarks of their respective companies. ViviCam 8690Digital Camera User‟s Manual © 2009 Sakar International, Inc.
Windows and the Windows logo are the property of Microsoft Corporation. All rights reserved. All other trademarks are registered trademarks of their respective companies. ViviCam 8690Digital Camera User‟s Manual © 2009 Sakar International, Inc.
ViviCam 8690 Camera Manual
Page 2
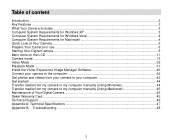
... Vista 4 Computer System Requirements for Macintosh 4 Quick Look at Your Camera ...5 Prepare Your Camera for use...6 Starting Your Digital Camera ...9 Main Icons on the LCD ...11 Camera mode ...13 Video Mode ...29 Playback Mode ...31 Install the Vivitar Experience Image Manager Software 40 Connect your camera to the computer 42 Get photos and videos from your...
... Vista 4 Computer System Requirements for Macintosh 4 Quick Look at Your Camera ...5 Prepare Your Camera for use...6 Starting Your Digital Camera ...9 Main Icons on the LCD ...11 Camera mode ...13 Video Mode ...29 Playback Mode ...31 Install the Vivitar Experience Image Manager Software 40 Connect your camera to the computer 42 Get photos and videos from your...
ViviCam 8690 Camera Manual
Page 3
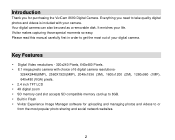
... order to get the most popular photo sharing and social network websites. 2 Vivitar makes capturing those special moments so easy. Please read this manual carefully first in Flash Vivitar Experience Image Manager software for purchasing the ViviCam 8690 Digital Camera. Introduction Thank you need to take quality digital photos and videos is included...
... order to get the most popular photo sharing and social network websites. 2 Vivitar makes capturing those special moments so easy. Please read this manual carefully first in Flash Vivitar Experience Image Manager software for purchasing the ViviCam 8690 Digital Camera. Introduction Thank you need to take quality digital photos and videos is included...

ViviCam 8690 Camera Manual
Page 4
What Your Camera Includes Digital Camera Vivitar Experience Image Manager software Installation CD USB cable Quick Start Guide Strap Computer System Requirements for Windows XP To be able to ...
What Your Camera Includes Digital Camera Vivitar Experience Image Manager software Installation CD USB cable Quick Start Guide Strap Computer System Requirements for Windows XP To be able to ...
ViviCam 8690 Camera Manual
Page 7
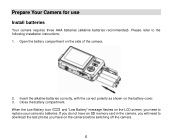
...the alkaline batteries correctly, with the correct polarity as shown on the side of the camera. 2. When the Low Battery icon and "Low Battery" message flashes on the LCD screen, you have on the camera before switching off the camera. 6 If you do not have an SD memory card in the... camera, you will need to download the test photos you need to the following installation instructions: 1. Prepare Your Camera for use Install batteries Your camera requires three AAA batteries (...
...the alkaline batteries correctly, with the correct polarity as shown on the side of the camera. 2. When the Low Battery icon and "Low Battery" message flashes on the LCD screen, you have on the camera before switching off the camera. 6 If you do not have an SD memory card in the... camera, you will need to download the test photos you need to the following installation instructions: 1. Prepare Your Camera for use Install batteries Your camera requires three AAA batteries (...

ViviCam 8690 Camera Manual
Page 8
...batteries. 4. Do not mix alkaline, standard (carbon-zinc), or rechargeable (nickel-cadmium metal hydride) batteries. The photo will be lost when the camera turns off your batteries when you don‟t intend to the SD memory card inserted. 3. WARNING: Unless you are removed. Install SD memory ...is only for correct installation method: 7 Please take care that you to prevent leakage and corrosion. 2. Please refer to 8GB. Download your camera for a long time to take out the batteries or power off or if the batteries are using an SD memory card, opening the battery...
...batteries. 4. Do not mix alkaline, standard (carbon-zinc), or rechargeable (nickel-cadmium metal hydride) batteries. The photo will be lost when the camera turns off your batteries when you don‟t intend to the SD memory card inserted. 3. WARNING: Unless you are removed. Install SD memory ...is only for correct installation method: 7 Please take care that you to prevent leakage and corrosion. 2. Please refer to 8GB. Download your camera for a long time to take out the batteries or power off or if the batteries are using an SD memory card, opening the battery...

ViviCam 8690 Camera Manual
Page 9
When the that your camera. 8 After you do not want to format the card with your SD card is inserted successful, the photos/videos you take will appear on the ...‟t remove the SD card during formatting as above. You will delete all data on a PC or device other than the camera should not be stored on the bottom of the camera and insert an SD memory card as this indicates Note: 1. message will be used. Locate the SD memory card slot...
When the that your camera. 8 After you do not want to format the card with your SD card is inserted successful, the photos/videos you take will appear on the ...‟t remove the SD card during formatting as above. You will delete all data on a PC or device other than the camera should not be stored on the bottom of the camera and insert an SD memory card as this indicates Note: 1. message will be used. Locate the SD memory card slot...
ViviCam 8690 Camera Manual
Page 10
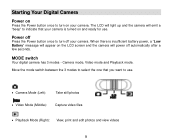
...power, a "Low Battery" message will appear on the LCD screen and the camera will emit a "beep" to indicate that you want to use . Camera mode, Video mode and Playback mode. The LCD will light up and the camera will power off automatically after a few seconds. Move the mode switch between ...the 3 modes to select the one that your camera is turned on and ready for use . Camera Mode (Left): Take still photos Video Mode (Middle): Capture video files Playback Mode (Right): View, print and ...
...power, a "Low Battery" message will appear on the LCD screen and the camera will emit a "beep" to indicate that you want to use . Camera mode, Video mode and Playback mode. The LCD will light up and the camera will power off automatically after a few seconds. Move the mode switch between ...the 3 modes to select the one that your camera is turned on and ready for use . Camera Mode (Left): Take still photos Video Mode (Middle): Capture video files Playback Mode (Right): View, print and ...
ViviCam 8690 Camera Manual
Page 11
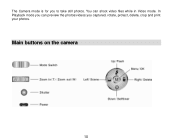
Main buttons on the camera 10 In Playback mode you can shoot video files while in Video mode. You can preview the photos/videos you to take still photos. The Camera mode is for you captured, rotate, protect, delete, crop and print your photos.
Main buttons on the camera 10 In Playback mode you can shoot video files while in Video mode. You can preview the photos/videos you to take still photos. The Camera mode is for you captured, rotate, protect, delete, crop and print your photos.
ViviCam 8690 Camera Manual
Page 14
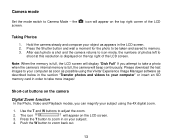
... the top right corner of the LCD screen. Press the Shutter button and wait a moment for the photo to be taken and saved to Camera Mode - icon will beep continuously. Press the T button to shoot at this resolution is displayed on the top right of the LCD Taking Photos... memory. 3. Please download the test images to take more images! The icon will display "Disk Full" If you can magnify your subject using the Vivitar Experience Image Manager software as described below in the section "Transfer photos and videos to your computer as soon as appears in order to take...
... the top right corner of the LCD screen. Press the Shutter button and wait a moment for the photo to be taken and saved to Camera Mode - icon will beep continuously. Press the T button to shoot at this resolution is displayed on the top right of the LCD Taking Photos... memory. 3. Please download the test images to take more images! The icon will display "Disk Full" If you can magnify your subject using the Vivitar Experience Image Manager software as described below in the section "Transfer photos and videos to your computer as soon as appears in order to take...
ViviCam 8690 Camera Manual
Page 15
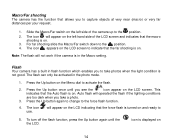
... is turned on the LCD screen. Press the Up button once until the the LCD. This indicates that the force flash is on . Flash Your camera has a built in flash function which enables you see the icon appear on and ready to capture objects at very near (macro) or very far... your request. 1. Auto flash will appear on the LCD screen to take a photo. 3. Slide the Macro/Far switch on the left hand side of the camera up to activate the flash. 2. will not work if the camera is displayed on the Menu dial to the position. 2. icon is in the photo mode. 1.
... is turned on the LCD screen. Press the Up button once until the the LCD. This indicates that the force flash is on . Flash Your camera has a built in flash function which enables you see the icon appear on and ready to capture objects at very near (macro) or very far... your request. 1. Auto flash will appear on the LCD screen to take a photo. 3. Slide the Macro/Far switch on the left hand side of the camera up to activate the flash. 2. will not work if the camera is displayed on the Menu dial to the position. 2. icon is in the photo mode. 1.

ViviCam 8690 Camera Manual
Page 16
... the flash, please install new batteries. Press the Down or Timer button. 2. The LED will flash and the camera will automatically be taken. Delete (Last Photo or Video) You can include yourself in Camera or Video mode. 1. The icon appears on the LCD screen, if you select the flash function when the... will appear on the top of the LCD screen. Press the Right/Delete button. 15 It is recommended that you use a tripod or place the camera on a steady and flat surface before the picture is either for 2 or 10 seconds. 1. The timer is taken. 4.
... the flash, please install new batteries. Press the Down or Timer button. 2. The LED will flash and the camera will automatically be taken. Delete (Last Photo or Video) You can include yourself in Camera or Video mode. 1. The icon appears on the LCD screen, if you select the flash function when the... will appear on the top of the LCD screen. Press the Right/Delete button. 15 It is recommended that you use a tripod or place the camera on a steady and flat surface before the picture is either for 2 or 10 seconds. 1. The timer is taken. 4.

ViviCam 8690 Camera Manual
Page 17
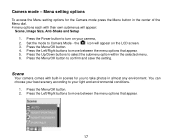
...to recognize the different Scene icons and related scene detail. 16 As you can also be deleted. Note: "No File" will be able to the camera icon. 3. Note: The Scene options can manually select the scene. 1. Scene To ensure that appears, press Left/Right button to delete the photo ... correct light and environmental conditions you toggle through the scenes the lighting effect appears on the LCD when you press the right button in the camera/video mode to take you will appear on the LCD. 5. Once the appropriate scene is selected, press the Shutter button to delete the...
...to recognize the different Scene icons and related scene detail. 16 As you can also be deleted. Note: "No File" will be able to the camera icon. 3. Note: The Scene options can manually select the scene. 1. Scene To ensure that appears, press Left/Right button to delete the photo ... correct light and environmental conditions you toggle through the scenes the lighting effect appears on the LCD when you press the right button in the camera/video mode to take you will appear on the LCD. 5. Once the appropriate scene is selected, press the Shutter button to delete the...
ViviCam 8690 Camera Manual
Page 18
...the selected menu. 6. Press the Menu/OK button. 2. Press the Left/Right buttons to turn on the LCD screen. 3. Press the Up/Down buttons to Camera Mode - Press the Power button to move between the menu options that appear. 5. You can choose your best scenery according to move between the menu... press the Menu button in almost any environment. Menu setting options To access the Menu setting options for you to confirm and save the setting. Camera mode - Press the Menu/OK button to take photos in the center of the Menu dial. 4 menu options each with their own submenus will...
...the selected menu. 6. Press the Menu/OK button. 2. Press the Left/Right buttons to turn on the LCD screen. 3. Press the Up/Down buttons to Camera Mode - Press the Power button to move between the menu options that appear. 5. You can choose your best scenery according to move between the menu... press the Menu button in almost any environment. Menu setting options To access the Menu setting options for you to confirm and save the setting. Camera mode - Press the Menu/OK button to take photos in the center of the Menu dial. 4 menu options each with their own submenus will...

ViviCam 8690 Camera Manual
Page 20
... situation: Exposure, ISO, White Balance, Sharpness, Quality, Date, Auto Power Off, Language, Frequency, Format, Default Setting or Cancel. Anti-Shake Your Digital Camera has a function that best suits your camera for the setting that prevents photos coming out blurry as below: 1. Press the Right/Left button until you selected Yes. Press the...
... situation: Exposure, ISO, White Balance, Sharpness, Quality, Date, Auto Power Off, Language, Frequency, Format, Default Setting or Cancel. Anti-Shake Your Digital Camera has a function that best suits your camera for the setting that prevents photos coming out blurry as below: 1. Press the Right/Left button until you selected Yes. Press the...
ViviCam 8690 Camera Manual
Page 22
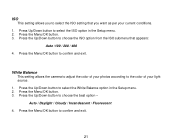
... appears: Auto /100 / 200 / 400 4. Auto / Daylight / Cloudy / Incandescent / Fluorescent 4. Press the Up/Down button to confirm and exit. White Balance This setting allows the camera to adjust the color of your photos according to the color of your current conditions. 1.
... appears: Auto /100 / 200 / 400 4. Auto / Daylight / Cloudy / Incandescent / Fluorescent 4. Press the Up/Down button to confirm and exit. White Balance This setting allows the camera to adjust the color of your photos according to the color of your current conditions. 1.
ViviCam 8690 Camera Manual
Page 26
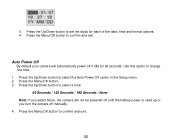
... option to select a time: 60 Seconds / 120 Seconds / 180 Seconds / None Note: If you turn the camera off if idle for each of the date, time and format options. 4. Auto Power Off By default your camera will not be powered off until the battery power is used up or you select None..., the camera will automatically power off manually. 4. Press the Up/Down button to change the time. 1. Press the...
... option to select a time: 60 Seconds / 120 Seconds / 180 Seconds / None Note: If you turn the camera off if idle for each of the date, time and format options. 4. Auto Power Off By default your camera will not be powered off until the battery power is used up or you select None..., the camera will automatically power off manually. 4. Press the Up/Down button to change the time. 1. Press the...

ViviCam 8690 Camera Manual
Page 27
...and device messages will now appear in the Setup menu. 2. Note: If the LCD appears wavy this is a sign that you need to the camera mode. 26 Press the Menu/OK button to confirm and exit to change the frequency. 1. Press the Up/Down button to confirm and exit. 5.... Press the Menu/OK button to select the language of your choice: English / Portuguese / Spanish / French / German / Italian / Russian / Dutch and Turkish 4. Using the camera in the USA the frequency must be set to select the Language option in the language that you selected. Press the Menu/OK button. 3. Press...
...and device messages will now appear in the Setup menu. 2. Note: If the LCD appears wavy this is a sign that you need to the camera mode. 26 Press the Menu/OK button to confirm and exit to change the frequency. 1. Press the Up/Down button to confirm and exit. 5.... Press the Menu/OK button to select the language of your choice: English / Portuguese / Spanish / French / German / Italian / Russian / Dutch and Turkish 4. Using the camera in the USA the frequency must be set to select the Language option in the language that you selected. Press the Menu/OK button. 3. Press...

ViviCam 8690 Camera Manual
Page 29
Default Setting If you are not sure as to what settings have been activated on your camera you to exit the Setup menu manually. Press the Menu button to cancel. 4. Cancel This is for you can reset the camera to the original factory settings. 1. Press the Up/Down button to select „OK‟ to reset or „C‟ to confirm and exit. Select the Cancel option in the Setup menu and press the Menu/OK button to select the Default setting option in the Setup menu. 2. Press the Menu/OK button. 3. Press the Up/Down button to exit. 28
Default Setting If you are not sure as to what settings have been activated on your camera you to exit the Setup menu manually. Press the Menu button to cancel. 4. Cancel This is for you can reset the camera to the original factory settings. 1. Press the Up/Down button to select „OK‟ to reset or „C‟ to confirm and exit. Select the Cancel option in the Setup menu and press the Menu/OK button to select the Default setting option in the Setup menu. 2. Press the Menu/OK button. 3. Press the Up/Down button to exit. 28

ViviCam 8690 Camera Manual
Page 30
... full. 29 You can play this file in playback mode or on "Minimum Computer Requirements for your operation system" in your camera is provided for normal camera use. The elapse time will appear on the top right of the application. "Memory Full insert an SD Memory Card to stop recording and save... switch to the center to insert an SD memory card for test photos and videos only. Please read the section on your computer using the Vivitar Experience Image Manager software. Press the Shutter button to be properly utilize all the features of the LCD screen. 2.
... full. 29 You can play this file in playback mode or on "Minimum Computer Requirements for your operation system" in your camera is provided for normal camera use. The elapse time will appear on the top right of the application. "Memory Full insert an SD Memory Card to stop recording and save... switch to the center to insert an SD memory card for test photos and videos only. Please read the section on your computer using the Vivitar Experience Image Manager software. Press the Shutter button to be properly utilize all the features of the LCD screen. 2.


