
Camera Manual
Page 1
Windows and the Windows logo are the property of Microsoft Corporation. All other trademarks are registered trademarks of their respective companies. DVR 518 Digital Video Camcorder User's Manual © 2009 Sakar International, Inc. All rights reserved.
Windows and the Windows logo are the property of Microsoft Corporation. All other trademarks are registered trademarks of their respective companies. DVR 518 Digital Video Camcorder User's Manual © 2009 Sakar International, Inc. All rights reserved.

Camera Manual
Page 2
... 2 What your digital video camcorder includes 3 Computer System Requirements for Windows XP 4 Computer System Requirement for Windows Vista 5 Computer System Requirements for Macintosh 5 A Quick Look at your Digital Video Camcorder 7 Preparing Your Camcorder for Use 8 Inserting an SD Memory Card 9 Maintenance and Care 11 DVR Function Control 12 Capturing Videos 15 Taking Photos 21 Audio Mode 34 Playback mode 35 Setup Mode 50 Connecting the Camcorder to a TV 59 Install the Vivitar Experience Image Manager Software 59 Connect your camcorder to the computer...
... 2 What your digital video camcorder includes 3 Computer System Requirements for Windows XP 4 Computer System Requirement for Windows Vista 5 Computer System Requirements for Macintosh 5 A Quick Look at your Digital Video Camcorder 7 Preparing Your Camcorder for Use 8 Inserting an SD Memory Card 9 Maintenance and Care 11 DVR Function Control 12 Capturing Videos 15 Taking Photos 21 Audio Mode 34 Playback mode 35 Setup Mode 50 Connecting the Camcorder to a TV 59 Install the Vivitar Experience Image Manager Software 59 Connect your camcorder to the computer...
Camera Manual
Page 3
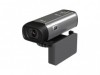
...your DVR camcorder. Your camcorder also has a PC Camera function for purchasing the DVR 518 Digital Video Camcorder. Video, Audio, Camera, Playback and Set Up. Digital Video resolutions - 640x480 (VGA), 320x240 (QVGA). 2 Key Features 5 modes - With your camcorder you for web conferencing. Transfer media from my camcorder to my computer manually (Using Windows) ...66 Transfer media from my camcorder to my computer manually (Using Macintosh 67 Using your camcorder as a PC Camera (on Windows 68 Sakar Warranty Card 69 Technical Specifications 70 Trouble Shooting...
...your DVR camcorder. Your camcorder also has a PC Camera function for purchasing the DVR 518 Digital Video Camcorder. Video, Audio, Camera, Playback and Set Up. Digital Video resolutions - 640x480 (VGA), 320x240 (QVGA). 2 Key Features 5 modes - With your camcorder you for web conferencing. Transfer media from my camcorder to my computer manually (Using Windows) ...66 Transfer media from my camcorder to my computer manually (Using Macintosh 67 Using your camcorder as a PC Camera (on Windows 68 Sakar Warranty Card 69 Technical Specifications 70 Trouble Shooting...
Camera Manual
Page 4
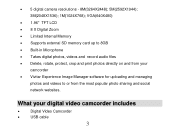
... camcorder Vivitar Experience Image Manager software for uploading and managing photos and videos to or from the most popular photo sharing and social network websites. VGA(640X480) 1.96" TFT LCD 8 X Digital Zoom Limited Internal Memory Supports external SD memory card up to 8GB Built-in Microphone Takes digital photos, videos and record audio files Delete, rotate, protect, crop and print photos directly on and from your digital video camcorder includes Digital Video Camcorder USB cable...
... camcorder Vivitar Experience Image Manager software for uploading and managing photos and videos to or from the most popular photo sharing and social network websites. VGA(640X480) 1.96" TFT LCD 8 X Digital Zoom Limited Internal Memory Supports external SD memory card up to 8GB Built-in Microphone Takes digital photos, videos and record audio files Delete, rotate, protect, crop and print photos directly on and from your digital video camcorder includes Digital Video Camcorder USB cable...

Camera Manual
Page 10
... movies, photos and audio that can be inserted into your DVR camcorder. Media sitting on the memory card is required to expand the memory in order to capture and record many more media items. All the media in the built-in memory will not be lost when your camcorder's power runs low or on replacing the batteries. 9 SD Memory cards expand the amount of memory thus allowing an increase in the number...
... movies, photos and audio that can be inserted into your DVR camcorder. Media sitting on the memory card is required to expand the memory in order to capture and record many more media items. All the media in the built-in memory will not be lost when your camcorder's power runs low or on replacing the batteries. 9 SD Memory cards expand the amount of memory thus allowing an increase in the number...
Camera Manual
Page 15
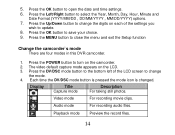
... video default capture mode appears on the LCD. 3. Playback mode Preview the record files. 14 Press the Left/Right button to save your choice. 9. Press the MENU button to open the date and time settings. 6. Audio mode For recording audio files. Display Title Capture mode Description For taking still photos. Each time the DV/DSC mode button is pressed the mode icon is changed. Press the OK button to close the menu and exit the Setup function Change the camcorder`s mode There are four modes in this DVR camcorder. 1. Video mode For recording movie...
... video default capture mode appears on the LCD. 3. Playback mode Preview the record files. 14 Press the Left/Right button to save your choice. 9. Press the MENU button to open the date and time settings. 6. Audio mode For recording audio files. Display Title Capture mode Description For taking still photos. Each time the DV/DSC mode button is pressed the mode icon is changed. Press the OK button to close the menu and exit the Setup function Change the camcorder`s mode There are four modes in this DVR camcorder. 1. Video mode For recording movie...

Camera Manual
Page 16
... turning on the top of the camcorder to appear is the Video mode. Press the Shutter button on your camcorder you wish to capture. 3. Use a compatible SD card of the LCD. 2. Aim the camcorder at that resolution and memory appears on the bottom left at the subject or object you need to select the Video mode. The amount of time left of the LCD. 1. To change between the function modes on your DVR...
... turning on the top of the camcorder to appear is the Video mode. Press the Shutter button on your camcorder you wish to capture. 3. Use a compatible SD card of the LCD. 2. Aim the camcorder at that resolution and memory appears on the bottom left at the subject or object you need to select the Video mode. The amount of time left of the LCD. 1. To change between the function modes on your DVR...

Camera Manual
Page 17
... to shoot further videos. Please insert an SD memory card of the camcorder is full, a "Memory Full" message will be used for you to the PC view them using QuickTime and Windows Media Player. 4. When the internal memory is limited it should be saved in on the LCD screen when you wish to Pause the recording in playback mode. 3. Press the Shutter button again to focus in AVI format. You can view the AVI files in the...
... to shoot further videos. Please insert an SD memory card of the camcorder is full, a "Memory Full" message will be used for you to the PC view them using QuickTime and Windows Media Player. 4. When the internal memory is limited it should be saved in on the LCD screen when you wish to Pause the recording in playback mode. 3. Press the Shutter button again to focus in AVI format. You can view the AVI files in the...
Camera Manual
Page 21
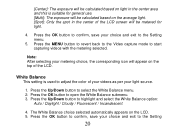
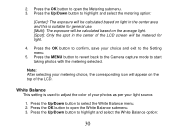
... used to the Setting menu. 5. Press the OK button to select the White Balance menu. 2. Note: After selecting your choice and exit to adjust the color of the LCD. Press the Up/Down button to start capturing videos with the metering selected. Press the MENU button to revert back to the Video capture mode to highlight and select the White Balance option: Auto / Daylight / Cloudy / Fluorescent / Incandescent. 4. White Balance This setting is suitable for light...
... used to the Setting menu. 5. Press the OK button to select the White Balance menu. 2. Note: After selecting your choice and exit to adjust the color of the LCD. Press the Up/Down button to start capturing videos with the metering selected. Press the MENU button to revert back to the Video capture mode to highlight and select the White Balance option: Auto / Daylight / Cloudy / Fluorescent / Incandescent. 4. White Balance This setting is suitable for light...

Camera Manual
Page 23
Either download the photos to your computer using the Vivitar Experience Image Manager software as described below in the section "Transfer photos and videos to your computer" or insert an SD card to take up (like a torch) to offer better lighting. The number of the LCD Screen. LED Lamp When light conditions are taken at higher resolutions but also on the LCD screen when you attempt to press...
Either download the photos to your computer using the Vivitar Experience Image Manager software as described below in the section "Transfer photos and videos to your computer" or insert an SD card to take up (like a torch) to offer better lighting. The number of the LCD Screen. LED Lamp When light conditions are taken at higher resolutions but also on the LCD screen when you attempt to press...
Camera Manual
Page 25
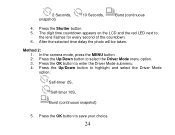
Press the Shutter button. 5. After the selected time delay the photo will be taken. The digit time countdown appears on the LCD and the red LED next to save your choice. 24 Press the OK button to the lens flashes for every second of the countdown. 6. Method 2: 1. In the camera mode, press the MENU button. 2. Press the Up/Down button to highlight and select the Driver Mode option: Self-timer...
Press the Shutter button. 5. After the selected time delay the photo will be taken. The digit time countdown appears on the LCD and the red LED next to save your choice. 24 Press the OK button to the lens flashes for every second of the countdown. 6. Method 2: 1. In the camera mode, press the MENU button. 2. Press the Up/Down button to highlight and select the Driver Mode option: Self-timer...

Camera Manual
Page 26
... digit time countdown appears on the LCD and the red LED next to the Camera icon on the top of 1 second between shots. 25 The Burst icon will need enough memory in the Driver Mode submenu. The Burst option is found together with intervals of the LCD screen. 8. You will appear next to the lens flashes for every second of the LCD. 2. Press the Shutter button...
... digit time countdown appears on the LCD and the red LED next to the Camera icon on the top of 1 second between shots. 25 The Burst icon will need enough memory in the Driver Mode submenu. The Burst option is found together with intervals of the LCD screen. 8. You will appear next to the lens flashes for every second of the LCD. 2. Press the Shutter button...
Camera Manual
Page 31
... light in the center area and this is used to the Setting menu. 5. Press the MENU button to revert back to the Camera capture mode to highlight and select the White Balance option: 30 Press the Up/Down button to start taking photos with the metering selected. Note: After selecting your choice and exit to adjust the color of the LCD screen will be metered for general use...
... light in the center area and this is used to the Setting menu. 5. Press the MENU button to revert back to the Camera capture mode to highlight and select the White Balance option: 30 Press the Up/Down button to start taking photos with the metering selected. Note: After selecting your choice and exit to adjust the color of the LCD screen will be metered for general use...
Camera Manual
Page 34
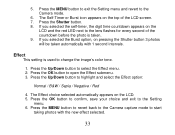
... the Shutter button 3 photos will be taken automatically with the new effect selected. 33 Press the Shutter button. 8. Press the OK button to confirm, save your choice and exit to open the Effect submenu. 3. Press the OK button to the Setting menu. 6. Press the Up/Down button to the lens flashes for every second of the LCD screen. 7. If you selected the self-timer, the digit time countdown...
... the Shutter button 3 photos will be taken automatically with the new effect selected. 33 Press the Shutter button. 8. Press the OK button to confirm, save your choice and exit to open the Effect submenu. 3. Press the OK button to the Setting menu. 6. Press the Up/Down button to the lens flashes for every second of the LCD screen. 7. If you selected the self-timer, the digit time countdown...
Camera Manual
Page 47
... for AVI video files You can playback AVI files (with audio) recorded on your camcorder or view them on the bottom left corner of the LCD to indicate that the image you selected in the Setup mode needs to play. 2. Press the Shutter button to stop the playback. 46 If you wish to be set the selected image select the Set option and press the OK button. Use the Left/Right button to select...
... for AVI video files You can playback AVI files (with audio) recorded on your camcorder or view them on the bottom left corner of the LCD to indicate that the image you selected in the Setup mode needs to play. 2. Press the Shutter button to stop the playback. 46 If you wish to be set the selected image select the Set option and press the OK button. Use the Left/Right button to select...
Camera Manual
Page 49
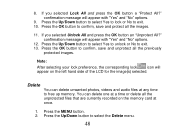
... files that are currently recorded on the left hand side of the LCD for the image(s) selected. confirmation message will appear on the memory card at any time to confirm, save and unprotect all the images. 11. You can delete unwanted photos, videos and audio files at once. 1. confirmation message will appear with "Yes" and "No" options. 12. Press the OK button to exit. 13. 8. Press the MENU button...
... files that are currently recorded on the left hand side of the LCD for the image(s) selected. confirmation message will appear on the memory card at any time to confirm, save and unprotect all the images. 11. You can delete unwanted photos, videos and audio files at once. 1. confirmation message will appear with "Yes" and "No" options. 12. Press the OK button to exit. 13. 8. Press the MENU button...

Camera Manual
Page 51
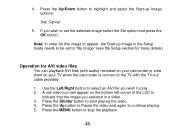
In Setup mode you can adjust the sounds the camcorder emits 50 Press the Right button to select the icon to open the Setup menu. Press the MENU button. 2. Setup Mode The Setup mode can set - Sounds, Auto Review, Power Frequency, Power Save, Date & Time, Language, TV Out, USB, Start-up Image, Format and Reset All. 1. Sounds In this Setup mode you can be accessed from the Video, Camera Capture and Playback modes.
In Setup mode you can adjust the sounds the camcorder emits 50 Press the Right button to select the icon to open the Setup menu. Press the MENU button. 2. Setup Mode The Setup mode can set - Sounds, Auto Review, Power Frequency, Power Save, Date & Time, Language, TV Out, USB, Start-up Image, Format and Reset All. 1. Sounds In this Setup mode you can be accessed from the Video, Camera Capture and Playback modes.
Camera Manual
Page 60
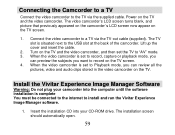
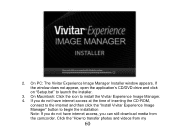
... screen. 4. When the video camcorder is situated next to the USB slot at the back of the camcorder. The installation screen should automatically open. 59 Connecting the Camcorder to a TV Connect the video camcorder to the TV via the TV-out cable (supplied). The video camcorder's LCD screen turns blank, and picture that previously appeared on the camcorder`s LCD screen now appear on the TV. Install the Vivitar Experience Image Manager Software Warning: Do not plug your CD-ROM drive. Power...
... screen. 4. When the video camcorder is situated next to the USB slot at the back of the camcorder. The installation screen should automatically open. 59 Connecting the Camcorder to a TV Connect the video camcorder to the TV via the TV-out cable (supplied). The video camcorder's LCD screen turns blank, and picture that previously appeared on the camcorder`s LCD screen now appear on the TV. Install the Vivitar Experience Image Manager Software Warning: Do not plug your CD-ROM drive. Power...
Camera Manual
Page 61
.../DVD drive and click on "Setup.bat" to install the Vivitar Experience Image Manager. 4. If you do not have internet access at the time of inserting the CD-ROM, connect to the internet and then click the "Install Vivitar Experience Image Manager" button to transfer photos and videos from the camcorder. Click the "How to begin the installation Note: If you do not have internet access, you can still download media from...
.../DVD drive and click on "Setup.bat" to install the Vivitar Experience Image Manager. 4. If you do not have internet access at the time of inserting the CD-ROM, connect to the internet and then click the "Install Vivitar Experience Image Manager" button to transfer photos and videos from the camcorder. Click the "How to begin the installation Note: If you do not have internet access, you can still download media from...
Camera Manual
Page 68
... mode 4. Transfer media from the Finder's Edit menu. "MSDC" will cancel the transfer of any files on the device icon and open the DCIM folder and the folder inside to your computer. 2. Optionally, select the files and choose Copy from my camcorder to my computer manually (Using Macintosh) 1. Doing so will appear on the LCD, indicating that your computer. Use the USB cable that you connect your camcorder to view...
... mode 4. Transfer media from the Finder's Edit menu. "MSDC" will cancel the transfer of any files on the device icon and open the DCIM folder and the folder inside to your computer. 2. Optionally, select the files and choose Copy from my camcorder to my computer manually (Using Macintosh) 1. Doing so will appear on the LCD, indicating that your computer. Use the USB cable that you connect your camcorder to view...


