
Camera Manual
Page 1
Windows and the Windows logo are the property of Microsoft Corporation. All other trademarks are registered trademarks of their respective companies. All rights reserved. DVR 518 Digital Video Camcorder User's Manual © 2009 Sakar International, Inc.
Windows and the Windows logo are the property of Microsoft Corporation. All other trademarks are registered trademarks of their respective companies. All rights reserved. DVR 518 Digital Video Camcorder User's Manual © 2009 Sakar International, Inc.

Camera Manual
Page 2
... Windows Vista 5 Computer System Requirements for Macintosh 5 A Quick Look at your Digital Video Camcorder 7 Preparing Your Camcorder for Use 8 Inserting an SD Memory Card 9 Maintenance and Care 11 DVR Function Control 12 Capturing Videos 15 Taking Photos 21 Audio Mode 34 Playback mode 35 Setup ...Mode 50 Connecting the Camcorder to a TV 59 Install the Vivitar Experience Image Manager Software 59 Connect your camcorder to the computer 63 Get photos...
... Windows Vista 5 Computer System Requirements for Macintosh 5 A Quick Look at your Digital Video Camcorder 7 Preparing Your Camcorder for Use 8 Inserting an SD Memory Card 9 Maintenance and Care 11 DVR Function Control 12 Capturing Videos 15 Taking Photos 21 Audio Mode 34 Playback mode 35 Setup ...Mode 50 Connecting the Camcorder to a TV 59 Install the Vivitar Experience Image Manager Software 59 Connect your camcorder to the computer 63 Get photos...
Camera Manual
Page 3
...Camera function for purchasing the DVR 518 Digital Video Camcorder. Video, Audio, Camera, Playback and Set Up. Digital Video resolutions - 640x480 (VGA), 320x240 (QVGA). 2 With your camcorder you can be inserted in order to my computer manually (Using Macintosh 67 Using your DVR camcorder. In addition, a ...SD compatible memory card of up to 8GB can shoot video clips, take individual photos and record audio files. Transfer media from my camcorder to my computer manually (Using Windows) ...66...
...Camera function for purchasing the DVR 518 Digital Video Camcorder. Video, Audio, Camera, Playback and Set Up. Digital Video resolutions - 640x480 (VGA), 320x240 (QVGA). 2 With your camcorder you can be inserted in order to my computer manually (Using Macintosh 67 Using your DVR camcorder. In addition, a ...SD compatible memory card of up to 8GB can shoot video clips, take individual photos and record audio files. Transfer media from my camcorder to my computer manually (Using Windows) ...66...
Camera Manual
Page 4
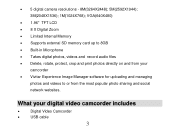
... Memory Supports external SD memory card up to or from your digital video camcorder includes Digital Video Camcorder USB cable 3 5 digital camera resolutions - 8M(3264X2448); 5M(2592X1944); 3M(2048X1536); 1M(1024X768); What your camcorder Vivitar Experience Image Manager software for uploading and managing photos and videos to 8GB ...
... Memory Supports external SD memory card up to or from your digital video camcorder includes Digital Video Camcorder USB cable 3 5 digital camera resolutions - 8M(3264X2448); 5M(2592X1944); 3M(2048X1536); 1M(1024X768); What your camcorder Vivitar Experience Image Manager software for uploading and managing photos and videos to 8GB ...

Camera Manual
Page 9
Return and close the battery cover. Lift and open the battery compartment on the side of the camcorder. 2. Note: 8 Preparing Your Camcorder for Use Battery Installation Your DVR camcorder requires 3 "AAA" batteries (not included). Insert the batteries in accordance with the polarity indicated in the battery compartment. 3. It is recommended that alkaline batteries be used. 1.
Return and close the battery cover. Lift and open the battery compartment on the side of the camcorder. 2. Note: 8 Preparing Your Camcorder for Use Battery Installation Your DVR camcorder requires 3 "AAA" batteries (not included). Insert the batteries in accordance with the polarity indicated in the battery compartment. 3. It is recommended that alkaline batteries be used. 1.

Camera Manual
Page 10
... you change your batteries. We strongly recommend downloading your photos and videos regularly to your computer. Remove the batteries from the DVR camcorder when not in use for an extended period. Inserting an SD Memory Card An SD compatible memory card of movies, photos and audio that can ...be inserted into your DVR camcorder. SD Memory cards expand the amount of memory thus allowing an increase in the number of up to 8GB (not included) should be captured ...
... you change your batteries. We strongly recommend downloading your photos and videos regularly to your computer. Remove the batteries from the DVR camcorder when not in use for an extended period. Inserting an SD Memory Card An SD compatible memory card of movies, photos and audio that can ...be inserted into your DVR camcorder. SD Memory cards expand the amount of memory thus allowing an increase in the number of up to 8GB (not included) should be captured ...

Camera Manual
Page 11
The media you capture will sit flush with the camcorder. Press the memory card until you insert an SD memory card, the SD card icon will appear on the right side of the LCD, indicating that your SD memory card has been installed successfully. Insert an SD memory card correctly in the internal memory. This product supports SD cards of the camcorder. 2. The memory card when properly inserted will now be stored on the bottom of up to 8GB. 10 Note: After you hear a "Click" sound. Locate the SD card slot on the card and not in the direction shown. 3. 1.
The media you capture will sit flush with the camcorder. Press the memory card until you insert an SD memory card, the SD card icon will appear on the right side of the LCD, indicating that your SD memory card has been installed successfully. Insert an SD memory card correctly in the internal memory. This product supports SD cards of the camcorder. 2. The memory card when properly inserted will now be stored on the bottom of up to 8GB. 10 Note: After you hear a "Click" sound. Locate the SD card slot on the card and not in the direction shown. 3. 1.
Camera Manual
Page 12
... or snow. Maintenance and repairs should be sure to format the card with wet hands. Use of power sources not expressly recommended for this video camcorder in the manual for instruction on the SD Memory Card including protected data. Do not remove the SD memory Card during formatting as this... may damage the card and render it unusable. Before using the video camcorder, please ensure that you read and understand the safety precautions described below: • Do not try to open the case of the video...
... or snow. Maintenance and repairs should be sure to format the card with wet hands. Use of power sources not expressly recommended for this video camcorder in the manual for instruction on the SD Memory Card including protected data. Do not remove the SD memory Card during formatting as this... may damage the card and render it unusable. Before using the video camcorder, please ensure that you read and understand the safety precautions described below: • Do not try to open the case of the video...

Camera Manual
Page 13
... an operation mode for 60 seconds it will light up indicating that your DVR is ready for use. Power off Press the Power button to turn your DVR. The DVR camcorder will automatically power off . The camcorder will switch off a few moments later. 12 When there is situated on... the LCD screen. The Power button is insufficient battery power, a "Low Battery" message will appear on the inside of the camcorder. Power on Press...
... an operation mode for 60 seconds it will light up indicating that your DVR is ready for use. Power off Press the Power button to turn your DVR. The DVR camcorder will automatically power off . The camcorder will switch off a few moments later. 12 When there is situated on... the LCD screen. The Power button is insufficient battery power, a "Low Battery" message will appear on the inside of the camcorder. Power on Press...

Camera Manual
Page 14
... appear on the OK dial to open the Setup menu. 4. Press the MENU button. 3. Setting the Language When using the video camcorder for the language interface of the camcorder to change to highlight and select the language you desire. 7. Press the MENU button to choose a language and set the date &... time before using the video camcorder. 1. Setting the Date and Time This will be sure to close the menu and exit the Setup function. Press the Right button to enter the...
... appear on the OK dial to open the Setup menu. 4. Press the MENU button. 3. Setting the Language When using the video camcorder for the language interface of the camcorder to change to highlight and select the language you desire. 7. Press the MENU button to choose a language and set the date &... time before using the video camcorder. 1. Setting the Date and Time This will be sure to close the menu and exit the Setup function. Press the Right button to enter the...
Camera Manual
Page 15
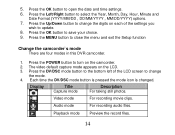
Press the OK button to close the menu and exit the Setup function Change the camcorder`s mode There are four modes in this DVR camcorder. 1. Video mode For recording movie clips. The video default capture mode appears on the camcorder. 2. Display Title Capture mode Description For taking still photos. Audio mode For recording audio files...
Press the OK button to close the menu and exit the Setup function Change the camcorder`s mode There are four modes in this DVR camcorder. 1. Video mode For recording movie clips. The video default capture mode appears on the camcorder. 2. Display Title Capture mode Description For taking still photos. Audio mode For recording audio files...

Camera Manual
Page 16
... that resolution and memory appears on your camcorder the first mode to start shooting. 4. The amount of time left of the LCD. 2. On turning on the top right of the LCD screen. To change between the function modes on your DVR, press the DV/DSC button on the top of the LCD.... 1. Press the Shutter button on the bottom left at the subject or object you need to select the Video mode. The video icon will appear on the top right on the top left corner of the camcorder to...
... that resolution and memory appears on your camcorder the first mode to start shooting. 4. The amount of time left of the LCD. 2. On turning on the top right of the LCD screen. To change between the function modes on your DVR, press the DV/DSC button on the top of the LCD.... 1. Press the Shutter button on the bottom left at the subject or object you need to select the Video mode. The video icon will appear on the top right on the top left corner of the camcorder to...

Camera Manual
Page 17
Press the Up button to Zoom In or the Down button to Zoom Out of the camcorder is full, a "Memory Full" message will be used for you wish to Pause the recording in playback mode. 3. As the internal memory of the subject ...
Press the Up button to Zoom In or the Down button to Zoom Out of the camcorder is full, a "Memory Full" message will be used for you wish to Pause the recording in playback mode. 3. As the internal memory of the subject ...

Camera Manual
Page 22
... 21 Use the image that appears in order to insert a compatible SD card of the screen. Taking Photos After you power on your shot. 1. The camcorder`s internal memory is limited per each resolution so it is recommended to expand the memory and capture many more memorable photos. The... camcorder will appear on the bottom left corner of up to 8GB in the LCD to start capturing videos with the new white balance selected. Press ...
... 21 Use the image that appears in order to insert a compatible SD card of the screen. Taking Photos After you power on your shot. 1. The camcorder`s internal memory is limited per each resolution so it is recommended to expand the memory and capture many more memorable photos. The... camcorder will appear on the bottom left corner of up to 8GB in the LCD to start capturing videos with the new white balance selected. Press ...

Camera Manual
Page 23
memory. 3. The number of photos that can be captured not only depends on the resolution selected. Either download the photos to your computer using the Vivitar Experience Image Manager software as described below in the section "Transfer photos and videos to your computer" or insert an SD card to offer better ..., "Memory Full" will light up more photos and videos. 6. Better quality photos are poor, press the LED ON/OFF button on the card. When the camcorder's internal memory is reduced by one. 5.
memory. 3. The number of photos that can be captured not only depends on the resolution selected. Either download the photos to your computer using the Vivitar Experience Image Manager software as described below in the section "Transfer photos and videos to your computer" or insert an SD card to offer better ..., "Memory Full" will light up more photos and videos. 6. Better quality photos are poor, press the LED ON/OFF button on the card. When the camcorder's internal memory is reduced by one. 5.

Camera Manual
Page 24
... see the Self-Timer option you wish to activate the Self-Timer. Press the Up button to Zoom In to Zoom back out. 3. Place the camcorder on a tripod or on the top of the LCD screen. Press the Down button to the object. 2. Self-Timer You can magnify your pressing of...
... see the Self-Timer option you wish to activate the Self-Timer. Press the Up button to Zoom In to Zoom back out. 3. Place the camcorder on a tripod or on the top of the LCD screen. Press the Down button to the object. 2. Self-Timer You can magnify your pressing of...

Camera Manual
Page 26
... on the top of 1 second between shots. 25 You will now automatically take 3 continuous photos with the Self-timer options in the camcorder to the Camera mode. 7. The camcorder will need enough memory in the Driver Mode submenu. The digit time countdown appears on the top left corner of the countdown. 10...
... on the top of 1 second between shots. 25 You will now automatically take 3 continuous photos with the Self-timer options in the camcorder to the Camera mode. 7. The camcorder will need enough memory in the Driver Mode submenu. The digit time countdown appears on the top left corner of the countdown. 10...

Camera Manual
Page 29
... your choice and exit to confirm, save your resolution, the corresponding icon will appear on the top of the LCD. VGA(640X480) 4. To set the camcorder`s resolution: 1. The image size and quality will take. Press the MENU button to revert back to the Camera capture mode to highlight and select one...
... your choice and exit to confirm, save your resolution, the corresponding icon will appear on the top of the LCD. VGA(640X480) 4. To set the camcorder`s resolution: 1. The image size and quality will take. Press the MENU button to revert back to the Camera capture mode to highlight and select one...

Camera Manual
Page 35
...& Time]: Add date and time to the image. 4. Press the OK button to select the Date Stamp menu. 2. The amount of time to record your camcorder. Press the Up/Down button to open the Date Stamp submenu. 3. Press the OK button to confirm, save your photo. 1. Date Stamp With this function...
...& Time]: Add date and time to the image. 4. Press the OK button to select the Date Stamp menu. 2. The amount of time to record your camcorder. Press the Up/Down button to open the Date Stamp submenu. 3. Press the OK button to confirm, save your photo. 1. Date Stamp With this function...

Camera Manual
Page 36
...card to expand the memory capacity of the LCD. 1. icon appearing on the top right corner of the camcorder to being recording. 2. Press the Shutter button to enjoy many more hours of the LCD. 3. Press ...Audio screen appears. Press the Up button to resume recording. 5. After you power on your camcorder, press the DV/DSC mode button on the bottom left The amount of time that you have to watch them... on your camcorder or attach the TV-out cable to record audio files appears on the top left of the ...
...card to expand the memory capacity of the LCD. 1. icon appearing on the top right corner of the camcorder to being recording. 2. Press the Shutter button to enjoy many more hours of the LCD. 3. Press ...Audio screen appears. Press the Up button to resume recording. 5. After you power on your camcorder, press the DV/DSC mode button on the bottom left The amount of time that you have to watch them... on your camcorder or attach the TV-out cable to record audio files appears on the top left of the ...


