Camera Manual
Page 3
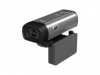
... possible. What Your Camera Includes Digital Video Camera Vivitar Experience Image Manager software Installation CD USB cable TV Cable Easy Guide Strap Warranty Certificate 2 Please read this camera. Note: Your camera needs an SD Memory card (up to 8GB) for purchasing this manual carefully first in...
... possible. What Your Camera Includes Digital Video Camera Vivitar Experience Image Manager software Installation CD USB cable TV Cable Easy Guide Strap Warranty Certificate 2 Please read this camera. Note: Your camera needs an SD Memory card (up to 8GB) for purchasing this manual carefully first in...
Camera Manual
Page 4
... Working Temperature CMOS (5M) 2592x1944 pixels, (3M) 2048x1536 pixels, (2M) 1600x1200, (1M) 1280x1024 pixels, (VGA) 640x480 pixels 1280X720 (HD), 640X480(VGA), 320X240(QVGA) JPEG/AVI SD Card (up to 8GB) 1.5 Inch TFT F3.0 Fixed Focus 150cm ~ infinity 4X Digital Zoom -3.0EV ~ +3.0EV Auto, Daylight, Cloudy, Incandescent , Fluorescent Auto / Scenery / Portrait / Night Scenery...
... Working Temperature CMOS (5M) 2592x1944 pixels, (3M) 2048x1536 pixels, (2M) 1600x1200, (1M) 1280x1024 pixels, (VGA) 640x480 pixels 1280X720 (HD), 640X480(VGA), 320X240(QVGA) JPEG/AVI SD Card (up to 8GB) 1.5 Inch TFT F3.0 Fixed Focus 150cm ~ infinity 4X Digital Zoom -3.0EV ~ +3.0EV Auto, Daylight, Cloudy, Incandescent , Fluorescent Auto / Scenery / Portrait / Night Scenery...
Camera Manual
Page 6
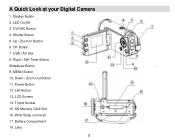
Shutter Button 5. Right / Self-Timer Button Slideshow Button 9. SD Memory Card Slot 16. Up / Zoom In Button 6. MENU Button 10. Down / Zoom Out Button 11. Wrist Strap connector 17. Power Button 12. Tripod Socket 15. Battery Compartment 18. DV/DSC Button 4. Lens 5 A Quick Look at your Digital Camera 1. Display Button 2. OK Button 7. LED On/Off 3. USB / AV Slot 8. LCD Screen 14. Left Button 13.
Shutter Button 5. Right / Self-Timer Button Slideshow Button 9. SD Memory Card Slot 16. Up / Zoom In Button 6. MENU Button 10. Down / Zoom Out Button 11. Wrist Strap connector 17. Power Button 12. Tripod Socket 15. Battery Compartment 18. DV/DSC Button 4. Lens 5 A Quick Look at your Digital Camera 1. Display Button 2. OK Button 7. LED On/Off 3. USB / AV Slot 8. LCD Screen 14. Left Button 13.
Camera Manual
Page 7
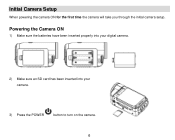
Initial Camera Setup When powering the camera ON for the first time the camera will take you through the initial camera setup. Powering the Camera ON 1) Make sure the batteries have been inserted properly into your digital camera. 2) Make sure an SD card has been inserted into your camera. 3) Press the POWER button to turn on the camera. 6
Initial Camera Setup When powering the camera ON for the first time the camera will take you through the initial camera setup. Powering the Camera ON 1) Make sure the batteries have been inserted properly into your digital camera. 2) Make sure an SD card has been inserted into your camera. 3) Press the POWER button to turn on the camera. 6

Camera Manual
Page 12
... a four-directional pad that appear in progress. 6) To stop the video record, press the Shutter button again. 7) The video will automatically be saved to the SD card memory card.
... a four-directional pad that appear in progress. 6) To stop the video record, press the Shutter button again. 7) The video will automatically be saved to the SD card memory card.

Camera Manual
Page 32
... mode, use the LCD display on the back of the camera to take the picture. 4) The picture will automatically be saved to the memory or SD card. Photo Capture Mode Quick Function Buttons Your digital camera has a four-directional pad that functions as Quick Function buttons: Left Up Right Down No Function...
... mode, use the LCD display on the back of the camera to take the picture. 4) The picture will automatically be saved to the memory or SD card. Photo Capture Mode Quick Function Buttons Your digital camera has a four-directional pad that functions as Quick Function buttons: Left Up Right Down No Function...
Camera Manual
Page 57
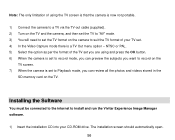
... to Playback mode, you want to record on the TV. Installing the Software You must be connected to the internet to install and run the Vivitar Experience Image Manager software. 1) Insert the installation CD into your TV set. 4) In the Video Capture mode there is set to record mode, you can... preview the subjects you can review all the photos and videos stored in the SD memory card on the TV screen. 7) When the camera is a TV Out menu option - The installation screen should automatically open. 56 Note: The only limitation of...
... to Playback mode, you want to record on the TV. Installing the Software You must be connected to the internet to install and run the Vivitar Experience Image Manager software. 1) Insert the installation CD into your TV set. 4) In the Video Capture mode there is set to record mode, you can... preview the subjects you can review all the photos and videos stored in the SD memory card on the TV screen. 7) When the camera is a TV Out menu option - The installation screen should automatically open. 56 Note: The only limitation of...

Camera Manual
Page 61
3) The first time you connect the device to the computer you will cancel the transfer of any files on their way to wait a few seconds until the computer recognizes the device. Do not disconnect the cable during transfer. Doing so will have to your computer. 1) Select the "Get images" button from Your Camera to Your Computer An SD card needs to be inserted. Getting Photos and Videos from the Main menu. 60
3) The first time you connect the device to the computer you will cancel the transfer of any files on their way to wait a few seconds until the computer recognizes the device. Do not disconnect the cable during transfer. Doing so will have to your computer. 1) Select the "Get images" button from Your Camera to Your Computer An SD card needs to be inserted. Getting Photos and Videos from the Main menu. 60

Camera Manual
Page 67
... Image Manager. I deleted images using the Vivitar Experience Image Manager are saved to the images stored on my computer. With test photos if the camera powers off before the camera powers off nothing will happen to the SD memory card then all the photos should be retrieved from my ... Bin and can be uploaded quickly before you have taken photos and selected the "Get Images" button. How do not appear on the SD memory card. We recommend always downloading your photos to prevent unintentional data loss. These photos should appear. What do ? If the camera powers off ...
... Image Manager. I deleted images using the Vivitar Experience Image Manager are saved to the images stored on my computer. With test photos if the camera powers off before the camera powers off nothing will happen to the SD memory card then all the photos should be retrieved from my ... Bin and can be uploaded quickly before you have taken photos and selected the "Get Images" button. How do not appear on the SD memory card. We recommend always downloading your photos to prevent unintentional data loss. These photos should appear. What do ? If the camera powers off ...


