v3 Camera Manual
Page 1
All other trademarks are registered trademarks of their respective companies. DVR 620v3 Digital Video Camera User Manual © 2009-2011 Sakar International, Inc. Windows and the Windows logo are the property of Microsoft Corporation. All rights reserved.
All other trademarks are registered trademarks of their respective companies. DVR 620v3 Digital Video Camera User Manual © 2009-2011 Sakar International, Inc. Windows and the Windows logo are the property of Microsoft Corporation. All rights reserved.
v3 Camera Manual
Page 2
... Photo Playback Mode ...24 Connecting the Digital Video Camera to a TV 28 Installing the Software ...29 Connecting the Camera to the Computer 30 Getting Photos and Videos from your Camera to Your Computer 31 Get started!...32 Transferring Images from my Camera to my Computer Manually 33 Camera Maintenance ...34 Sakar Warranty Card...34 Technical Support...35 Troubleshooting...35 1 Contents Introduction ...2 What Your Camera Includes...2 Parts of the Camera ...3 Initial Camera Setup...4 Main Camera Modes ...7 Camera Technical Specifications 8 Computer System Requirements - Windows...
... Photo Playback Mode ...24 Connecting the Digital Video Camera to a TV 28 Installing the Software ...29 Connecting the Camera to the Computer 30 Getting Photos and Videos from your Camera to Your Computer 31 Get started!...32 Transferring Images from my Camera to my Computer Manually 33 Camera Maintenance ...34 Sakar Warranty Card...34 Technical Support...35 Troubleshooting...35 1 Contents Introduction ...2 What Your Camera Includes...2 Parts of the Camera ...3 Initial Camera Setup...4 Main Camera Modes ...7 Camera Technical Specifications 8 Computer System Requirements - Windows...
v3 Camera Manual
Page 3
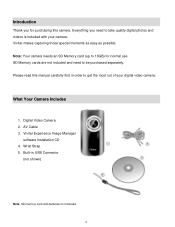
... memory card and batteries not included. 2 SD Memory cards are not included and need to take quality digital photos and videos is included with your digital video camera. Digital Video Camera 2. What Your Camera Includes 1. AV Cable 3. Wrist Strap 5. Everything you for normal use. Vivitar makes capturing those special moments as easy as possible. Built-in order to get the most out of your camera. Please read this camera. Vivitar Experience Image Manager software Installation CD...
... memory card and batteries not included. 2 SD Memory cards are not included and need to take quality digital photos and videos is included with your digital video camera. Digital Video Camera 2. What Your Camera Includes 1. AV Cable 3. Wrist Strap 5. Everything you for normal use. Vivitar makes capturing those special moments as easy as possible. Built-in order to get the most out of your camera. Please read this camera. Vivitar Experience Image Manager software Installation CD...
v3 Camera Manual
Page 6
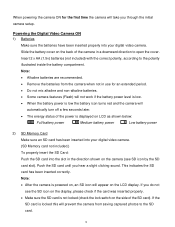
... direction to open the cover. Powering the Digital Video Camera ON 1) Batteries Make sure the batteries have been inserted properly into your digital video camera. (SD Memory card not included.) To properly insert the SD Card: Push the SD card into your digital video camera. When powering the camera ON for an extended period. Do not mix alkaline and non-alkaline batteries. Some camera features (Flash) will not work if the battery power level is...
... direction to open the cover. Powering the Digital Video Camera ON 1) Batteries Make sure the batteries have been inserted properly into your digital video camera. (SD Memory card not included.) To properly insert the SD Card: Push the SD card into your digital video camera. When powering the camera ON for an extended period. Do not mix alkaline and non-alkaline batteries. Some camera features (Flash) will not work if the battery power level is...
v3 Camera Manual
Page 8
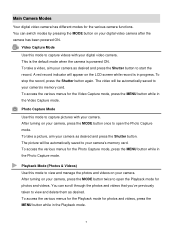
... photos and videos. Main Camera Modes Your digital video camera has different modes for photos and videos, press the MENU button while in progress. A red record indicator will be automatically saved to view and manage the photos and videos on your camera‟s memory card. Playback Mode (Photos & Videos) Use this mode to your camera. Video Capture Mode Use this mode to your digital video camera after the camera has been powered ON. This is the default mode when the camera is in the Playback mode. 7 To stop the record, press the Shutter button again. The video...
... photos and videos. Main Camera Modes Your digital video camera has different modes for photos and videos, press the MENU button while in progress. A red record indicator will be automatically saved to view and manage the photos and videos on your camera‟s memory card. Playback Mode (Photos & Videos) Use this mode to your camera. Video Capture Mode Use this mode to your digital video camera after the camera has been powered ON. This is the default mode when the camera is in the Playback mode. 7 To stop the record, press the Shutter button again. The video...

v3 Camera Manual
Page 9
... LCD screen opens up to 16GB) - Camera Technical Specifications Image Sensor Image Resolution Video Resolution File Format External Memory LCD Display Lens Zoom Scene Image Quality White Balance Color Effect Light Exposure ISO Frequency Auto Power Off Metering Language Microphone Speaker Interface System Requirements Battery Working Temperature CMOS Sensor (5M) 2592x1944 pixels, (3M) 2048x1536 pixels 1280x720 (HD 30 fps), 640X480pixels (VGA 30fps), 320X240pixels (QVGA 30 fps) JPEG/AVI SD Card (up 180 degree f=6.5mm F3.1 4X Digital Zoom Auto Normal Auto Standard Auto Auto...
... LCD screen opens up to 16GB) - Camera Technical Specifications Image Sensor Image Resolution Video Resolution File Format External Memory LCD Display Lens Zoom Scene Image Quality White Balance Color Effect Light Exposure ISO Frequency Auto Power Off Metering Language Microphone Speaker Interface System Requirements Battery Working Temperature CMOS Sensor (5M) 2592x1944 pixels, (3M) 2048x1536 pixels 1280x720 (HD 30 fps), 640X480pixels (VGA 30fps), 320X240pixels (QVGA 30 fps) JPEG/AVI SD Card (up 180 degree f=6.5mm F3.1 4X Digital Zoom Auto Normal Auto Standard Auto Auto...

v3 Camera Manual
Page 11
... turn your camera ON. The digital video camera will power off the camera if it is fully charged before the first use. Make sure an SD card has been inserted into your digital video camera. If your camera comes with a rechargeable lithium battery, make sure it has not been in Video Capture mode to turn your camera OFF. Powering the camera OFF While the camera is insufficient battery power, a "Low Battery" message will be in use...
... turn your camera ON. The digital video camera will power off the camera if it is fully charged before the first use. Make sure an SD card has been inserted into your digital video camera. If your camera comes with a rechargeable lithium battery, make sure it has not been in Video Capture mode to turn your camera OFF. Powering the camera OFF While the camera is insufficient battery power, a "Low Battery" message will be in use...
v3 Camera Manual
Page 14
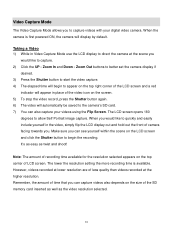
... recording. Zoom In and Down - Zoom Out buttons to better set the camera display if desired. 3) Press the Shutter button to the camera‟s SD card. 7) You can capture videos also depends on the top center of the SD memory card inserted as well as twist and shoot! When you would like to quickly and easily include yourself in Video Capture Mode use the LCD display to capture videos with your videos using the Flip Screen. When the camera...
... recording. Zoom In and Down - Zoom Out buttons to better set the camera display if desired. 3) Press the Shutter button to the camera‟s SD card. 7) You can capture videos also depends on the top center of the SD memory card inserted as well as twist and shoot! When you would like to quickly and easily include yourself in Video Capture Mode use the LCD display to capture videos with your videos using the Flip Screen. When the camera...
v3 Camera Manual
Page 18
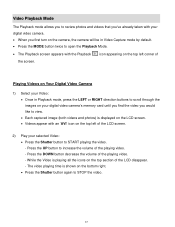
... the LCD screen. 2) Play your selected Video: Press the Shutter button to START playing the video. - The video playing time is shown on the bottom right. Press the Shutter button again to increase the volume of the LCD disappear. - Video Playback Mode The Playback mode allows you to review photos and videos that you‟ve already taken with your digital video camera. When you would like to view. Each captured image (both videos and photos) is displayed...
... the LCD screen. 2) Play your selected Video: Press the Shutter button to START playing the video. - The video playing time is shown on the bottom right. Press the Shutter button again to increase the volume of the LCD disappear. - Video Playback Mode The Playback mode allows you to review photos and videos that you‟ve already taken with your digital video camera. When you would like to view. Each captured image (both videos and photos) is displayed...

v3 Camera Manual
Page 19
... as Quick Function buttons. Increases Volume (while playing back your video) DOWN - Opens selected image from the Thumbnail display. Button Function LEFT - Decreases Volume (while playing back your video) UP - Shutter/OK - Scrolls through your Thumbnail images - Opens the Thumbnail display - Toggles between the Video Capture Mode, Photo Capture Mode, and MODE Playback Mode Exits the menu screen 18 Displays the PREVIOUS image - Scrolls through the Menus, use the Left, Up, Right, and Down directions control buttons. Plays the selected video file...
... as Quick Function buttons. Increases Volume (while playing back your video) DOWN - Opens selected image from the Thumbnail display. Button Function LEFT - Decreases Volume (while playing back your video) UP - Shutter/OK - Scrolls through your Thumbnail images - Opens the Thumbnail display - Toggles between the Video Capture Mode, Photo Capture Mode, and MODE Playback Mode Exits the menu screen 18 Displays the PREVIOUS image - Scrolls through the Menus, use the Left, Up, Right, and Down directions control buttons. Plays the selected video file...

v3 Camera Manual
Page 21
... pressing the Delete button. Delete This Video: 1) Select the image you wish to delete. 2) Press the MENU button to open the „Delete‟ menu. 2) Press the UP or DOWN direction control buttons to delete the selected video. Video Playback Mode Menu The following is the menu that you only use this Delete feature with care. Remember, you can delete videos from your camera through the Delete menu. Once all the images are deleted they are permanently removed from your SD memory card.
... pressing the Delete button. Delete This Video: 1) Select the image you wish to delete. 2) Press the MENU button to open the „Delete‟ menu. 2) Press the UP or DOWN direction control buttons to delete the selected video. Video Playback Mode Menu The following is the menu that you only use this Delete feature with care. Remember, you can delete videos from your camera through the Delete menu. Once all the images are deleted they are permanently removed from your SD memory card.
v3 Camera Manual
Page 22
... Screen. Note: The lower the resolution setting the more photos can be in the photo, simply flip the LCD display out and hold out the front of the scene. 6) Press the Shutter button to capture and save your photo to the memory card. 7) Self Portrait Photo Capture: You can see yourself within the scene on your digital video camera. 2) Press the MODE button once to open the Photo Capture Mode. 3) While in Photo Capture mode, use the LCD display to direct...
... Screen. Note: The lower the resolution setting the more photos can be in the photo, simply flip the LCD display out and hold out the front of the scene. 6) Press the Shutter button to capture and save your photo to the memory card. 7) Self Portrait Photo Capture: You can see yourself within the scene on your digital video camera. 2) Press the MODE button once to open the Photo Capture Mode. 3) While in Photo Capture mode, use the LCD display to direct...

v3 Camera Manual
Page 23
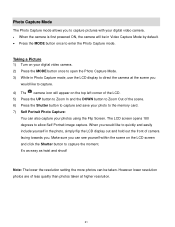
Toggles between the Video Capture Mode, Photo Capture Mode, and Playback Mode Exits the menu screen 22 Photo Capture Mode Quick Function Buttons Your digital video camera has a four-directional pad and additional buttons that functions as Quick Function buttons. Button LEFT UP RIGHT DOWN Function Zooms in Zooms out Other Shutter Delete MENU MODE Captures your Photo Allows you to delete last image taken by opening the „Delete‟ options Opens the Photo Menu options Note: To navigate through the Menus, use the Left, Up, Right, and Down directions control buttons.
Toggles between the Video Capture Mode, Photo Capture Mode, and Playback Mode Exits the menu screen 22 Photo Capture Mode Quick Function Buttons Your digital video camera has a four-directional pad and additional buttons that functions as Quick Function buttons. Button LEFT UP RIGHT DOWN Function Zooms in Zooms out Other Shutter Delete MENU MODE Captures your Photo Allows you to delete last image taken by opening the „Delete‟ options Opens the Photo Menu options Note: To navigate through the Menus, use the Left, Up, Right, and Down directions control buttons.

v3 Camera Manual
Page 24
... manually change the setting or restore the camera‟s default factory settings. Photo Capture Mode Menus The following are the menus that appear in mind that this setting will also take up more of the images taken by your digital video camera until you to choose the desired size of your camera‟s memory. 1) Press the MENU button to open the menus for the current mode. 2) Press the LEFT or RIGHT direction control buttons...
... manually change the setting or restore the camera‟s default factory settings. Photo Capture Mode Menus The following are the menus that appear in mind that this setting will also take up more of the images taken by your digital video camera until you to choose the desired size of your camera‟s memory. 1) Press the MENU button to open the menus for the current mode. 2) Press the LEFT or RIGHT direction control buttons...
v3 Camera Manual
Page 25
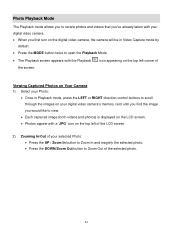
... turn on the digital video camera, the camera will be in Video Capture mode by default. Press the MODE button twice to Zoom Out of the screen. Viewing Captured Photos on Your Camera 1) Select your Photo: Once in Playback mode, press the LEFT or RIGHT direction control buttons to scroll through the images on your digital video camera‟s memory card until you find the image you would like to view. Each captured image (both videos and photos) is displayed on the LCD screen...
... turn on the digital video camera, the camera will be in Video Capture mode by default. Press the MODE button twice to Zoom Out of the screen. Viewing Captured Photos on Your Camera 1) Select your Photo: Once in Playback mode, press the LEFT or RIGHT direction control buttons to scroll through the images on your digital video camera‟s memory card until you find the image you would like to view. Each captured image (both videos and photos) is displayed on the LCD screen...

v3 Camera Manual
Page 26
... Menus, use the Left, Up, Right, and Down directions control buttons. Zooms Out of your Thumbnail images. - Note: To navigate through your Thumbnail images. - Button LEFT UP RIGHT DOWN Function - Other Shutter/OK Delete MENU MODE Opens selected image from the Thumbnail display. Toggles between the Video Capture Mode, Photo Capture Mode, and Playback Mode. Displays the PREVIOUS image. - Displays the NEXT image. - Scrolls through your Thumbnail images. - Allows you to your Thumbnail display images. - Photo Playback Mode Quick Function Buttons Your digital video camera has...
... Menus, use the Left, Up, Right, and Down directions control buttons. Zooms Out of your Thumbnail images. - Note: To navigate through your Thumbnail images. - Button LEFT UP RIGHT DOWN Function - Other Shutter/OK Delete MENU MODE Opens selected image from the Thumbnail display. Toggles between the Video Capture Mode, Photo Capture Mode, and Playback Mode. Displays the PREVIOUS image. - Displays the NEXT image. - Scrolls through your Thumbnail images. - Allows you to your Thumbnail display images. - Photo Playback Mode Quick Function Buttons Your digital video camera has...
v3 Camera Manual
Page 28
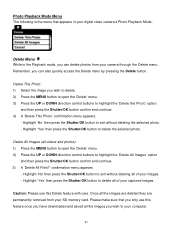
... SD memory card. Once all videos and photos): 1) Press the MENU button to open the „Delete‟ menu. 3) Press the UP or DOWN direction control buttons to highlight the „Delete this feature once you have downloaded and saved all the images you wish to highlight the „Delete All Images‟ option and then press the Shutter/OK button confirm and continue. 3) A „Delete All Files?‟ confirmation menu appears. - Photo Playback Mode Menu The...
... SD memory card. Once all videos and photos): 1) Press the MENU button to open the „Delete‟ menu. 3) Press the UP or DOWN direction control buttons to highlight the „Delete this feature once you have downloaded and saved all the images you wish to highlight the „Delete All Images‟ option and then press the Shutter/OK button confirm and continue. 3) A „Delete All Files?‟ confirmation menu appears. - Photo Playback Mode Menu The...

v3 Camera Manual
Page 29
... of using the TV screen is that the camera is set to record, capture or playback mode, you can preview the images you can review all the pictures and videos stored on the SD card inserted in place of the digital video camera. 2) Connect the end with double-connectors to the video (yellow) and to the audio (red or white) input jack on the TV. 3) Turn on the LCD screen. Connecting the Digital Video Camera to a TV Your digital video camera has...
... of using the TV screen is that the camera is set to record, capture or playback mode, you can preview the images you can review all the pictures and videos stored on the SD card inserted in place of the digital video camera. 2) Connect the end with double-connectors to the video (yellow) and to the audio (red or white) input jack on the TV. 3) Turn on the LCD screen. Connecting the Digital Video Camera to a TV Your digital video camera has...
v3 Camera Manual
Page 30
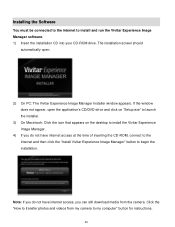
... can still download media from my camera to install and run the Vivitar Experience Image Manager software. 1) Insert the installation CD into your CD-ROM drive. Click the "How to transfer photos and videos from the camera. Installing the Software You must be connected to the internet to my computer" button for instructions. 29 If the window does not appear, open . 2) On PC: The Vivitar Experience Image Manager Installer window appears. The installation screen should automatically open the...
... can still download media from my camera to install and run the Vivitar Experience Image Manager software. 1) Insert the installation CD into your CD-ROM drive. Click the "How to transfer photos and videos from the camera. Installing the Software You must be connected to the internet to my computer" button for instructions. 29 If the window does not appear, open . 2) On PC: The Vivitar Experience Image Manager Installer window appears. The installation screen should automatically open the...

v3 Camera Manual
Page 31
... and click "Next" to open the next window. 7) Click "Next" to confirm your camera model selection and to install the application. 8) Please wait while the application is being installed on your computer. 9) Please review the license terms. On PC and Macintosh: Click the "I accept the terms of the digital video camera to reveal the retractable built -in Mass Storage Mode. 30
... and click "Next" to open the next window. 7) Click "Next" to confirm your camera model selection and to install the application. 8) Please wait while the application is being installed on your computer. 9) Please review the license terms. On PC and Macintosh: Click the "I accept the terms of the digital video camera to reveal the retractable built -in Mass Storage Mode. 30


