
Camera Manual
Page 1
All other trademarks are registered trademarks of their respective companies. DVR 785HD Action Camcorder User Manual © 2009-2012 Sakar International, Inc. All rights reserved. Windows and the Windows logo are the property of Microsoft Corporation.
All other trademarks are registered trademarks of their respective companies. DVR 785HD Action Camcorder User Manual © 2009-2012 Sakar International, Inc. All rights reserved. Windows and the Windows logo are the property of Microsoft Corporation.
Camera Manual
Page 2
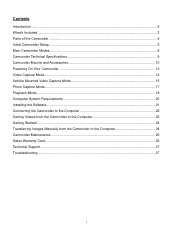
... Mode ...17 Playback Mode...18 Computer System Requirements 20 Installing the Software ...21 Connecting the Camcorder to the Computer 22 Getting Videos from the Camcorder to the Computer 23 Getting Started! ...24 Transferring Images Manually from the Camcorder to the Computer 24 Camcorder Maintenance ...26 Sakar Warranty Card...26 Technical Support...27 Troubleshooting...27 1
... Mode ...17 Playback Mode...18 Computer System Requirements 20 Installing the Software ...21 Connecting the Camcorder to the Computer 22 Getting Videos from the Camcorder to the Computer 23 Getting Started! ...24 Transferring Images Manually from the Camcorder to the Computer 24 Camcorder Maintenance ...26 Sakar Warranty Card...26 Technical Support...27 Troubleshooting...27 1
Camera Manual
Page 3
...to get the most out of your camcorder. NOTE: Your digital action camcorder supports a Micro SD Memory Card (up to enjoy the full Vivitar experience. 2 We would however recommend that you need to use . Please read this Digital Action Camcorder. Micro SD Memory cards are not... pictures and videos without the software by directly accessing the memory card from your digital action camcorder normally, please insert the Micro SD Memory card before use your computer. Vivitar makes capturing those special moments as easy as possible. In order to be purchased separately. ...
...to get the most out of your camcorder. NOTE: Your digital action camcorder supports a Micro SD Memory Card (up to enjoy the full Vivitar experience. 2 We would however recommend that you need to use . Please read this Digital Action Camcorder. Micro SD Memory cards are not... pictures and videos without the software by directly accessing the memory card from your digital action camcorder normally, please insert the Micro SD Memory card before use your computer. Vivitar makes capturing those special moments as easy as possible. In order to be purchased separately. ...
Camera Manual
Page 4
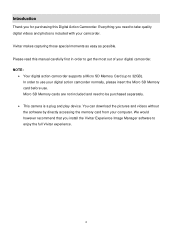
Vivitar Experience Installation CD 5. Waterproof Casing 7. USB Cable 3. Helmet Mount 9. Bicycle Mount 10.Helmet Mount Strap NOTE: Built-in Lithium Battery included (not shown). Micro SD Card not included. 3 Helmet and Bicycle Mount Screw 8. What's Included 1. AC Adapter 4. Stand Accessory 6. Digital Camcorder 2.
Vivitar Experience Installation CD 5. Waterproof Casing 7. USB Cable 3. Helmet Mount 9. Bicycle Mount 10.Helmet Mount Strap NOTE: Built-in Lithium Battery included (not shown). Micro SD Card not included. 3 Helmet and Bicycle Mount Screw 8. What's Included 1. AC Adapter 4. Stand Accessory 6. Digital Camcorder 2.
Camera Manual
Page 5
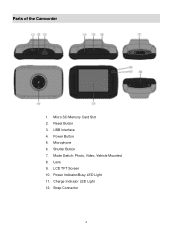
Power Button 5. Strap Connector 4 Lens 9. Charge Indicator LED Light 12. Mode Switch: Photo, Video, Vehicle Mounted 8. Shutter Button 7. Power Indicator/Busy LED Light 11. LCD TFT Screen 10. Parts of the Camcorder 1. Micro SD Memory Card Slot 2. Reset Button 3. USB Interface 4. Microphone 6.
Power Button 5. Strap Connector 4 Lens 9. Charge Indicator LED Light 12. Mode Switch: Photo, Video, Vehicle Mounted 8. Shutter Button 7. Power Indicator/Busy LED Light 11. LCD TFT Screen 10. Parts of the Camcorder 1. Micro SD Memory Card Slot 2. Reset Button 3. USB Interface 4. Microphone 6.
Camera Manual
Page 6
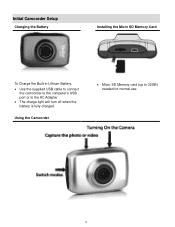
Using the Camcorder Micro SD Memory card (up to the AC Adapter. The charge light will turn off when the battery is fully charged. Initial Camcorder Setup Charging the Battery Installing the Micro SD Memory Card To Charge the Built-in Lithium Battery: Use the supplied USB cable to connect the camcorder to the computer's USB port or to 32GB) needed for normal use. 5
Using the Camcorder Micro SD Memory card (up to the AC Adapter. The charge light will turn off when the battery is fully charged. Initial Camcorder Setup Charging the Battery Installing the Micro SD Memory Card To Charge the Built-in Lithium Battery: Use the supplied USB cable to connect the camcorder to the computer's USB port or to 32GB) needed for normal use. 5
Camera Manual
Page 7
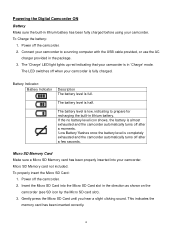
...properly inserted into the Micro SD Card slot in 'Charge' mode. Micro SD Memory card not included. Insert the Micro SD Card into your camcorder. To Charge the battery: 1. Gently press the Micro SD Card until you hear a slight clicking sound. Power off after a moments. ... off after a few seconds. If the no battery level icon shows, the battery is completely exhausted and the camcorder automatically turns off the camcorder. 2. Connect your camcorder is low, indicating to a running computer with the USB cable provided, or use the AC charger provided in ...
...properly inserted into the Micro SD Card slot in 'Charge' mode. Micro SD Memory card not included. Insert the Micro SD Card into your camcorder. To Charge the battery: 1. Gently press the Micro SD Card until you hear a slight clicking sound. Power off after a moments. ... off after a few seconds. If the no battery level icon shows, the battery is completely exhausted and the camcorder automatically turns off the camcorder. 2. Connect your camcorder is low, indicating to a running computer with the USB cable provided, or use the AC charger provided in ...
Camera Manual
Page 8
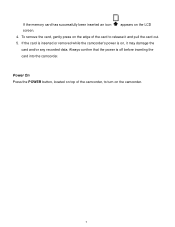
If the card is inserted or removed while the camcorder's power is off before inserting the card into the camcorder. Always confirm that the power is on the edge of the camcorder, to release it may damage the card and/or any recorded data. appears on the camcorder. 7 To remove the card, gently press on , it and pull the card out. 5. Power On Press the POWER button, located on top of the card to turn on the LCD 4. If the memory card has successfully been inserted an icon screen.
If the card is inserted or removed while the camcorder's power is off before inserting the card into the camcorder. Always confirm that the power is on the edge of the camcorder, to release it may damage the card and/or any recorded data. appears on the camcorder. 7 To remove the card, gently press on , it and pull the card out. 5. Power On Press the POWER button, located on top of the card to turn on the LCD 4. If the memory card has successfully been inserted an icon screen.
Camera Manual
Page 9
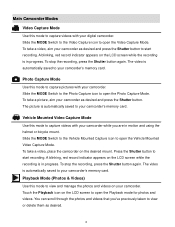
... button. A blinking, red record indicator appears on the LCD screen while the recording is in progress. The video is automatically saved to your camcorder's memory card. Slide the MODE Switch to the Video Capture icon to open the Vehicle Mounted Video Capture Mode. The video is automatically saved ... through the photos and videos that you are in motion and using the helmet or bicycle mount. Main Camcorder Modes Video Capture Mode Use this mode to capture videos with your camcorder. To stop the recording, press the Shutter button again. Slide the MODE Switch to the Photo Capture ...
... button. A blinking, red record indicator appears on the LCD screen while the recording is in progress. The video is automatically saved to your camcorder's memory card. Slide the MODE Switch to the Video Capture icon to open the Vehicle Mounted Video Capture Mode. The video is automatically saved ... through the photos and videos that you are in motion and using the helmet or bicycle mount. Main Camcorder Modes Video Capture Mode Use this mode to capture videos with your camcorder. To stop the recording, press the Shutter button again. Slide the MODE Switch to the Photo Capture ...

Camera Manual
Page 10
Camcorder Technical Specifications Image Sensor Video Resolution Photo Resolution File Format External Memory LCD Display Zoom Focus Range ISO Scene White Balance Light Exposure Metering Auto ...
Camcorder Technical Specifications Image Sensor Video Resolution Photo Resolution File Format External Memory LCD Display Zoom Focus Range ISO Scene White Balance Light Exposure Metering Auto ...
Camera Manual
Page 11
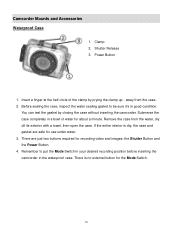
...Mode Switch. 10 Remove the case from the case. 2. Submerse the case completely in a bowl of the clamp by closing the case without inserting the camcorder. You can test the gasket by prying the clamp up - Before sealing the case, inspect the water sealing gasket to put the Mode Switch in... your desired recording position before inserting the camcorder in good condition. Remember to be sure it's in the waterproof case. away from the water, dry off its exterior with a towel, then open ...
...Mode Switch. 10 Remove the case from the case. 2. Submerse the case completely in a bowl of the clamp by closing the case without inserting the camcorder. You can test the gasket by prying the clamp up - Before sealing the case, inspect the water sealing gasket to put the Mode Switch in... your desired recording position before inserting the camcorder in good condition. Remember to be sure it's in the waterproof case. away from the water, dry off its exterior with a towel, then open ...
Camera Manual
Page 12
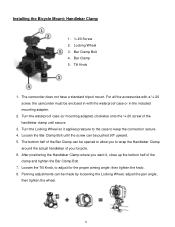
... can be opened to allow you want it applies pressure to the case to keep the connection secure. 4. then tighten the wheel. 11 The camcorder does not have a standard tripod mount. The bottom half of your bicycle. 6. Loosen the Tilt Knob, to wrap the Handlebar Clamp around the actual... adapter. 2. Installing the Bicycle Mount: Handlebar Clamp 1. ¼-20 Screw 2. Bar Clamp 5. Tilt Knob 1. For all the accessories with a ¼-20 screw, the camcorder must be made by loosening the Locking Wheel, adjust the pan angle; Loosen the Bar Clamp Bolt until secure. 3.
... can be opened to allow you want it applies pressure to the case to keep the connection secure. 4. then tighten the wheel. 11 The camcorder does not have a standard tripod mount. The bottom half of your bicycle. 6. Loosen the Tilt Knob, to wrap the Handlebar Clamp around the actual... adapter. 2. Installing the Bicycle Mount: Handlebar Clamp 1. ¼-20 Screw 2. Bar Clamp 5. Tilt Knob 1. For all the accessories with a ¼-20 screw, the camcorder must be made by loosening the Locking Wheel, adjust the pan angle; Loosen the Bar Clamp Bolt until secure. 3.
Camera Manual
Page 14
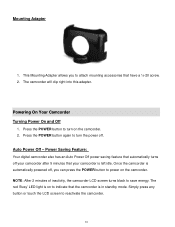
... The red 'Busy' LED light is on to indicate that the camcorder is automatically powered off, you to turn the power off your camcorder after 5 minutes that your camcorder is left idle. Auto Power Off - Once the camcorder is in standby mode. Mounting Adapter 1. Press the POWER button to attach ...mounting accessories that automatically turns off . Power Saving Feature: Your digital camcorder also has an Auto Power Off power saving feature that have a ¼-20 screw. 2. Simply press any button or touch the LCD ...
... The red 'Busy' LED light is on to indicate that the camcorder is automatically powered off, you to turn the power off your camcorder after 5 minutes that your camcorder is left idle. Auto Power Off - Once the camcorder is in standby mode. Mounting Adapter 1. Press the POWER button to attach ...mounting accessories that automatically turns off . Power Saving Feature: Your digital camcorder also has an Auto Power Off power saving feature that have a ¼-20 screw. 2. Simply press any button or touch the LCD ...
Camera Manual
Page 15
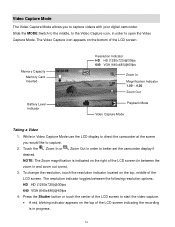
... HD HD (1280x720)@30fps 640 VGA (640x480)@60fps 4. Video Capture Mode The Video Capture Mode allows you would like to capture videos with your digital camcorder. The Video Capture icon appears on the right of the LCD screen. NOTE: The Zoom magnification is in and zoom out icons). 3. The resolution indicator... 1.00 - 4.00 Zoom Out Playback Mode Video Capture Mode Taking a Video 1. Touch the Zoom In or Zoom Out in order to better set the camcorder display if desired. Slide the MODE Switch to the middle, to the Video Capture icon, in order to open the Video Capture Mode.
... HD HD (1280x720)@30fps 640 VGA (640x480)@60fps 4. Video Capture Mode The Video Capture Mode allows you would like to capture videos with your digital camcorder. The Video Capture icon appears on the right of the LCD screen. NOTE: The Zoom magnification is in and zoom out icons). 3. The resolution indicator... 1.00 - 4.00 Zoom Out Playback Mode Video Capture Mode Taking a Video 1. Touch the Zoom In or Zoom Out in order to better set the camcorder display if desired. Slide the MODE Switch to the middle, to the Video Capture icon, in order to open the Video Capture Mode.

Camera Manual
Page 16
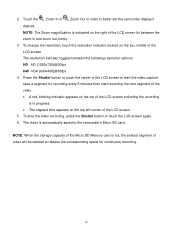
...of video will be deleted to the Vehicle Mounted Video Capture icon, in motion and using the camcorder with your camcorder as desired. Make sure the resolution and zoom are in order to the camcorder's Micro SD card. Slide the MODE Switch to the bottom, to release the corresponding space ...: When the storage capacity of the LCD screen. 5. While in Vehicle Mounted Video Capture Mode use the supplied mounts to place your digital camcorder while you are set before you to capture videos with the helmet or bicycle mount. Memory Capacity Memory Card Inserted Resolution Indicator HD HD (...
...of video will be deleted to the Vehicle Mounted Video Capture icon, in motion and using the camcorder with your camcorder as desired. Make sure the resolution and zoom are in order to the camcorder's Micro SD card. Slide the MODE Switch to the bottom, to release the corresponding space ...: When the storage capacity of the LCD screen. 5. While in Vehicle Mounted Video Capture Mode use the supplied mounts to place your digital camcorder while you are set before you to capture videos with the helmet or bicycle mount. Memory Capacity Memory Card Inserted Resolution Indicator HD HD (...
Camera Manual
Page 17
... the recording is indicated on the top, middle of video will be deleted to better set the camcorder display if desired. Press the Shutter button or touch the center of the LCD screen to the camcorder's Micro SD card. NOTE: When the storage capacity of the Micro SD Memory card is automatically...
... the recording is indicated on the top, middle of video will be deleted to better set the camcorder display if desired. Press the Shutter button or touch the center of the LCD screen to the camcorder's Micro SD card. NOTE: When the storage capacity of the Micro SD Memory card is automatically...
Camera Manual
Page 18
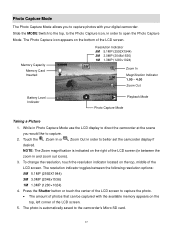
... Mode Photo Capture Mode Taking a Picture 1. Press the Shutter button or touch the center of photos that can be captured with your digital camcorder. NOTE: The Zoom magnification is automatically saved to capture the photo. The amount of the LCD screen to the... 5M 5.1MP (2592X1944) 3M 3.0MP (2048x1536) 1M 1.3MP (1280×1024) 4. The resolution indicator toggles between the zoom in order to better set the camcorder display if desired. To change the resolution, touch the resolution indicator located on the bottom of the LCD screen. Slide the MODE Switch to the...
... Mode Photo Capture Mode Taking a Picture 1. Press the Shutter button or touch the center of photos that can be captured with your digital camcorder. NOTE: The Zoom magnification is automatically saved to capture the photo. The amount of the LCD screen to the... 5M 5.1MP (2592X1944) 3M 3.0MP (2048x1536) 1M 1.3MP (1280×1024) 4. The resolution indicator toggles between the zoom in order to better set the camcorder display if desired. To change the resolution, touch the resolution indicator located on the bottom of the LCD screen. Slide the MODE Switch to the...
Camera Manual
Page 19
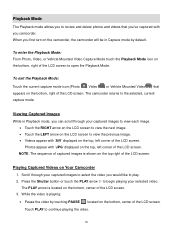
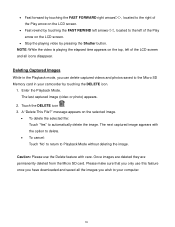
...to play. 2. To enter the Playback Mode: From Photo, Video, or Vehicle Mounted Video Capture Mode touch the Playback Mode icon on the camcorder, the camcorder will be in Playback mode, you first turn on the bottom, right of the LCD screen to view the previous image. Videos appear... LCD screen. 3. Playing Captured Videos on the top, left corner of the LCD screen. Photos appear with you would like to select the video you camcorder. To exit the Playback Mode: Touch the current capture mode icon (Photo , Video , or Vehicle Mounted Video ) that you've captured with 'JPG...
...to play. 2. To enter the Playback Mode: From Photo, Video, or Vehicle Mounted Video Capture Mode touch the Playback Mode icon on the camcorder, the camcorder will be in Playback mode, you first turn on the bottom, right of the LCD screen to view the previous image. Videos appear... LCD screen. 3. Playing Captured Videos on the top, left corner of the LCD screen. Photos appear with you would like to select the video you camcorder. To exit the Playback Mode: Touch the current capture mode icon (Photo , Video , or Vehicle Mounted Video ) that you've captured with 'JPG...
Camera Manual
Page 20
... disappear. NOTE: While the video is playing the elapsed time appears on the selected image. To delete the selected file: Touch 'Yes'' to your camcorder by pressing the Shutter button. Touch the DELETE icon . 3. Deleting Captured Images While in your computer. 19
... disappear. NOTE: While the video is playing the elapsed time appears on the selected image. To delete the selected file: Touch 'Yes'' to your camcorder by pressing the Shutter button. Touch the DELETE icon . 3. Deleting Captured Images While in your computer. 19

Camera Manual
Page 22
... Image Manager Installer window appears. On MACINTOSH OS: Click the icon that appears on "Setup.exe" to install the Vivitar Experience Image Manager. 4. Installing the Software You must be connected to the Internet to begin the installation. If the window does not appear, open . 2. The...-ROM drive. NOTE: If you do not have internet access, you can still download media from my camera to transfer photos and videos from the camcorder. Click the "How to my computer" button for instructions. 5. If you do not have internet access at the time of inserting the CD-ROM, ...
... Image Manager Installer window appears. On MACINTOSH OS: Click the icon that appears on "Setup.exe" to install the Vivitar Experience Image Manager. 4. Installing the Software You must be connected to the Internet to begin the installation. If the window does not appear, open . 2. The...-ROM drive. NOTE: If you do not have internet access, you can still download media from my camera to transfer photos and videos from the camcorder. Click the "How to my computer" button for instructions. 5. If you do not have internet access at the time of inserting the CD-ROM, ...


