Camera Manual
Page 2
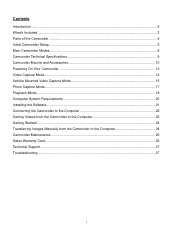
... Setup ...5 Main Camcorder Modes ...8 Camcorder Technical Specifications 9 Camcorder Mounts and Accessories 10 Powering On Your Camcorder...13 Video Capture Mode ...14 Vehicle Mounted Video Capture Mode 15 Photo Capture Mode ...17 Playback Mode...18 Computer System Requirements 20 Installing the Software ...21 Connecting the Camcorder to the Computer 22 Getting Videos from the Camcorder to the Computer 23 Getting Started! ...24 Transferring Images Manually from the Camcorder to the Computer 24 Camcorder Maintenance ...26 Sakar Warranty Card...26 Technical Support...27 Troubleshooting...
... Setup ...5 Main Camcorder Modes ...8 Camcorder Technical Specifications 9 Camcorder Mounts and Accessories 10 Powering On Your Camcorder...13 Video Capture Mode ...14 Vehicle Mounted Video Capture Mode 15 Photo Capture Mode ...17 Playback Mode...18 Computer System Requirements 20 Installing the Software ...21 Connecting the Camcorder to the Computer 22 Getting Videos from the Camcorder to the Computer 23 Getting Started! ...24 Transferring Images Manually from the Camcorder to the Computer 24 Camcorder Maintenance ...26 Sakar Warranty Card...26 Technical Support...27 Troubleshooting...
Camera Manual
Page 3
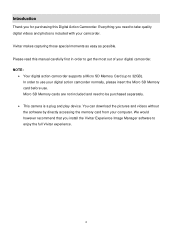
...; Your digital action camcorder supports a Micro SD Memory Card (up to take quality digital videos and photos is a plug and play device. Vivitar makes capturing those special moments as easy as possible. You can download the pictures and videos without the software by directly accessing the memory card from your digital camcorder. Everything you need to be purchased separately. This camera is included with your digital action camcorder normally, please insert the Micro SD Memory card before use your camcorder...
...; Your digital action camcorder supports a Micro SD Memory Card (up to take quality digital videos and photos is a plug and play device. Vivitar makes capturing those special moments as easy as possible. You can download the pictures and videos without the software by directly accessing the memory card from your digital camcorder. Everything you need to be purchased separately. This camera is included with your digital action camcorder normally, please insert the Micro SD Memory card before use your camcorder...
Camera Manual
Page 5
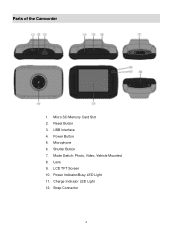
Power Button 5. Shutter Button 7. Lens 9. USB Interface 4. Charge Indicator LED Light 12. Micro SD Memory Card Slot 2. Microphone 6. LCD TFT Screen 10. Strap Connector 4 Reset Button 3. Mode Switch: Photo, Video, Vehicle Mounted 8. Power Indicator/Busy LED Light 11. Parts of the Camcorder 1.
Power Button 5. Shutter Button 7. Lens 9. USB Interface 4. Charge Indicator LED Light 12. Micro SD Memory Card Slot 2. Microphone 6. LCD TFT Screen 10. Strap Connector 4 Reset Button 3. Mode Switch: Photo, Video, Vehicle Mounted 8. Power Indicator/Busy LED Light 11. Parts of the Camcorder 1.
Camera Manual
Page 6
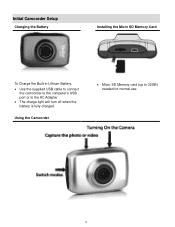
Initial Camcorder Setup Charging the Battery Installing the Micro SD Memory Card To Charge the Built-in Lithium Battery: Use the supplied USB cable to connect the camcorder to the computer's USB port or to 32GB) needed for normal use. 5 Using the Camcorder Micro SD Memory card (up to the AC Adapter. The charge light will turn off when the battery is fully charged.
Initial Camcorder Setup Charging the Battery Installing the Micro SD Memory Card To Charge the Built-in Lithium Battery: Use the supplied USB cable to connect the camcorder to the computer's USB port or to 32GB) needed for normal use. 5 Using the Camcorder Micro SD Memory card (up to the AC Adapter. The charge light will turn off when the battery is fully charged.
Camera Manual
Page 7
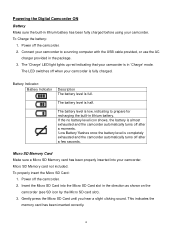
... sound. To Charge the battery: 1. Power off the camcorder. 2. Battery Indicator: Battery Indicator Description The battery level is low, indicating to a running computer with the USB cable provided, or use the AC charger provided in 'Charge' mode. The 'Charge' LED light lights up red indicating that your camcorder to prepare for recharging the built-in the direction as shown on the camcorder (see SD icon by the Micro SD card slot). 3. Micro SD Memory Card...
... sound. To Charge the battery: 1. Power off the camcorder. 2. Battery Indicator: Battery Indicator Description The battery level is low, indicating to a running computer with the USB cable provided, or use the AC charger provided in 'Charge' mode. The 'Charge' LED light lights up red indicating that your camcorder to prepare for recharging the built-in the direction as shown on the camcorder (see SD icon by the Micro SD card slot). 3. Micro SD Memory Card...
Camera Manual
Page 9
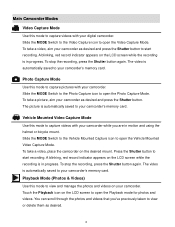
... progress. A blinking, red record indicator appears on the LCD screen while the recording is automatically saved to your camcorder as desired. 8 Vehicle Mounted Video Capture Mode Use this mode to capture pictures with your camcorder while you 've previously taken to view or delete them as desired and press the Shutter button. To stop the recording, press the Shutter button again. To stop the recording, press the Shutter button again. To take a picture, aim your camcorder's memory card. Main Camcorder Modes Video Capture Mode Use this mode to view and...
... progress. A blinking, red record indicator appears on the LCD screen while the recording is automatically saved to your camcorder as desired. 8 Vehicle Mounted Video Capture Mode Use this mode to capture pictures with your camcorder while you 've previously taken to view or delete them as desired and press the Shutter button. To stop the recording, press the Shutter button again. To stop the recording, press the Shutter button again. To take a picture, aim your camcorder's memory card. Main Camcorder Modes Video Capture Mode Use this mode to view and...

Camera Manual
Page 10
Camcorder Technical Specifications Image Sensor Video Resolution Photo Resolution File Format External Memory LCD Display Zoom Focus Range ISO Scene White Balance Light Exposure Metering Auto Power Off Interface System Requirements Battery CMOS Sensor HD(1280×720)@30fps VGA (640x480)@60fps 5.1MP (2592X1944) 3.0MP (2048x1536) 1.3 MP (1280×1024) AVI (Video), JPEG (Photo) Micro SD Memory card, up to 32GB 2.0"TFT, resistive touch panel 4X Digital Zoom 120CM-Infinity Auto Auto Auto Auto Center Yes USB 2.0 Windows XP (SP3), Vista (SP1...
Camcorder Technical Specifications Image Sensor Video Resolution Photo Resolution File Format External Memory LCD Display Zoom Focus Range ISO Scene White Balance Light Exposure Metering Auto Power Off Interface System Requirements Battery CMOS Sensor HD(1280×720)@30fps VGA (640x480)@60fps 5.1MP (2592X1944) 3.0MP (2048x1536) 1.3 MP (1280×1024) AVI (Video), JPEG (Photo) Micro SD Memory card, up to 32GB 2.0"TFT, resistive touch panel 4X Digital Zoom 120CM-Infinity Auto Auto Auto Auto Center Yes USB 2.0 Windows XP (SP3), Vista (SP1...
Camera Manual
Page 15
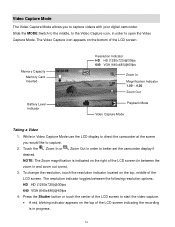
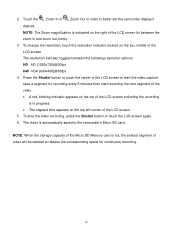
... the MODE Switch to the middle, to the Video Capture icon, in Video Capture Mode use the LCD display to direct the camcorder at the scene you to capture videos with your digital camcorder. While in order to better set the camcorder display if desired. To change the resolution, touch the resolution indicator located on the top of the LCD screen indicating the recording is indicated on the bottom of the LCD screen. Press the Shutter button...
... the MODE Switch to the middle, to the Video Capture icon, in Video Capture Mode use the LCD display to direct the camcorder at the scene you to capture videos with your digital camcorder. While in order to better set the camcorder display if desired. To change the resolution, touch the resolution indicator located on the top of the LCD screen indicating the recording is indicated on the bottom of the LCD screen. Press the Shutter button...

Camera Manual
Page 16
... video will be deleted to open the Vehicle Mounted Video Capture Mode. Vehicle Mounted Video Capture Mode The Vehicle Mounted Video Capture Mode allows you to place your digital camcorder while you are set before you begin recording and moving. While in Vehicle Mounted Video Capture Mode use the supplied mounts to capture videos with the helmet or bicycle mount. The video is full, the earliest segment of the Micro SD Memory card is automatically saved...
... video will be deleted to open the Vehicle Mounted Video Capture Mode. Vehicle Mounted Video Capture Mode The Vehicle Mounted Video Capture Mode allows you to place your digital camcorder while you are set before you begin recording and moving. While in Vehicle Mounted Video Capture Mode use the supplied mounts to capture videos with the helmet or bicycle mount. The video is full, the earliest segment of the Micro SD Memory card is automatically saved...
Camera Manual
Page 17
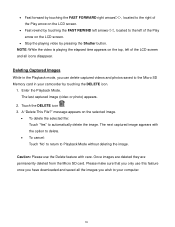
... the video capture, save a segment for continuous recording. 16 To stop the video recording, press the Shutter button or touch the LCD screen again. 6. To change the resolution, touch the resolution indicator located on the top left corner of the Micro SD Memory card is automatically saved to the camcorder's Micro SD card. NOTE: When the storage capacity of the LCD screen. 5. The resolution indicator toggles between the zoom in...
... the video capture, save a segment for continuous recording. 16 To stop the video recording, press the Shutter button or touch the LCD screen again. 6. To change the resolution, touch the resolution indicator located on the top left corner of the Micro SD Memory card is automatically saved to the camcorder's Micro SD card. NOTE: When the storage capacity of the LCD screen. 5. The resolution indicator toggles between the zoom in...
Camera Manual
Page 18
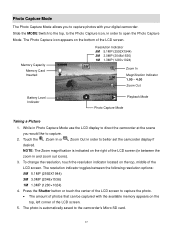
... Zoom Out Battery Level Indicator Playback Mode Photo Capture Mode Taking a Picture 1. The photo is indicated on the top, left corner of the LCD screen to the camcorder's Micro SD card. 17 Press the Shutter button or touch the center of the LCD screen. 5. While in order to capture photos with the available memory appears on the right of photos that can be captured with your digital camcorder. Slide the MODE Switch to the top, to the Photo Capture...
... Zoom Out Battery Level Indicator Playback Mode Photo Capture Mode Taking a Picture 1. The photo is indicated on the top, left corner of the LCD screen to the camcorder's Micro SD card. 17 Press the Shutter button or touch the center of the LCD screen. 5. While in order to capture photos with the available memory appears on the right of photos that can be captured with your digital camcorder. Slide the MODE Switch to the top, to the Photo Capture...
Camera Manual
Page 20
... to Playback Mode without deleting the image. Caution: Please use this feature once you have downloaded and saved all icons disappear. message appears on the top, left of the LCD screen and all the images you wish to your camcorder by pressing the Shutter button. NOTE: While the video is playing the elapsed time appears on the selected image. To delete the selected file: Touch 'Yes'' to automatically delete the image...
... to Playback Mode without deleting the image. Caution: Please use this feature once you have downloaded and saved all icons disappear. message appears on the top, left of the LCD screen and all the images you wish to your camcorder by pressing the Shutter button. NOTE: While the video is playing the elapsed time appears on the selected image. To delete the selected file: Touch 'Yes'' to automatically delete the image...

Camera Manual
Page 21
... to download videos and photos to your computer, you will need the following minimum configuration: WINDOWS OS Microsoft® Windows XP with Service Pack 3, Windows Vista with Service Pack 1 or Windows 7 Pentium® 4 processor (or above) 1 GB of RAM, 250 MB available hard disk space 16-bit Color monitor, 1024 X 768 recommended screen resolution CD-ROM Drive ...
... to download videos and photos to your computer, you will need the following minimum configuration: WINDOWS OS Microsoft® Windows XP with Service Pack 3, Windows Vista with Service Pack 1 or Windows 7 Pentium® 4 processor (or above) 1 GB of RAM, 250 MB available hard disk space 16-bit Color monitor, 1024 X 768 recommended screen resolution CD-ROM Drive ...

Camera Manual
Page 22
... the "Install Vivitar Experience Image Manager" button to install and run the Vivitar Experience Image Manager Software. 1. The installation screen should automatically open the application's CD/DVD drive and click on the desktop to my computer" button for instructions. 5. On WINDOWS OS: The Vivitar Experience Image Manager Installer window appears. Installing the Software You must be connected to the Internet to begin the installation. If you can still download media from my camera to install the Vivitar Experience Image Manager...
... the "Install Vivitar Experience Image Manager" button to install and run the Vivitar Experience Image Manager Software. 1. The installation screen should automatically open the application's CD/DVD drive and click on the desktop to my computer" button for instructions. 5. On WINDOWS OS: The Vivitar Experience Image Manager Installer window appears. Installing the Software You must be connected to the Internet to begin the installation. If you can still download media from my camera to install the Vivitar Experience Image Manager...
Camera Manual
Page 23
... Camcorder to open the application. Click the "Launch Vivitar Experience Image Manager" to the Computer 1. Select your camera model from the Programs (PC) or Applications (Mac) menu on your computer. Click "Next" to confirm your computer. This requires Internet connection. 12. Power the camcorder ON. 3. On MACINTOSH OS: If needed, please follow instructions to your digital camcorder to install the Adobe® Flash® Player. Use the supplied USB cable...
... Camcorder to open the application. Click the "Launch Vivitar Experience Image Manager" to the Computer 1. Select your camera model from the Programs (PC) or Applications (Mac) menu on your computer. Click "Next" to confirm your computer. This requires Internet connection. 12. Power the camcorder ON. 3. On MACINTOSH OS: If needed, please follow instructions to your digital camcorder to install the Adobe® Flash® Player. Use the supplied USB cable...
Camera Manual
Page 24
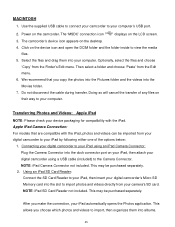
... computer where to place the new video files. 6. You can select to albums if desired. 7. The "Get media from device" window opens. 3. A message appears when the download is the only USB device connected then it will cancel the transfer of media files downloading to your camera (removable disk) from the device window. Do not disconnect the cable during transfer. Getting Videos from the Camcorder to the Computer The Micro SD Memory card needs to be selected automatically. 5.
... computer where to place the new video files. 6. You can select to albums if desired. 7. The "Get media from device" window opens. 3. A message appears when the download is the only USB device connected then it will cancel the transfer of media files downloading to your camera (removable disk) from the device window. Do not disconnect the cable during transfer. Getting Videos from the Camcorder to the Computer The Micro SD Memory card needs to be selected automatically. 5.

Camera Manual
Page 25
... the Pictures/My Pictures folder and the videos into your computer. 24 Do not disconnect the cable during transfer. Select the media and copy the files from one social network to another Organize your images by creating offline and online albums Edit images using automatic and manual tools Use automatic "Geotagging" with a list of any files on the LCD screen. 3. Use the supplied USB cable to connect your camcorder...
... the Pictures/My Pictures folder and the videos into your computer. 24 Do not disconnect the cable during transfer. Select the media and copy the files from one social network to another Organize your images by creating offline and online albums Edit images using automatic and manual tools Use automatic "Geotagging" with a list of any files on the LCD screen. 3. Use the supplied USB cable to connect your camcorder...
Camera Manual
Page 26
... digital camcorder's Micro SD Memory card into albums. 25 Power on the device icon and open the DCIM folder and the folder inside to your iPad, then insert your iPad automatically opens the Photos application. Using an iPad SD Card Reader: Connect the SD Card Reader to view the media files. 5. Use the supplied USB cable to connect your camcorder to your camera's SD card. Transferring Photos and Videos: Apple iPad NOTE: Please check your device packaging for compatibility...
... digital camcorder's Micro SD Memory card into albums. 25 Power on the device icon and open the DCIM folder and the folder inside to your iPad, then insert your iPad automatically opens the Photos application. Using an iPad SD Card Reader: Connect the SD Card Reader to view the media files. 5. Use the supplied USB cable to connect your camcorder to your camera's SD card. Transferring Photos and Videos: Apple iPad NOTE: Please check your device packaging for compatibility...
Camera Manual
Page 27
... address and telephone number (Daytime). A detailed written description of sale. 2. What to , repair by unauthorized parties, tampering, modification or accident. Do not use , including but limited to Do When Service Is Required: When returning your camcorder with care to heat sources. Copy of original bill of the problem. 3. Camcorder Maintenance The digital camcorder is not transferable. Sakar Warranty Card This warranty covers...
... address and telephone number (Daytime). A detailed written description of sale. 2. What to , repair by unauthorized parties, tampering, modification or accident. Do not use , including but limited to Do When Service Is Required: When returning your camcorder with care to heat sources. Copy of original bill of the problem. 3. Camcorder Maintenance The digital camcorder is not transferable. Sakar Warranty Card This warranty covers...

Camera Manual
Page 28
... toll free number. This camcorder requires a Micro SD card for ? I deleted images using the Vivitar Experience Image Manager are sent to call 1800-006-614. Q: I get a message that I do I accidently deleted? All images deleted using the Vivitar Experience Image Manager. Technical Support For technical support issues please visit our website at the website. Can't find manuals, software and FAQ's at www.vivitar.com. Troubleshooting Q: I don't lose important pictures? We recommend always downloading your photos and videos to...
... toll free number. This camcorder requires a Micro SD card for ? I deleted images using the Vivitar Experience Image Manager are sent to call 1800-006-614. Q: I get a message that I do I accidently deleted? All images deleted using the Vivitar Experience Image Manager. Technical Support For technical support issues please visit our website at the website. Can't find manuals, software and FAQ's at www.vivitar.com. Troubleshooting Q: I don't lose important pictures? We recommend always downloading your photos and videos to...


