
Camera Manual
Page 4
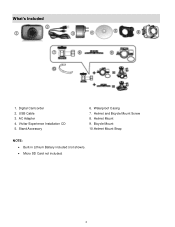
Helmet Mount 9. Stand Accessory 6. Vivitar Experience Installation CD 5. Bicycle Mount 10.Helmet Mount Strap NOTE: Built-in Lithium Battery included (not shown). Micro SD Card not included. 3 What's Included 1. AC Adapter 4. Helmet and Bicycle Mount Screw 8. Digital Camcorder 2. USB Cable 3. Waterproof Casing 7.
Helmet Mount 9. Stand Accessory 6. Vivitar Experience Installation CD 5. Bicycle Mount 10.Helmet Mount Strap NOTE: Built-in Lithium Battery included (not shown). Micro SD Card not included. 3 What's Included 1. AC Adapter 4. Helmet and Bicycle Mount Screw 8. Digital Camcorder 2. USB Cable 3. Waterproof Casing 7.
Camera Manual
Page 9
...and videos on the LCD screen to start recording. Slide the MODE Switch to the Vehicle Mounted Capture icon to open the Vehicle Mounted Video Capture Mode. The video is in motion and using the helmet or bicycle mount. Touch the Playback icon on your camcorder's memory card. To take a video, aim your...Shutter button to open the Playback mode for photos and videos. Slide the MODE Switch to the Photo Capture icon to start recording. Vehicle Mounted Video Capture Mode Use this mode to view or delete them as desired and press the Shutter button to open the Photo Capture Mode. ...
...and videos on the LCD screen to start recording. Slide the MODE Switch to the Vehicle Mounted Capture icon to open the Vehicle Mounted Video Capture Mode. The video is in motion and using the helmet or bicycle mount. Touch the Playback icon on your camcorder's memory card. To take a video, aim your...Shutter button to open the Playback mode for photos and videos. Slide the MODE Switch to the Photo Capture icon to start recording. Vehicle Mounted Video Capture Mode Use this mode to view or delete them as desired and press the Shutter button to open the Photo Capture Mode. ...

Camera Manual
Page 13
... end of the Helmet Belt through the other side of the Helmet mount. You should now have both ends of the belt inside the helmet. Take both ends of the Belt and pull to the Helmet Mount through the helmet vent. 3. then tighten the knob. 7. Please note this helmet mount will only work ... and then back up to tighten and then attach together with vented helmets. 12 Thread the same end in the base of the Helmet Mount until secured. 5. Loosen the Tilt Knob, to keep the connection secure. 6. Helmet Belt 2. Tilt Knob 1. Locking Wheel 5. Then insert the belt back through...
... end of the Helmet Belt through the other side of the Helmet mount. You should now have both ends of the belt inside the helmet. Take both ends of the Belt and pull to the Helmet Mount through the helmet vent. 3. then tighten the knob. 7. Please note this helmet mount will only work ... and then back up to tighten and then attach together with vented helmets. 12 Thread the same end in the base of the Helmet Mount until secured. 5. Loosen the Tilt Knob, to keep the connection secure. 6. Helmet Belt 2. Tilt Knob 1. Locking Wheel 5. Then insert the belt back through...

Camera Manual
Page 16
The video is full, the earliest segment of video will be deleted to capture videos with the helmet or bicycle mount. Slide the MODE Switch to the bottom, to the Vehicle Mounted Video Capture icon, in order to the camcorder's Micro SD card. NOTE: When the storage capacity of ...Indicator HD HD (1280x720)@30fps 640 VGA (640x480)@60fps Zoom In Magnification Indicator 1.00 - 4.00 Zoom Out Battery Level Indicator Playback Mode Vehicle Mounted Video Capture Mode Taking a Video 1. See below for continuous recording. To stop the video recording, press the Shutter button or touch the LCD...
The video is full, the earliest segment of video will be deleted to capture videos with the helmet or bicycle mount. Slide the MODE Switch to the bottom, to the Vehicle Mounted Video Capture icon, in order to the camcorder's Micro SD card. NOTE: When the storage capacity of ...Indicator HD HD (1280x720)@30fps 640 VGA (640x480)@60fps Zoom In Magnification Indicator 1.00 - 4.00 Zoom Out Battery Level Indicator Playback Mode Vehicle Mounted Video Capture Mode Taking a Video 1. See below for continuous recording. To stop the video recording, press the Shutter button or touch the LCD...

