

Warranty
Page 2
... Include in package: a) Evidence of date and place of original purchase (for your problem. Return item (insured) to: (in the U.S.): Vivitar Attn: Technical Support 195 Carter Drive Edison NJ 08817 (in the U.K.) Sakar UK 2D Siskin Parkway East CV3 4PE, UK When service is ...complete, the product will answer your sales receipt). WHAT TO DO WHEN SERVICE IS NEEDED STEP 1. Package the product and relevant accessories carefully, using ample padding materials and a sturdy mailing container to State thereof. c) When possible, a sample evidencing the problem. b) Detailed ...
... Include in package: a) Evidence of date and place of original purchase (for your problem. Return item (insured) to: (in the U.S.): Vivitar Attn: Technical Support 195 Carter Drive Edison NJ 08817 (in the U.K.) Sakar UK 2D Siskin Parkway East CV3 4PE, UK When service is ...complete, the product will answer your sales receipt). WHAT TO DO WHEN SERVICE IS NEEDED STEP 1. Package the product and relevant accessories carefully, using ample padding materials and a sturdy mailing container to State thereof. c) When possible, a sample evidencing the problem. b) Detailed ...
Camera Manual
Page 2
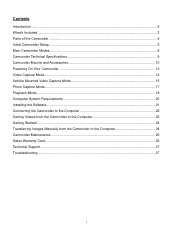
Contents Introduction ...2 What's Included...3 Parts of the Camcorder ...4 Initial Camcorder Setup ...5 Main Camcorder Modes ...8 Camcorder Technical Specifications 9 Camcorder Mounts and Accessories 10 Powering On Your Camcorder...13 Video Capture Mode ...14 Vehicle Mounted Video Capture Mode 15 Photo Capture Mode ...17 Playback Mode...18 Computer System ...
Contents Introduction ...2 What's Included...3 Parts of the Camcorder ...4 Initial Camcorder Setup ...5 Main Camcorder Modes ...8 Camcorder Technical Specifications 9 Camcorder Mounts and Accessories 10 Powering On Your Camcorder...13 Video Capture Mode ...14 Vehicle Mounted Video Capture Mode 15 Photo Capture Mode ...17 Playback Mode...18 Computer System ...
Camera Manual
Page 4
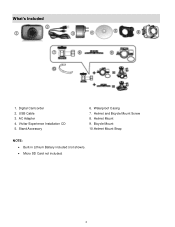
Helmet and Bicycle Mount Screw 8. AC Adapter 4. Digital Camcorder 2. Vivitar Experience Installation CD 5. Helmet Mount 9. Waterproof Casing 7. Bicycle Mount 10.Helmet Mount Strap NOTE: Built-in Lithium Battery included (not shown). Micro SD Card not included. 3 USB Cable 3. Stand Accessory 6. What's Included 1.
Helmet and Bicycle Mount Screw 8. AC Adapter 4. Digital Camcorder 2. Vivitar Experience Installation CD 5. Helmet Mount 9. Waterproof Casing 7. Bicycle Mount 10.Helmet Mount Strap NOTE: Built-in Lithium Battery included (not shown). Micro SD Card not included. 3 USB Cable 3. Stand Accessory 6. What's Included 1.
Camera Manual
Page 11
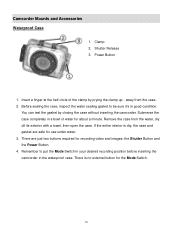
... and the Power Button. 4. If the entire interior is no external button for use under water. 3. Remove the case from the case. 2. Camcorder Mounts and Accessories Waterproof Case 1. Remember to be sure it's in the waterproof case. There are safe for the Mode Switch. 10 Shutter Release 3. away from the water...
... and the Power Button. 4. If the entire interior is no external button for use under water. 3. Remove the case from the case. 2. Camcorder Mounts and Accessories Waterproof Case 1. Remember to be sure it's in the waterproof case. There are safe for the Mode Switch. 10 Shutter Release 3. away from the water...
Camera Manual
Page 12
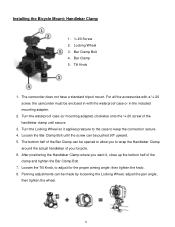
... 1. ¼-20 Screw 2. Loosen the Bar Clamp Bolt until secure. 3. The bottom half of the clamp and tighten the Bar Clamp Bolt. 7. For all the accessories with a ¼-20 screw, the camcorder must be opened to allow you want it applies pressure to the case to adjust for the proper aiming...
... 1. ¼-20 Screw 2. Loosen the Bar Clamp Bolt until secure. 3. The bottom half of the clamp and tighten the Bar Clamp Bolt. 7. For all the accessories with a ¼-20 screw, the camcorder must be opened to allow you want it applies pressure to the case to adjust for the proper aiming...
Camera Manual
Page 14
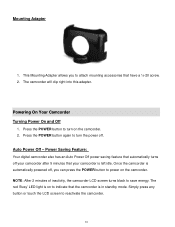
... to reactivate the camcorder. 13 Press the POWER button to power on the camcorder. Press the POWER button again to turn on to attach mounting accessories that your camcorder is on the camcorder. 2. Auto Power Off - The camcorder will clip right into this adapter. The red 'Busy' LED light is left...
... to reactivate the camcorder. 13 Press the POWER button to power on the camcorder. Press the POWER button again to turn on to attach mounting accessories that your camcorder is on the camcorder. 2. Auto Power Off - The camcorder will clip right into this adapter. The red 'Busy' LED light is left...
