

Camera Manual
Page 1
All other trademarks are registered trademarks of their respective companies. Windows and the Windows logo are the property of Microsoft Corporation. DVR 925HD Digital Video Camera User Manual © 2010 Sakar International, Inc. All rights reserved.
All other trademarks are registered trademarks of their respective companies. Windows and the Windows logo are the property of Microsoft Corporation. DVR 925HD Digital Video Camera User Manual © 2010 Sakar International, Inc. All rights reserved.

Camera Manual
Page 3
... normal use. Please read this camera. What Your Camera Includes 1. AC Charger 8. Lithium-ion Battery 3. Vivitar Experience Image Manager software Installation CD 6. HDMI Cable 7. Vivitar makes capturing those special moments as easy as possible. USB cable 4. SD Memory cards are not included and need to get the most out of your camera. Introduction Thank you need to 32GB) for purchasing this manual carefully first in order to take quality digital photos and videos...
... normal use. Please read this camera. What Your Camera Includes 1. AC Charger 8. Lithium-ion Battery 3. Vivitar Experience Image Manager software Installation CD 6. HDMI Cable 7. Vivitar makes capturing those special moments as easy as possible. USB cable 4. SD Memory cards are not included and need to get the most out of your camera. Introduction Thank you need to 32GB) for purchasing this manual carefully first in order to take quality digital photos and videos...

Camera Manual
Page 6
... part of your digital camera. First, open . Insert a compatible SD memory card correctly in accordance with the polarity indicated. Setting the Camera Language To select a language for the first time you may manually go through and setup some of the features of the setup. 5 Setting the Date and Time To set the Date and Time as desired, press the OK/Menu button. When powering the camera ON for the camera, press the OK/Menu button. Then press the memory card...
... part of your digital camera. First, open . Insert a compatible SD memory card correctly in accordance with the polarity indicated. Setting the Camera Language To select a language for the first time you may manually go through and setup some of the features of the setup. 5 Setting the Date and Time To set the Date and Time as desired, press the OK/Menu button. When powering the camera ON for the camera, press the OK/Menu button. Then press the memory card...

Camera Manual
Page 7
... Playback mode for the Photo Capture mode, press the OK button while in progress. To stop the record, press the Video Shutter button again. After turning on your camera, press the MODE button twice to view, edit or delete them as desired and press the Video Shutter button to view and manage the photos and videos on your camera as desired. A red record indicator will be automatically saved to capture videos with your camera‟s memory card. Video Capture Mode Use this mode to open the Playback mode for photos and videos. Photo Capture Mode Use...
... Playback mode for the Photo Capture mode, press the OK button while in progress. To stop the record, press the Video Shutter button again. After turning on your camera, press the MODE button twice to view, edit or delete them as desired and press the Video Shutter button to view and manage the photos and videos on your camera as desired. A red record indicator will be automatically saved to capture videos with your camera‟s memory card. Video Capture Mode Use this mode to open the Playback mode for photos and videos. Photo Capture Mode Use...
Camera Manual
Page 8
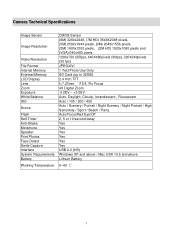
Camera Technical Specifications Image Sensor Image Resolution Video Resolution File Format Internal Memory External Memory LCD Display Lens Zoom Exposure White Balance ISO Scene Flash Self-Timer Anti-Shake Micrphone Speaker Print Photos Face Detect Smile Capture Interface System Requirements Battery Working Temperature CMOS Sensor (8M) 3264x2448, (7M HD) 3648X2048 pixels, (5M) 2592x1944 pixels, (3M) 2048x1536 pixels, (2M) 1600x1200 pixels, (2M HD) 1920x1080 pixels and (VGA) 640x480 ...
Camera Technical Specifications Image Sensor Image Resolution Video Resolution File Format Internal Memory External Memory LCD Display Lens Zoom Exposure White Balance ISO Scene Flash Self-Timer Anti-Shake Micrphone Speaker Print Photos Face Detect Smile Capture Interface System Requirements Battery Working Temperature CMOS Sensor (8M) 3264x2448, (7M HD) 3648X2048 pixels, (5M) 2592x1944 pixels, (3M) 2048x1536 pixels, (2M) 1600x1200 pixels, (2M HD) 1920x1080 pixels and (VGA) 640x480 ...
Camera Manual
Page 10
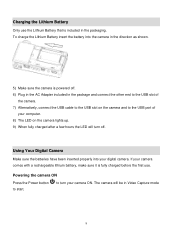
To charge the Lithium Battery insert the battery into your digital camera. Powering the camera ON Press the Power button to turn off . 6) Plug in the AC Adapter included in Video Capture mode 9 If your camera ON. The camera will be in the package and connect the other end to the USB slot of the camera. 7) Alternatively, connect the USB cable to the USB slot on the camera and to the USB port of your computer. 8) The...
To charge the Lithium Battery insert the battery into your digital camera. Powering the camera ON Press the Power button to turn off . 6) Plug in the AC Adapter included in Video Capture mode 9 If your camera ON. The camera will be in the package and connect the other end to the USB slot of the camera. 7) Alternatively, connect the USB cable to the USB slot on the camera and to the USB port of your computer. 8) The...
Camera Manual
Page 11
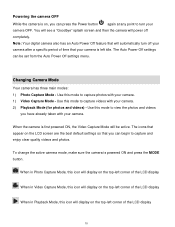
... screen and then the camera will power off your camera after a specific period of time that your camera is left idle. Note: Your digital camera also has an Auto Power Off feature that you can begin to turn off completely. Use this mode to view the photos and videos you have already taken with your camera OFF. When the camera is first powered ON, the Video Capture Mode will automatically turn your camera. The Auto Power Off settings...
... screen and then the camera will power off your camera after a specific period of time that your camera is left idle. Note: Your digital camera also has an Auto Power Off feature that you can begin to turn off completely. Use this mode to view the photos and videos you have already taken with your camera OFF. When the camera is first powered ON, the Video Capture Mode will automatically turn your camera. The Auto Power Off settings...
Camera Manual
Page 13
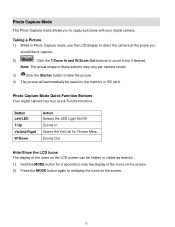
... screen. 12 Photo Capture Mode Quick Function Buttons Your digital camera has four Quick Function buttons: Button Left/LED T/Up Vivilink/Right W/Down Action Selects the LED Light On/Off Zooms In Opens the ViviLink for 2 seconds to hide the display of the icons on the LCD screen can be saved to redisplay the icons on the screen. 2) Press the MODE button again to the memory or SD card. Taking a Picture 1) While in Photo Capture mode, use the LCD display to direct the camera...
... screen. 12 Photo Capture Mode Quick Function Buttons Your digital camera has four Quick Function buttons: Button Left/LED T/Up Vivilink/Right W/Down Action Selects the LED Light On/Off Zooms In Opens the ViviLink for 2 seconds to hide the display of the icons on the LCD screen can be saved to redisplay the icons on the screen. 2) Press the MODE button again to the memory or SD card. Taking a Picture 1) While in Photo Capture mode, use the LCD display to direct the camera...
Camera Manual
Page 15
... the LEFT or RIGHT button to select the next menu item. 7) Press the MODE button to exit the menu and return to your previous mode. 8) An icon reflecting your selection will display on the LCD screen. 9) Remember that this setting will be saved by your camera until you manually change the setting or restore the camera‟s default factory settings. 14 Keep in mind that images with a higher resolution...
... the LEFT or RIGHT button to select the next menu item. 7) Press the MODE button to exit the menu and return to your previous mode. 8) An icon reflecting your selection will display on the LCD screen. 9) Remember that this setting will be saved by your camera until you manually change the setting or restore the camera‟s default factory settings. 14 Keep in mind that images with a higher resolution...
Camera Manual
Page 16
... icon will display on the LCD screen. 9) Remember that the camera‟s shutter button is an optimal feature if you don‟t just want to take up more memory on your camera. 1) Press the OK button to open the menus for the current mode. 2) Press the LEFT or RIGHT direction control buttons to scroll and select the chosen menu. 3) Press the UP or DOWN direction control buttons to...
... icon will display on the LCD screen. 9) Remember that the camera‟s shutter button is an optimal feature if you don‟t just want to take up more memory on your camera. 1) Press the OK button to open the menus for the current mode. 2) Press the LEFT or RIGHT direction control buttons to scroll and select the chosen menu. 3) Press the UP or DOWN direction control buttons to...
Camera Manual
Page 21
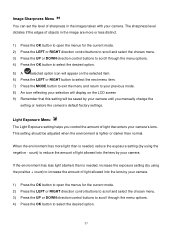
... adjusted when the environment is needed , increase the exposure setting (by your camera. Image Sharpness Menu You can set the level of light allowed into the lens by using the negative - Light Exposure Menu The Light Exposure setting helps you manually change the setting or restore the camera‟s default factory settings. This setting should be saved by your camera until you control the amount of light that this setting will appear on the LCD screen 9) Remember that enters your camera...
... adjusted when the environment is needed , increase the exposure setting (by your camera. Image Sharpness Menu You can set the level of light allowed into the lens by using the negative - Light Exposure Menu The Light Exposure setting helps you manually change the setting or restore the camera‟s default factory settings. This setting should be saved by your camera until you control the amount of light that this setting will appear on the LCD screen 9) Remember that enters your camera...
Camera Manual
Page 27
... format. 7) The camera will be reset. 8) A message will appear indicating that the settings have been reset successfully. Viewing Photos on Your Camera Once in Video Capture mode by default. The Playback mode will allow you to review and edit photos and videos that your memory card has been formatted clean. 5) You will be asked to confirm your wish to restore all of the LCD screen . 26 Firmware Menu Use this menu to view the Firmware version on your camera‟s memory card...
... format. 7) The camera will be reset. 8) A message will appear indicating that the settings have been reset successfully. Viewing Photos on Your Camera Once in Video Capture mode by default. The Playback mode will allow you to review and edit photos and videos that your memory card has been formatted clean. 5) You will be asked to confirm your wish to restore all of the LCD screen . 26 Firmware Menu Use this menu to view the Firmware version on your camera‟s memory card...
Camera Manual
Page 33
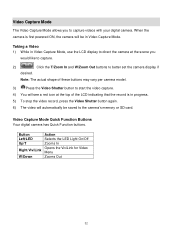
... Video Capture Mode. Video Capture Mode Quick Function Buttons Your digital camera has Quick Function buttons. When the camera is in progress. 5) To stop the video record, press the Video Shutter button again. 6) The video will be in Video Capture Mode, use the LCD display to direct the camera at the top of the LCD indicating that the record is first powered ON, the camera will automatically be saved to capture videos with your digital camera. Button Left/LED Up/T Right/ViviLink W/Down Action Selects the LED Light On/Off Zooms In Opens...
... Video Capture Mode. Video Capture Mode Quick Function Buttons Your digital camera has Quick Function buttons. When the camera is in progress. 5) To stop the video record, press the Video Shutter button again. 6) The video will be in Video Capture Mode, use the LCD display to direct the camera at the top of the LCD indicating that the record is first powered ON, the camera will automatically be saved to capture videos with your digital camera. Button Left/LED Up/T Right/ViviLink W/Down Action Selects the LED Light On/Off Zooms In Opens...
Camera Manual
Page 35
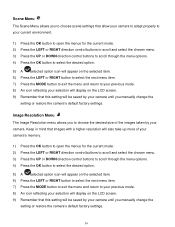
... your camera. Keep in mind that this setting will be saved by your camera until you manually change the setting or restore the camera‟s default factory settings. Scene Menu The Scene Menu allows you to choose scene settings that allow your camera to adapt properly to your current environment. 1) Press the OK button to open the menus for the current mode. 2) Press the LEFT or RIGHT direction control buttons to...
... your camera. Keep in mind that this setting will be saved by your camera until you manually change the setting or restore the camera‟s default factory settings. Scene Menu The Scene Menu allows you to choose scene settings that allow your camera to adapt properly to your current environment. 1) Press the OK button to open the menus for the current mode. 2) Press the LEFT or RIGHT direction control buttons to...
Camera Manual
Page 38
... darker than is needed , increase the exposure setting (by using the negative - count) to increase the amount of light allowed into the lens by your camera. The sharpness level dictates if the edges of sharpness in the image are more light than is needed , reduce the exposure setting (by your camera‟s lens. Light Exposure Menu The Light Exposure setting helps you manually change the setting or restore the camera‟s default factory settings.
... darker than is needed , increase the exposure setting (by using the negative - count) to increase the amount of light allowed into the lens by your camera. The sharpness level dictates if the edges of sharpness in the image are more light than is needed , reduce the exposure setting (by your camera‟s lens. Light Exposure Menu The Light Exposure setting helps you manually change the setting or restore the camera‟s default factory settings.
Camera Manual
Page 42
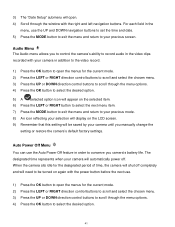
... Audio menu allows you to control the camera‟s ability to record audio in order to conserve you manually change the setting or restore the camera‟s default factory settings. Auto Power Off Menu You can use the Auto Power Off feature in the video clips recorded with the power button before the next use the UP and DOWN navigation buttons to set the time and date. 5) Press the MODE button to exit the menu and return to your previous screen...
... Audio menu allows you to control the camera‟s ability to record audio in order to conserve you manually change the setting or restore the camera‟s default factory settings. Auto Power Off Menu You can use the Auto Power Off feature in the video clips recorded with the power button before the next use the UP and DOWN navigation buttons to set the time and date. 5) Press the MODE button to exit the menu and return to your previous screen...
Camera Manual
Page 48
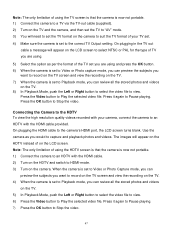
... video file. When the camera is set to Video or Photo Capture mode, you can review all the stored photos and videos on the LCD screen. Press it again to Pause playing. 7) Press the OK button to capture and playback photos and videos. Note: The only limitation of using the TV screen is that the camera is now not portable. 1) Connect the camera to an HDTV with the HDMI cable. 2) Turn on the HDTV and switch to Stop the video...
... video file. When the camera is set to Video or Photo Capture mode, you can review all the stored photos and videos on the LCD screen. Press it again to Pause playing. 7) Press the OK button to capture and playback photos and videos. Note: The only limitation of using the TV screen is that the camera is now not portable. 1) Connect the camera to an HDTV with the HDMI cable. 2) Turn on the HDTV and switch to Stop the video...

Camera Manual
Page 50
... internet access, you can run the Vivitar Experience Image Manager from the camera. Click the "Launch Vivitar Experience Image Manager" to the computer you can still download media from the Programs (PC) or Applications (Mac) menu on your computer. Connecting the Camera to the Computer 1) Use the USB cable that came with your camera to connect your camera to your computer. 2) Power the camera ON. 3) The first time you connect the device to open...
... internet access, you can run the Vivitar Experience Image Manager from the camera. Click the "Launch Vivitar Experience Image Manager" to the computer you can still download media from the Programs (PC) or Applications (Mac) menu on your computer. Connecting the Camera to the Computer 1) Use the USB cable that came with your camera to connect your camera to your computer. 2) Power the camera ON. 3) The first time you connect the device to open...
Camera Manual
Page 51
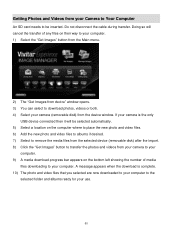
... Images" button to transfer the photos and videos from your camera to your computer. 9) A media download progress bar appears on the bottom left showing the number of any files on their way to your computer. 1) Select the "Get Images" button from the Main menu. 2) The "Get Images from device" window opens. 3) You can select to download photos, videos or both. 4) Select your use. 50 A message appears when the download is the only USB device connected then...
... Images" button to transfer the photos and videos from your camera to your computer. 9) A media download progress bar appears on the bottom left showing the number of any files on their way to your computer. 1) Select the "Get Images" button from the Main menu. 2) The "Get Images from device" window opens. 3) You can select to download photos, videos or both. 4) Select your use. 50 A message appears when the download is the only USB device connected then...
Camera Manual
Page 53
... media files. 5) Select the files and drag them into the Movies folder. 7) Do not disconnect the cable during transfer. Then select a folder and choose Paste from the Finder‟s Edit menu. Please handle your camera with your camera to connect your camera to your computer. Do not expose your computer. Do not use you copy the images into the Pictures folder and the videos into your camera...
... media files. 5) Select the files and drag them into the Movies folder. 7) Do not disconnect the cable during transfer. Then select a folder and choose Paste from the Finder‟s Edit menu. Please handle your camera with your camera to connect your camera to your computer. Do not expose your computer. Do not use you copy the images into the Pictures folder and the videos into your camera...


