
User Manual
Page 3
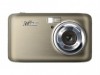
... moments as easy as possible. What's Included 1. USB cable 3. Note: Your camera needs an SD Memory card (up to be purchased separately. Vivitar Experience Image Manager software Installation CD 4. Wrist Strap Note: SD Memory Card and batteries not included. 2 SD Memory cards are not included and need to take quality digital photos and videos is included with...
... moments as easy as possible. What's Included 1. USB cable 3. Note: Your camera needs an SD Memory card (up to be purchased separately. Vivitar Experience Image Manager software Installation CD 4. Wrist Strap Note: SD Memory Card and batteries not included. 2 SD Memory cards are not included and need to take quality digital photos and videos is included with...
User Manual
Page 4
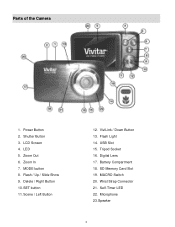
LCD Screen 4. USB Slot 15. SD Memory Card Slot 19. Zoom In 7. Wrist Strap Connector 21. ViviLink / Down Button 13. Battery Compartment 18. Power Button 2. Flash / Up / Slide Show 9. MACRO Switch 20. Delete / Right Button 10. Flash Light 14. Tripod Socket 16. Microphone 23. Shutter Button 3. Zoom Out 6. Self-Timer LED 22. Speaker 3 Scene / Left Button 12. SET button 11. Digital Lens 17. Parts of the Camera 1. LED 5. MODE button 8.
LCD Screen 4. USB Slot 15. SD Memory Card Slot 19. Zoom In 7. Wrist Strap Connector 21. ViviLink / Down Button 13. Battery Compartment 18. Power Button 2. Flash / Up / Slide Show 9. MACRO Switch 20. Delete / Right Button 10. Flash Light 14. Tripod Socket 16. Microphone 23. Shutter Button 3. Zoom Out 6. Self-Timer LED 22. Speaker 3 Scene / Left Button 12. SET button 11. Digital Lens 17. Parts of the Camera 1. LED 5. MODE button 8.

User Manual
Page 5
Using the Camera Selecting the modes Accessing the menu 4 Initial Camera Setup Installing the Batteries Installing the Memory Card Insert 3 AAA (1.5V) batteries. Turning On the Camera SD Memory card (up to 32GB) needed for normal use. Alkaline batteries recommended (not included).
Using the Camera Selecting the modes Accessing the menu 4 Initial Camera Setup Installing the Batteries Installing the Memory Card Insert 3 AAA (1.5V) batteries. Turning On the Camera SD Memory card (up to 32GB) needed for normal use. Alkaline batteries recommended (not included).

User Manual
Page 6
...the batteries have been inserted properly into the slot in the direction shown on the camera (see SD icon by the SD card slot). Use 3 x AAA (1.5V) batteries. This indicates the SD card has been inserted correctly. 5 Alkaline batteries are recommended. (Batteries not included.) Note: ... shown below: Full battery power Medium battery power Low battery power 2) SD Card Make sure an SD card has been properly inserted into your camera. (SD card not included.) To properly insert the SD Card: Push the SD card into your digital camera, according to the polarity shown inside the battery...
...the batteries have been inserted properly into the slot in the direction shown on the camera (see SD icon by the SD card slot). Use 3 x AAA (1.5V) batteries. This indicates the SD card has been inserted correctly. 5 Alkaline batteries are recommended. (Batteries not included.) Note: ... shown below: Full battery power Medium battery power Low battery power 2) SD Card Make sure an SD card has been properly inserted into your camera. (SD card not included.) To properly insert the SD Card: Push the SD card into your digital camera, according to the polarity shown inside the battery...

User Manual
Page 7
... On Press the POWER button to exit the setup. Note: If you would like to continue with Camera Setup?" If the SD card is locked this will first be adjusted at any time manually through the menus in the camera. 6 Then press the SET button to confirm the ... the camera setup, the camera will appear on the LCD display. If you do not see the SD icon on the display, please check if the card was inserted properly. Make sure the SD card is not locked (check the lock switch on the side of your choice by pressing the UP and...
... On Press the POWER button to exit the setup. Note: If you would like to continue with Camera Setup?" If the SD card is locked this will first be adjusted at any time manually through the menus in the camera. 6 Then press the SET button to confirm the ... the camera setup, the camera will appear on the LCD display. If you do not see the SD icon on the display, please check if the card was inserted properly. Make sure the SD card is not locked (check the lock switch on the side of your choice by pressing the UP and...

User Manual
Page 10
... x 720 pixels 720P (30 fps) / 640 x 480 pixels VGA (30 fps) / 320 x 240 pixels QVGA (30 fps) JPEG (Photo) /AVI (Video) 1 Test Photo Use Only SD Card (up to 32GB) 2.7 Inch TFT f=8.15 mm F3.0 4X Digital Zoom -3.0EV ~ +3.0EV Auto, Daylight, Cloudy, Fluorescent , Incandescent Auto / 100 / 200 / 400 Auto, Scenery, Portrait...
... x 720 pixels 720P (30 fps) / 640 x 480 pixels VGA (30 fps) / 320 x 240 pixels QVGA (30 fps) JPEG (Photo) /AVI (Video) 1 Test Photo Use Only SD Card (up to 32GB) 2.7 Inch TFT f=8.15 mm F3.0 4X Digital Zoom -3.0EV ~ +3.0EV Auto, Daylight, Cloudy, Fluorescent , Incandescent Auto / 100 / 200 / 400 Auto, Scenery, Portrait...

User Manual
Page 12
...OFF While the camera is fully charged before the first use. Make sure an SD card has been inserted into your camera in either Photo Capture Mode or Video Capture Mode). 11 SD Card not included) Please see Initial Camera Setup for more information. If your camera comes with your... the Power button to turn off completely. Powering the Camera On/Off Make sure the batteries have been inserted properly into your camera. (SD card up to turn your camera OFF. A "Goodbye" screen appears and then the camera will power off your camera after a specific period ...
...OFF While the camera is fully charged before the first use. Make sure an SD card has been inserted into your camera in either Photo Capture Mode or Video Capture Mode). 11 SD Card not included) Please see Initial Camera Setup for more information. If your camera comes with your... the Power button to turn off completely. Powering the Camera On/Off Make sure the batteries have been inserted properly into your camera. (SD card up to turn your camera OFF. A "Goodbye" screen appears and then the camera will power off your camera after a specific period ...
User Manual
Page 18
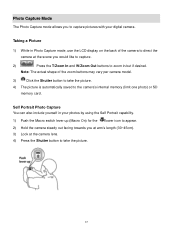
... lens. 4) Press the Shutter button to take the picture. 4) The picture is automatically saved to the camera‟s internal memory (limit one photo) or SD memory card. Photo Capture Mode The Photo Capture mode allows you would like to capture. 2) Press the T/Zoom In and W/Zoom Out buttons to zoom in/out...
... lens. 4) Press the Shutter button to take the picture. 4) The picture is automatically saved to the camera‟s internal memory (limit one photo) or SD memory card. Photo Capture Mode The Photo Capture mode allows you would like to capture. 2) Press the T/Zoom In and W/Zoom Out buttons to zoom in/out...

User Manual
Page 36
... are the menus that appear in your camera‟s Photo Playback Mode: Delete Menu While in the Playback Mode, you can delete pictures from your SD Memory card: Select „Delete All Images‟ and press the SET button. If you do not want to delete the current image, select „...
... are the menus that appear in your camera‟s Photo Playback Mode: Delete Menu While in the Playback Mode, you can delete pictures from your SD Memory card: Select „Delete All Images‟ and press the SET button. If you do not want to delete the current image, select „...

User Manual
Page 37
..., first unlock the image, then select delete. If you return to the Playback mode. A new default can be assigned to delete all of your SD card and you manually set it from this menu. 36 All of your videos and photos, select „No‟ and press the SET button. ViviLink... when you do not want to a photo or video if you will be permanently deleted. All images will remain on the image with the accompanying Vivitar Experience Image Manager application. 1) View the photo you would like to add a ViviLink. 2) Press the SET button to open the menus for the current mode...
..., first unlock the image, then select delete. If you return to the Playback mode. A new default can be assigned to delete all of your SD card and you manually set it from this menu. 36 All of your videos and photos, select „No‟ and press the SET button. ViviLink... when you do not want to a photo or video if you will be permanently deleted. All images will remain on the image with the accompanying Vivitar Experience Image Manager application. 1) View the photo you would like to add a ViviLink. 2) Press the SET button to open the menus for the current mode...

User Manual
Page 41
Press the MODE button once to the camera‟s memory or SD card. 40 On the top right, the recording time appears, indicating the amount of elapsed time as the video is being captured. 5) To STOP the video ...
Press the MODE button once to the camera‟s memory or SD card. 40 On the top right, the recording time appears, indicating the amount of elapsed time as the video is being captured. 5) To STOP the video ...

User Manual
Page 56
... and you will exit the menu and return to the Playback mode. 6) To delete all the images (videos and photos) you have saved on your SD Memory card: Select „Delete All Images‟ and press the SET button. If you would like to proceed with deleting the current image: select...
... and you will exit the menu and return to the Playback mode. 6) To delete all the images (videos and photos) you have saved on your SD Memory card: Select „Delete All Images‟ and press the SET button. If you would like to proceed with deleting the current image: select...

User Manual
Page 57
... remain on your previous mode. 8) An icon will appear on the selected item 7) Press the MODE button to exit the menu and return to your SD card and you do not want to delete all of your videos and photos, select „No‟ and press the SET button. A new default can... ViviLink technology allows you to quickly and easily upload your camera‟s photos and videos to the social networks of your choice with the accompanying Vivitar Experience Image Manager application. 1) Select the video to which you would like to add a ViviLink. 2) Press the SET button to open the menus for the...
... remain on your previous mode. 8) An icon will appear on the selected item 7) Press the MODE button to exit the menu and return to your SD card and you do not want to delete all of your videos and photos, select „No‟ and press the SET button. A new default can... ViviLink technology allows you to quickly and easily upload your camera‟s photos and videos to the social networks of your choice with the accompanying Vivitar Experience Image Manager application. 1) Select the video to which you would like to add a ViviLink. 2) Press the SET button to open the menus for the...

User Manual
Page 61
... the Camera to the Computer 1) Use the USB cable that came with your camera to connect your camera to your Camera to Your Computer An SD card needs to be selected automatically. 5) Select a location on their way to your computer. 1) Select the "Get Images" button from the Main menu. 2) The "Get media...
... the Camera to the Computer 1) Use the USB cable that came with your camera to connect your camera to your Camera to Your Computer An SD card needs to be selected automatically. 5) Select a location on their way to your computer. 1) Select the "Get Images" button from the Main menu. 2) The "Get media...

User Manual
Page 64
... attach your camera to heat sources. This item may be purchased separately. 2) Using an iPad SD Card Reader: Connect the SD Card Reader to your iPad, then insert your digital camera's SD Memory card into the slot to import photos and videos directly from your digital camera to your iPad by ...not included. Transferring Photos and Videos: Apple iPad NOTE: Please check your camera with care to avoid damaging it. NOTE: The iPad SD Card Reader is not included. Do not expose your digital camera using an iPad Camera Connector: Plug the Camera Connector into albums. Camera Maintenance...
... attach your camera to heat sources. This item may be purchased separately. 2) Using an iPad SD Card Reader: Connect the SD Card Reader to your iPad, then insert your digital camera's SD Memory card into the slot to import photos and videos directly from your digital camera to your iPad by ...not included. Transferring Photos and Videos: Apple iPad NOTE: Please check your camera with care to avoid damaging it. NOTE: The iPad SD Card Reader is not included. Do not expose your digital camera using an iPad Camera Connector: Plug the Camera Connector into albums. Camera Maintenance...

User Manual
Page 66
...always downloading your photos to the images stored on my computer. F128 -TA-122211ver2 FW1900FKGNMD51F01 65 These photos should appear. If the camera powers off . All images deleted using the Vivitar Experience Image Manager. Technical Support For technical support issues please visit ...our website at the website. If the photos are not stored in Australia call from my computer. I don't lose important pictures? This camera requires an SD card for your...
...always downloading your photos to the images stored on my computer. F128 -TA-122211ver2 FW1900FKGNMD51F01 65 These photos should appear. If the camera powers off . All images deleted using the Vivitar Experience Image Manager. Technical Support For technical support issues please visit ...our website at the website. If the photos are not stored in Australia call from my computer. I don't lose important pictures? This camera requires an SD card for your...


