User Manual
Page 1
User's Manual Happy Paws PlaylandTM © 2016 VTech All rights reserved Printed in China 91-003249-004 US
User's Manual Happy Paws PlaylandTM © 2016 VTech All rights reserved Printed in China 91-003249-004 US

User Manual
Page 3
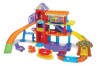
This exciting playland introduces time concepts, colors, songs and fun phrases. Go! ON/OFF VOLUME CONTROL SWITCH THREE LIGHT-UP BUTTONS ELEVATOR TRAP DOOR INTRODUCTION HAMMOCK SMARTPOINT® CAT STAGE EIGHT SMARTPOINT® LOCATIONS 2 Go! You can also connect the tracks to trigger fun responses. Smart Animals® playsets for more fun! (Each sold separately). Put the cute cat in the elevator or on the eight SmartPoint® locations to other Go! Smart Animals® Happy Paws Playland™ by VTech®. INTRODUCTION Play and explore with the Go!
This exciting playland introduces time concepts, colors, songs and fun phrases. Go! ON/OFF VOLUME CONTROL SWITCH THREE LIGHT-UP BUTTONS ELEVATOR TRAP DOOR INTRODUCTION HAMMOCK SMARTPOINT® CAT STAGE EIGHT SMARTPOINT® LOCATIONS 2 Go! You can also connect the tracks to trigger fun responses. Smart Animals® playsets for more fun! (Each sold separately). Put the cute cat in the elevator or on the eight SmartPoint® locations to other Go! Smart Animals® Happy Paws Playland™ by VTech®. INTRODUCTION Play and explore with the Go!
User Manual
Page 4
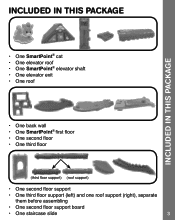
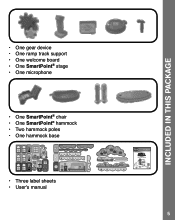
INCLUDED IN THIS PACKAGE INCLUDED IN THIS PACKAGE • One SmartPoint® cat • One elevator roof • One SmartPoint® elevator shaft • One elevator exit • One roof • One back wall • One SmartPoint® first floor • One second floor • One third floor • One second floor support • One third floor support (left) and one roof support (right), separate them before assembling • One second floor support board • One staircase slide 3
INCLUDED IN THIS PACKAGE INCLUDED IN THIS PACKAGE • One SmartPoint® cat • One elevator roof • One SmartPoint® elevator shaft • One elevator exit • One roof • One back wall • One SmartPoint® first floor • One second floor • One third floor • One second floor support • One third floor support (left) and one roof support (right), separate them before assembling • One second floor support board • One staircase slide 3
User Manual
Page 5
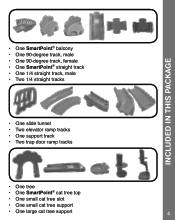
INCLUDED IN THIS PACKAGE • One SmartPoint® balcony • One 90-degree track, male • One 90-degree track, female • One SmartPoint® straight track • One 1/4 straight track, male • Two 1/4 straight tracks • One slide tunnel • Two elevator ramp tracks • One support track • Two trap door ramp tracks • One tree • One SmartPoint® cat tree top • One small cat tree slot • One small cat tree support • One large cat tree support 4
INCLUDED IN THIS PACKAGE • One SmartPoint® balcony • One 90-degree track, male • One 90-degree track, female • One SmartPoint® straight track • One 1/4 straight track, male • Two 1/4 straight tracks • One slide tunnel • Two elevator ramp tracks • One support track • Two trap door ramp tracks • One tree • One SmartPoint® cat tree top • One small cat tree slot • One small cat tree support • One large cat tree support 4
User Manual
Page 6
• One gear device • One ramp track support • One welcome board • One SmartPoint® stage • One microphone • One SmartPoint® chair • One SmartPoint® hammock • Two hammock poles • One hammock base • Three label sheets • User's manual User's Manual Happy Paws PlaylandTM © 2016 VTech All rights reserved Printed in China 91-003249-000 US 5 INCLUDED IN THIS PACKAGE
• One gear device • One ramp track support • One welcome board • One SmartPoint® stage • One microphone • One SmartPoint® chair • One SmartPoint® hammock • Two hammock poles • One hammock base • Three label sheets • User's manual User's Manual Happy Paws PlaylandTM © 2016 VTech All rights reserved Printed in China 91-003249-000 US 5 INCLUDED IN THIS PACKAGE

User Manual
Page 7
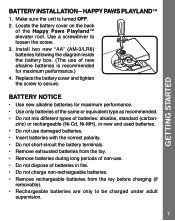
... use of new alkaline batteries is turned OFF. 2. Pull out and discard the packaging lock. CAT 1. GETTING STARTED GETTING STARTED BATTERY INSTALLATION - Locate the battery cover on the bottom of this user's manual as tape, plastic sheets, packaging locks and tags are not part of the cat. Use a coin or a screwdriver to secure. 6 Replace the battery cover and tighten the screw to loosen the screw. 3. Make sure the unit is...
... use of new alkaline batteries is turned OFF. 2. Pull out and discard the packaging lock. CAT 1. GETTING STARTED GETTING STARTED BATTERY INSTALLATION - Locate the battery cover on the bottom of this user's manual as tape, plastic sheets, packaging locks and tags are not part of the cat. Use a coin or a screwdriver to secure. 6 Replace the battery cover and tighten the screw to loosen the screw. 3. Make sure the unit is...
User Manual
Page 8
.... 7 Happy Paws Playland™ 1. Install two new "AA" (AM-3/LR6) batteries following the diagram inside the battery box. (The use . • Do not dispose of batteries: alkaline, standard (carbon- Locate the battery cover on the back of new alkaline batteries is turned OFF. 2. BATTERY NOTICE • Use new alkaline batteries for maximum performance.) 4. Make sure the unit is recommended for maximum performance. • Use only batteries of the same or equivalent type as...
.... 7 Happy Paws Playland™ 1. Install two new "AA" (AM-3/LR6) batteries following the diagram inside the battery box. (The use . • Do not dispose of batteries: alkaline, standard (carbon- Locate the battery cover on the back of new alkaline batteries is turned OFF. 2. BATTERY NOTICE • Use new alkaline batteries for maximum performance.) 4. Make sure the unit is recommended for maximum performance. • Use only batteries of the same or equivalent type as...
User Manual
Page 9
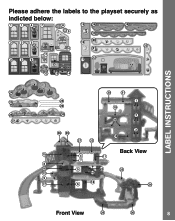
Please adhere the labels to the playset securely as indicted below: LABEL INSTRUCTIONS Back View Front View 8
Please adhere the labels to the playset securely as indicted below: LABEL INSTRUCTIONS Back View Front View 8
User Manual
Page 10
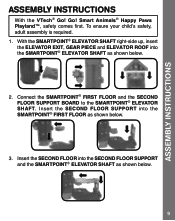
... the SMARTPOINT® ELEVATOR SHAFT. Insert the SECOND FLOOR into the SECOND FLOOR SUPPORT and the SMARTPOINT® ELEVATOR SHAFT as shown below. 3. ASSEMBLY INSTRUCTIONS ASSEMBLY INSTRUCTIONS With the VTech® Go! Smart Animals® Happy Paws Playland™, safety comes first. Insert the SECOND FLOOR SUPPORT into the SMARTPOINT® ELEVATOR SHAFT as shown below . 9 With the SMARTPOINT® ELEVATOR SHAFT right-side...
... the SMARTPOINT® ELEVATOR SHAFT. Insert the SECOND FLOOR into the SECOND FLOOR SUPPORT and the SMARTPOINT® ELEVATOR SHAFT as shown below. 3. ASSEMBLY INSTRUCTIONS ASSEMBLY INSTRUCTIONS With the VTech® Go! Smart Animals® Happy Paws Playland™, safety comes first. Insert the SECOND FLOOR SUPPORT into the SMARTPOINT® ELEVATOR SHAFT as shown below . 9 With the SMARTPOINT® ELEVATOR SHAFT right-side...
User Manual
Page 11
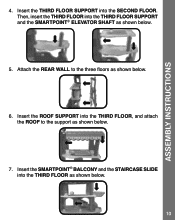
Insert the SMARTPOINT® BALCONY and the STAIRCASE SLIDE into the THIRD FLOOR, and attach the ROOF to the three floors as shown below . 6. ASSEMBLY INSTRUCTIONS 4. Attach the REAR WALL to the support as shown below . 7. Insert the ROOF SUPPORT into the THIRD FLOOR as shown below . 10 Then, insert the THIRD FLOOR into the SECOND FLOOR. Insert the THIRD FLOOR SUPPORT into the THIRD FLOOR SUPPORT and the SMARTPOINT® ELEVATOR SHAFT as shown below . 5.
Insert the SMARTPOINT® BALCONY and the STAIRCASE SLIDE into the THIRD FLOOR, and attach the ROOF to the three floors as shown below . 6. ASSEMBLY INSTRUCTIONS 4. Attach the REAR WALL to the support as shown below . 7. Insert the ROOF SUPPORT into the THIRD FLOOR as shown below . 10 Then, insert the THIRD FLOOR into the SECOND FLOOR. Insert the THIRD FLOOR SUPPORT into the THIRD FLOOR SUPPORT and the SMARTPOINT® ELEVATOR SHAFT as shown below . 5.

User Manual
Page 12
... RAMP TRACK as shown below . 11 Insert the CAT TREE SUPPORT into the TRAP DOOR RAMP TRACK, and connect the ramp track to the STAIR CASE SLIDE. ASSEMBLY INSTRUCTIONS 8. Insert the CAT TREE SLOT into the SMARTPOINT® ELEVATOR SHAFT. Insert the RAMP TRACK SUPPORT into the CAT TREE SLOT and the SMARTPOINT® CAT...
... RAMP TRACK as shown below . 11 Insert the CAT TREE SUPPORT into the TRAP DOOR RAMP TRACK, and connect the ramp track to the STAIR CASE SLIDE. ASSEMBLY INSTRUCTIONS 8. Insert the CAT TREE SLOT into the SMARTPOINT® ELEVATOR SHAFT. Insert the RAMP TRACK SUPPORT into the CAT TREE SLOT and the SMARTPOINT® CAT...
User Manual
Page 13
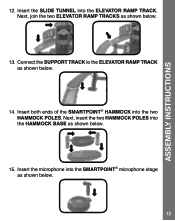
Connect the SUPPORT TRACK to the ELEVATOR RAMP TRACK as shown below . 13. Next, insert the two HAMMOCK POLES into the SmartPoint® microphone stage as shown below . 15. Next, join the two ELEVATOR RAMP TRACKS as shown below . 14. ASSEMBLY INSTRUCTIONS 12. Insert both ends of the SMARTPOINT® HAMMOCK into the ELEVATOR RAMP TRACK. Insert the microphone into the HAMMOCK BASE as shown below . 12 Insert the SLIDE TUNNEL into the two HAMMOCK POLES.
Connect the SUPPORT TRACK to the ELEVATOR RAMP TRACK as shown below . 13. Next, insert the two HAMMOCK POLES into the SmartPoint® microphone stage as shown below . 15. Next, join the two ELEVATOR RAMP TRACKS as shown below . 14. ASSEMBLY INSTRUCTIONS 12. Insert both ends of the SMARTPOINT® HAMMOCK into the ELEVATOR RAMP TRACK. Insert the microphone into the HAMMOCK BASE as shown below . 12 Insert the SLIDE TUNNEL into the two HAMMOCK POLES.

User Manual
Page 14
Go! ASSEMBLY INSTRUCTIONS 16. Insert both sides of the welcome board into the tree, and then insert the tree into the TRAP DOOR RAMP TRACK as shown below. EXPAND & EXPLORE Connect to play! Once you've completed the above steps, you can connect this playset to expand the Happy Paws Playland™ and inspire creativity. 13 Smart Animals® and Go! Go! Go! Go! Smart Wheels® tracks (each sold...
Go! ASSEMBLY INSTRUCTIONS 16. Insert both sides of the welcome board into the tree, and then insert the tree into the TRAP DOOR RAMP TRACK as shown below. EXPAND & EXPLORE Connect to play! Once you've completed the above steps, you can connect this playset to expand the Happy Paws Playland™ and inspire creativity. 13 Smart Animals® and Go! Go! Go! Go! Smart Wheels® tracks (each sold...

User Manual
Page 15
.../OFF SWITCH to the ON ( ) position to proceed with the sounds. 14 You will flash with normal play. Go! If the unit powers down after approximately 45 seconds without input. The light will automatically power down while playing, we suggest changing the batteries. CAT PRODUCT FEATURES - CAT 1. PRODUCT FEATURES - ACTIVITIES - Smart Animals® Happy Paws PlaylandTM will flash with the VTech® Go! CAT 1. To turn the unit ON. The unit can be turned...
.../OFF SWITCH to the ON ( ) position to proceed with the sounds. 14 You will flash with normal play. Go! If the unit powers down after approximately 45 seconds without input. The light will automatically power down while playing, we suggest changing the batteries. CAT PRODUCT FEATURES - CAT 1. PRODUCT FEATURES - ACTIVITIES - Smart Animals® Happy Paws PlaylandTM will flash with the VTech® Go! CAT 1. To turn the unit ON. The unit can be turned...

User Manual
Page 16
... even interacts with the included SmartPoint® cat or other Go! Go! HAPPY PAWS PLAYLAND™ 1. While the melody is playing, push the animal again to hear the cat play sounds, short tunes and sing-along songs. Simply roll or put the cat on top of the playset's SmartPoint® locations to add fun sounds on one of the melody. ON/OFF/VOLUME CONTROL SWITCH To turn the unit OFF...
... even interacts with the included SmartPoint® cat or other Go! Go! HAPPY PAWS PLAYLAND™ 1. While the melody is playing, push the animal again to hear the cat play sounds, short tunes and sing-along songs. Simply roll or put the cat on top of the playset's SmartPoint® locations to add fun sounds on one of the melody. ON/OFF/VOLUME CONTROL SWITCH To turn the unit OFF...
User Manual
Page 17
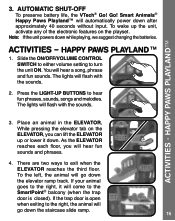
... turn the unit ON. HAPPY PAWS PLAYLAND™ 1. Press the LIGHT-UP BUTTONS to exit when the ELEVATOR reaches the third floor. There are two ways to hear fun phrases, sounds, songs and melodies. If the trap door is closed). The lights will go down the elevator ramp track. To the left, the animal will flash with the sounds. 3. AUTOMATIC SHUT-OFF To preserve battery life, the VTech...
... turn the unit ON. HAPPY PAWS PLAYLAND™ 1. Press the LIGHT-UP BUTTONS to exit when the ELEVATOR reaches the third floor. There are two ways to hear fun phrases, sounds, songs and melodies. If the trap door is closed). The lights will go down the elevator ramp track. To the left, the animal will flash with the sounds. 3. AUTOMATIC SHUT-OFF To preserve battery life, the VTech...

User Manual
Page 18
... located under the Customer Support link with a new set of our products. A service representative will be ready to ensure the accuracy of the information, which forms the value of batteries. Please turn the unit OFF. 2. However, errors sometimes can occur. Remove the batteries when the unit is accompanied by going to call our Consumer Services Department at 1-800-521-2010 in use for you . 17...
... located under the Customer Support link with a new set of our products. A service representative will be ready to ensure the accuracy of the information, which forms the value of batteries. Please turn the unit OFF. 2. However, errors sometimes can occur. Remove the batteries when the unit is accompanied by going to call our Consumer Services Department at 1-800-521-2010 in use for you . 17...

User Manual
Page 19
... Part 15 of the following measures: • Reorient or relocate the receiving antenna. • Increase the separation between the equipment and receiver. • Connect the equipment into an outlet on , the user is no guarantee that to which can radiate radio frequency energy and, if not installed and used in accordance with the limits for help...
... Part 15 of the following measures: • Reorient or relocate the receiving antenna. • Increase the separation between the equipment and receiver. • Connect the equipment into an outlet on , the user is no guarantee that to which can radiate radio frequency energy and, if not installed and used in accordance with the limits for help...

