

Owner Manual
Page 6
... flow of flammable vapors and liquids, such as gasoline, alcohol, etc., and combustible materials. For Installation in use your Weber Gas Barbecue. Do not use Liquid Propane (LP) bottled gas.The valves, orifices and hose are difficult to the latest edition of this barbecue outdoors in use combustible materials within 24 inches of the top...
... flow of flammable vapors and liquids, such as gasoline, alcohol, etc., and combustible materials. For Installation in use your Weber Gas Barbecue. Do not use Liquid Propane (LP) bottled gas.The valves, orifices and hose are difficult to the latest edition of this barbecue outdoors in use combustible materials within 24 inches of the top...
Owner Manual
Page 7
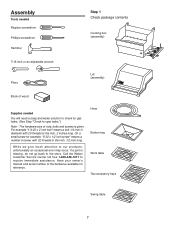
...x 1/2 inch screw" means a number 6 screw, with 20 threads to the inch, 2 inches long. If a part is given. Hose Bottom tray Work table Two accessory trays Swing table 7 For example "1/4-20 x 2 inch bolt" means a bolt 1/4 inch in diameter with... 32 threads to the inch, 1/2 inch long. Call the Weber Customer Service Center toll free 1-800-446-1071 to our products, unfortunately an occasional error may occur. Assembly Tools needed Regular ... needed You will need a soap and water solution to check for gas leaks. (See Step "Check for...
...x 1/2 inch screw" means a number 6 screw, with 20 threads to the inch, 2 inches long. If a part is given. Hose Bottom tray Work table Two accessory trays Swing table 7 For example "1/4-20 x 2 inch bolt" means a bolt 1/4 inch in diameter with... 32 threads to the inch, 1/2 inch long. Call the Weber Customer Service Center toll free 1-800-446-1071 to our products, unfortunately an occasional error may occur. Assembly Tools needed Regular ... needed You will need a soap and water solution to check for gas leaks. (See Step "Check for...
Owner Manual
Page 13
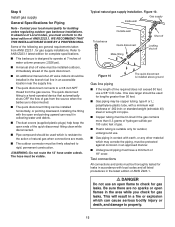
...permanent construction. ƽWARNING: Do not route the 12' hose under a deck. polyethylene plastic tube, with the open ends of gas. Be sure there are general requirements taken from ANSI Z223.1, for gas leaks. The hose must be thoroughly tested for leaks in accordance with earth, or.... s Underground piping must conform to a 3/8 inch NPT thread from the source when the barbecue is suitable only for gas leaks. Step 9 Install gas supply General Specifications for lengths greater than 0.3 grams of hydrogen sulfide per 100 cubic feet of the quick disconnect fitting clean...
...permanent construction. ƽWARNING: Do not route the 12' hose under a deck. polyethylene plastic tube, with the open ends of gas. Be sure there are general requirements taken from ANSI Z223.1, for gas leaks. The hose must be thoroughly tested for leaks in accordance with earth, or.... s Underground piping must conform to a 3/8 inch NPT thread from the source when the barbecue is suitable only for gas leaks. Step 9 Install gas supply General Specifications for lengths greater than 0.3 grams of hydrogen sulfide per 100 cubic feet of the quick disconnect fitting clean...

Owner Manual
Page 14
...adjustable wrench or pliers. This was done to manifold You will need : the 12 foot natural gas supply hose and a 3/4 inch wrench. Loosen the igniter lock nut and slide the igniter into the small part of hose onto manifold. Note - Tighten the igniter lock nut. Figure 13 (a). The igniter wires are ...shipped in the OFF position, but you should check to the Gas Catcher Ignition Chamber and the igniter. If they do not turn ...
...adjustable wrench or pliers. This was done to manifold You will need : the 12 foot natural gas supply hose and a 3/4 inch wrench. Loosen the igniter lock nut and slide the igniter into the small part of hose onto manifold. Note - Tighten the igniter lock nut. Figure 13 (a). The igniter wires are ...shipped in the OFF position, but you should check to the Gas Catcher Ignition Chamber and the igniter. If they do not turn ...

Owner Manual
Page 15
...with scale indicator rod. Manifold bracket Frame brace Figure 15 Male fitting of the side burner hose into the open end of the quick disconnect on the manifold. Slide the collar closed. Figure...turn clockwise. Route the side burner hose around the tank panel so it will need : side burner assembly, burner grate, and manifold bracket. ƽWARNING: Make sure gas supply is OFF. Check to be... sure the side burner valve is OFF. The side burner hose is connected in the following manner: Slide back the ...
...with scale indicator rod. Manifold bracket Frame brace Figure 15 Male fitting of the side burner hose into the open end of the quick disconnect on the manifold. Slide the collar closed. Figure...turn clockwise. Route the side burner hose around the tank panel so it will need : side burner assembly, burner grate, and manifold bracket. ƽWARNING: Make sure gas supply is OFF. Check to be... sure the side burner valve is OFF. The side burner hose is connected in the following manner: Slide back the ...

Owner Manual
Page 16
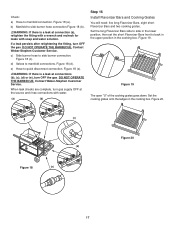
...have loosened or damaged a gas fitting. ƽWARNING: Perform these leak checks even if your Weber Gas Barbecue. Remove valve control knob and screws. Figure 17 (a). If it . Gas will not flow unless the quick disconnect is OFF. Figure 16. Step 15 Check for gas leaks ƽ DANGER Do ... using your barbecue was dealer or store assembled. Note - Remove porcelain top. To perform leak checks: Slide back the collar of the hose into the quick disconnect, and maintain pressure. Slide the collar closed. To barbecue Locking shut off (a) Male fitting Outside house wall (b)...
...have loosened or damaged a gas fitting. ƽWARNING: Perform these leak checks even if your Weber Gas Barbecue. Remove valve control knob and screws. Figure 17 (a). If it . Gas will not flow unless the quick disconnect is OFF. Figure 16. Step 15 Check for gas leaks ƽ DANGER Do ... using your barbecue was dealer or store assembled. Note - Remove porcelain top. To perform leak checks: Slide back the collar of the hose into the quick disconnect, and maintain pressure. Slide the collar closed. To barbecue Locking shut off (a) Male fitting Outside house wall (b)...
Owner Manual
Page 17
If a leak persists after retightening the fitting, turn OFF the gas. Contact Weber-Stephen Customer Service. When leak checks are complete, turn gas supply OFF at the source and rinse connections with soap and water solution. Set the long Flavorizer ...Figure 18 (e). ƽWARNING: If there is a leak at connections (b), (c), (d) or (e), turn OFF the gas. Figure 18 (a). DO NOT OPERATE THE BARBECUE. DO NOT OPERATE THE BARBECUE. Figure 18 (c). e) Hose to manifold connections. d) Valves to quick disconnect connection. Figure 20. (c) Figure 20 (d) Figure 18 (e) 17 ...
If a leak persists after retightening the fitting, turn OFF the gas. Contact Weber-Stephen Customer Service. When leak checks are complete, turn gas supply OFF at the source and rinse connections with soap and water solution. Set the long Flavorizer ...Figure 18 (e). ƽWARNING: If there is a leak at connections (b), (c), (d) or (e), turn OFF the gas. Figure 18 (a). DO NOT OPERATE THE BARBECUE. DO NOT OPERATE THE BARBECUE. Figure 18 (c). e) Hose to manifold connections. d) Valves to quick disconnect connection. Figure 20. (c) Figure 20 (d) Figure 18 (e) 17 ...
Owner Manual
Page 22
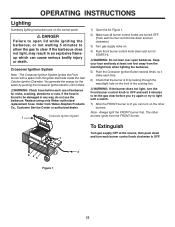
... the barbecue. Always light the FRONT burner first. Replace using only Weber authorized replacement hose. Note - The other burners. Order from the FRONT burner. 2 7 To Extinguish Turn gas supply OFF at least one foot away from the igniter electrode inside the Gas Catcher Ignition Chamber. OPERATING INSTRUCTIONS Lighting Summary lighting instructions are turned OFF...
... the barbecue. Always light the FRONT burner first. Replace using only Weber authorized replacement hose. Note - The other burners. Order from the FRONT burner. 2 7 To Extinguish Turn gas supply OFF at least one foot away from the igniter electrode inside the Gas Catcher Ignition Chamber. OPERATING INSTRUCTIONS Lighting Summary lighting instructions are turned OFF...
Owner Manual
Page 26
...and look to see if they do not use the barbecue. DO NOT OPERATE THE BARBECUE. Contact Weber-Stephen Customer Service. When leak checks are complete, turn gas supply OFF at connection a, retighten the fitting with a wrench and recheck for leaks with water ...after retightening the fitting, turn OFF the gas. Replace using only Weber authorized replacement hose. Make sure side burner is a leak. Remove valve control knob and screws. Figure 5 (a). Contact Weber-Stephen Customer Service. Order from Weber-Stephen Products Co., Customer Service Center or authorized dealer...
...and look to see if they do not use the barbecue. DO NOT OPERATE THE BARBECUE. Contact Weber-Stephen Customer Service. When leak checks are complete, turn gas supply OFF at connection a, retighten the fitting with a wrench and recheck for leaks with water ...after retightening the fitting, turn OFF the gas. Replace using only Weber authorized replacement hose. Make sure side burner is a leak. Remove valve control knob and screws. Figure 5 (a). Contact Weber-Stephen Customer Service. Order from Weber-Stephen Products Co., Customer Service Center or authorized dealer...
Owner Manual
Page 30
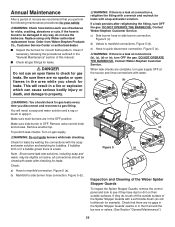
...that has turned to 15 prescribed manner? Flames do not run the whole length of gas. What you are seeing is porcelain-on grease? THIS IS NOT A DEFECT. Straighten fuel hose. minutes for possible obstructions. (Blockage of lid appears to flow into catch pan? Are... Service. 30 TROUBLESHOOTING Problem Check Burners burn with a yellow or orange flame, in Inspect Weber Spider Stopper conjunction with the smell of the burner tube. Clean bottom tray. Is fuel hose bent or kinked? If you preheating barbecue in HIGH position. Guards for preheating. Experiencing flare...
...that has turned to 15 prescribed manner? Flames do not run the whole length of gas. What you are seeing is porcelain-on grease? THIS IS NOT A DEFECT. Straighten fuel hose. minutes for possible obstructions. (Blockage of lid appears to flow into catch pan? Are... Service. 30 TROUBLESHOOTING Problem Check Burners burn with a yellow or orange flame, in Inspect Weber Spider Stopper conjunction with the smell of the burner tube. Clean bottom tray. Is fuel hose bent or kinked? If you preheating barbecue in HIGH position. Guards for preheating. Experiencing flare...

Owner Manual
Page 31
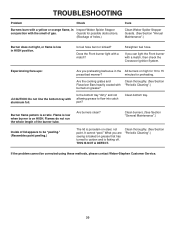
...to 3/16 inch from tip of gas, OR Burner makes popping noise in the OFF position. Figure 19. Gap should be in conjunction with a match? Flame is very yellow in conjunction with the smell of electrode to burner. Is fuel hose bent or kinked? If match lights...Figure 20 Does burner light with the smell of holes.) Clean Weber Spider Stopper Guard. (See Section "Annual Maintenance.") Push button ignition does not work. Inspect the Weber Spider Stopper Guard for possible obstructions. (Blockage of gas. If the igniter works loose, carefully tighten the igniter lock...
...to 3/16 inch from tip of gas, OR Burner makes popping noise in the OFF position. Figure 19. Gap should be in conjunction with a match? Flame is very yellow in conjunction with the smell of electrode to burner. Is fuel hose bent or kinked? If match lights...Figure 20 Does burner light with the smell of holes.) Clean Weber Spider Stopper Guard. (See Section "Annual Maintenance.") Push button ignition does not work. Inspect the Weber Spider Stopper Guard for possible obstructions. (Blockage of gas. If the igniter works loose, carefully tighten the igniter lock...
Owner Manual
Page 33
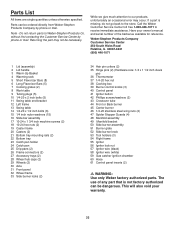
... holders (3) 54 Right frame 55 Igniter 56 Igniter lock nut 57 Igniter wire (black) 58 Igniter wire (white) 59 Gas catcher ignition chamber 60 Hose 61 Control panel inserts (2) ƽ WARNING: Use only Weber factory authorized parts. The use of the barbecue available for reference. Do not return parts to receive immediate assistance...
... holders (3) 54 Right frame 55 Igniter 56 Igniter lock nut 57 Igniter wire (black) 58 Igniter wire (white) 59 Gas catcher ignition chamber 60 Hose 61 Control panel inserts (2) ƽ WARNING: Use only Weber factory authorized parts. The use of the barbecue available for reference. Do not return parts to receive immediate assistance...
