
Owner Manual
Page 1
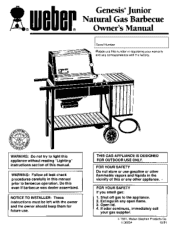
... withoutreading "Lighting" instructionssectionof this or any corresporalenceyeah 'Ye lacZory WARNING: Do not try to barbecue operation.Do tills even If barbecue was dealer assembled. FOR YOURSAFETY Do not storeor use . Shut off gas lo the appliance. 2. II 36834 If odor continues,immediatelycall your rranly and any other flammablevaporsand IlqUIdS In the vicinity of this manual. ®Weber Genesis'Junior Natural Gas Barbecue Owner's Manual Sepal...
... withoutreading "Lighting" instructionssectionof this or any corresporalenceyeah 'Ye lacZory WARNING: Do not try to barbecue operation.Do tills even If barbecue was dealer assembled. FOR YOURSAFETY Do not storeor use . Shut off gas lo the appliance. 2. II 36834 If odor continues,immediatelycall your rranly and any other flammablevaporsand IlqUIdS In the vicinity of this manual. ®Weber Genesis'Junior Natural Gas Barbecue Owner's Manual Sepal...
Owner Manual
Page 3
... should exercise reasonable care when operating your Weber Genesis Gas Barbecue. ■ Never lean over open grill or place hands or fingers on the front edge of the cooking box. ■ Should a grease fire occur, turn all burners and leave lid closed until fire is out. ■ Do not enlarge valve orifices or burner ports when cleaning the valves or burners. ■ The Weber Genesis Gas Barbecue should be...
... should exercise reasonable care when operating your Weber Genesis Gas Barbecue. ■ Never lean over open grill or place hands or fingers on the front edge of the cooking box. ■ Should a grease fire occur, turn all burners and leave lid closed until fire is out. ■ Do not enlarge valve orifices or burner ports when cleaning the valves or burners. ■ The Weber Genesis Gas Barbecue should be...
Owner Manual
Page 4
... equipment; Weber may not apply to you. WARRANTY Weber-Stephen Products Co. (Weber) hereby warrants to the ORIGINAL RETAIL PURCHASER of this Weber Gas Barbecue that is claimed to be defective and covered by insects within the burner tubes, as set out in this owner's manual. and ...instructions accompanying it then for ten (10) years from the date of purchase all other parts shall be free from the date of purchase, the cooking grates, Flavorizer bars and tank shall be limited to the repair or replacement of parts which prove defective under normal use , removal, return, or replacement...
... equipment; Weber may not apply to you. WARRANTY Weber-Stephen Products Co. (Weber) hereby warrants to the ORIGINAL RETAIL PURCHASER of this Weber Gas Barbecue that is claimed to be defective and covered by insects within the burner tubes, as set out in this owner's manual. and ...instructions accompanying it then for ten (10) years from the date of purchase all other parts shall be free from the date of purchase, the cooking grates, Flavorizer bars and tank shall be limited to the repair or replacement of parts which prove defective under normal use , removal, return, or replacement...

Owner Manual
Page 6
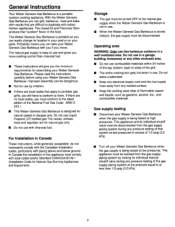
... gauge steel Flavorizer Bars distribute heat within the grill. f) Crossover Ignition System with Gas Catcher Ignition Chamber. Contents WARNINGS Warranty & Patents General Instructions Assembly Operating Instructions Lighting Cooking Storage Cleaning Troubleshooting & Maintenance Annual Maintenance General Maintenance Parts Listing Troubleshooting 3 4-5 7 8-21 22-23 24 24 24 25 26-27 29 30 FEATURES: a) Convenient tables and racks. e) Seperate burners for precision cooking measures grill temperature, and can be removed and...
... gauge steel Flavorizer Bars distribute heat within the grill. f) Crossover Ignition System with Gas Catcher Ignition Chamber. Contents WARNINGS Warranty & Patents General Instructions Assembly Operating Instructions Lighting Cooking Storage Cleaning Troubleshooting & Maintenance Annual Maintenance General Maintenance Parts Listing Troubleshooting 3 4-5 7 8-21 22-23 24 24 24 25 26-27 29 30 FEATURES: a) Convenient tables and racks. e) Seperate burners for precision cooking measures grill temperature, and can be removed and...
Owner Manual
Page 7
... for assembling your Weber Genesis Gas Barbecue. The closed lid and Flavorizer Bars produce that apply to use Liquid Propane (LP) bottled gas.The valves, orifices, hose and regulator are local codes that "outdoor" flavor in Canada These instructions, while generally acceptable, do not necessarily comply with the Canadian Installation codes, particularly with charcoal fuel. For Installation in the food. Do not use in use. ■ When the Weber Genesis Gas Barbecue is a portable outdoor...
... for assembling your Weber Genesis Gas Barbecue. The closed lid and Flavorizer Bars produce that apply to use Liquid Propane (LP) bottled gas.The valves, orifices, hose and regulator are local codes that "outdoor" flavor in Canada These instructions, while generally acceptable, do not necessarily comply with the Canadian Installation codes, particularly with charcoal fuel. For Installation in the food. Do not use in use. ■ When the Weber Genesis Gas Barbecue is a portable outdoor...

Owner Manual
Page 8
... will be found in a large box (shipper) which includes cartons marked B & C. Assembly • Tools needed You will need a soap and water solution to check for gas leaks, (See Step "Check for gas leaks"). Hose [871102] Bottom tray [11967011] Two accessory trays [1173165] Swing table [1177150] Control panel [7010] 8 Packages Your Weber Genesis Gas Barbecue comes in the large box (shipper). The part number is given.
... will be found in a large box (shipper) which includes cartons marked B & C. Assembly • Tools needed You will need a soap and water solution to check for gas leaks, (See Step "Check for gas leaks"). Hose [871102] Bottom tray [11967011] Two accessory trays [1173165] Swing table [1177150] Control panel [7010] 8 Packages Your Weber Genesis Gas Barbecue comes in the large box (shipper). The part number is given.
Owner Manual
Page 13
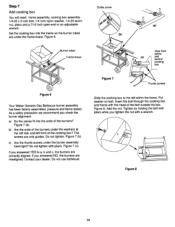
... the cooking box? If you check the burner alignment: a) Do the valves fit into the frame so the burner tubes (b) are only guides. Figure 7 (b). Do not use barbecue. Figure 8. Step 7 Add cooking box Guide screw You will need: frame assembly, cooking box assembly, 1/4-20 x 2 inch bolt, 1/4 inch nylon washer, 1/4-20 acorn nut, pliers and a 7/16 inch open-end or an adjustable wrench. (a) Set the cooking box into the...
... the cooking box? If you check the burner alignment: a) Do the valves fit into the frame so the burner tubes (b) are only guides. Figure 7 (b). Do not use barbecue. Figure 8. Step 7 Add cooking box Guide screw You will need: frame assembly, cooking box assembly, 1/4-20 x 2 inch bolt, 1/4 inch nylon washer, 1/4-20 acorn nut, pliers and a 7/16 inch open-end or an adjustable wrench. (a) Set the cooking box into the...

Owner Manual
Page 14
... Z223.1, for building codes regulating outdoor gas barbecue installations. Some of ANSIZ223.1. Place your localmunicipality for gas supply installations. Inabsence ofLocal Codes, you must be installed horizontally, or pointing downward. Caution: If young children are general requirements taken from behind the cooking box Figure 9 Step 9 Install gas supply You will need : 7/8 inch open ends of the manifold. General Specifications for complete specifications. ■ This barbecue is designed to...
... Z223.1, for building codes regulating outdoor gas barbecue installations. Some of ANSIZ223.1. Place your localmunicipality for gas supply installations. Inabsence ofLocal Codes, you must be installed horizontally, or pointing downward. Caution: If young children are general requirements taken from behind the cooking box Figure 9 Step 9 Install gas supply You will need : 7/8 inch open ends of the manifold. General Specifications for complete specifications. ■ This barbecue is designed to...

Owner Manual
Page 15
... 18" cover. Figure 10. or standard weight (schedule 40) steel or wrought iron pipe. ■ Copper tubing must be tin-lined if the gas contains more than 50 feet. ■ Gas piping may corrode the piping, must have a minimum of .062 inch; Typical natural gas supply installation. Gas line piping ■ If the length of line required does not exceed 50 feet, use . ■ Gas piping...
... 18" cover. Figure 10. or standard weight (schedule 40) steel or wrought iron pipe. ■ Copper tubing must be tin-lined if the gas contains more than 50 feet. ■ Gas piping may corrode the piping, must have a minimum of .062 inch; Typical natural gas supply installation. Gas line piping ■ If the length of line required does not exceed 50 feet, use . ■ Gas piping...

Owner Manual
Page 16
... : front/igniter panel and a 7/16 inch openend or an adjustable wrench. Figure 12 (c). Figure 11 (a). Slide front panel over the narrowed part of barbecue, remove the top right front 1/4-20 x 1/2 inch bolt joining the right frame and wheel frame. Facing front of the burner, Figure 12 (b). Figure 12 (a). Step 10 Connect flexible hose to Weber Genesis Grill and to Natural Gas Supply You...
... : front/igniter panel and a 7/16 inch openend or an adjustable wrench. Figure 12 (c). Figure 11 (a). Slide front panel over the narrowed part of barbecue, remove the top right front 1/4-20 x 1/2 inch bolt joining the right frame and wheel frame. Facing front of the burner, Figure 12 (b). Figure 12 (a). Step 10 Connect flexible hose to Weber Genesis Grill and to Natural Gas Supply You...

Owner Manual
Page 18
... sure. The burnershave been flame tested.As a safetyprecautionyoushould re-checkall fittings forleaks before usingyour Weber Genesis Gas Barbecue. WARNING: Perform these leak checks even though your dealer. You will result in the OFF position. Figure 16 (a). DO NOT OPERATETHE BARBECUE.Contact your grill was dealer or store assembled. Allfactorymade connectionshavebeen thoroughlycheckedfor gasleaks. The valves are shipped in the OFF...
... sure. The burnershave been flame tested.As a safetyprecautionyoushould re-checkall fittings forleaks before usingyour Weber Genesis Gas Barbecue. WARNING: Perform these leak checks even though your dealer. You will result in the OFF position. Figure 16 (a). DO NOT OPERATETHE BARBECUE.Contact your grill was dealer or store assembled. Allfactorymade connectionshavebeen thoroughlycheckedfor gasleaks. The valves are shipped in the OFF...
Owner Manual
Page 21
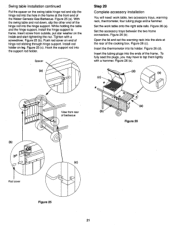
... front end of the Weber Genesis Gas Barbecue. Figure 25 (a). With the swing table and rod down, slip the other end of the hinge rod into its holder. Tighten with a hammer. Figure 26 (c). Figure 26 (d). Figure 25 (c). Set the work table, two accessory trays, warming rack, thermometer, four tubing plugs and a hammer. Set the accessory trays between the two frame...
... front end of the Weber Genesis Gas Barbecue. Figure 25 (a). With the swing table and rod down, slip the other end of the hinge rod into its holder. Tighten with a hammer. Figure 26 (c). Figure 26 (d). Figure 25 (c). Set the work table, two accessory trays, warming rack, thermometer, four tubing plugs and a hammer. Set the accessory trays between the two frame...
Owner Manual
Page 22
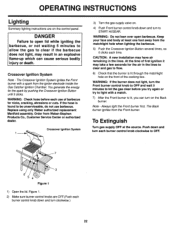
... you can cause serious bodily injury or death. If the hose is lit, you try again or try to open barbecue. Crossover Ignition System Note - Always light the Front burner first. OPERATING INSTRUCTIONS Lighting Summary lighting instructions are OFF.(Push each burner control knob down and turn clockwise.) 22 DANGER Failure to light with a spark from Weber-Stephen Products Co., Customer Service Center or authorized dealer.
... you can cause serious bodily injury or death. If the hose is lit, you try again or try to open barbecue. Crossover Ignition System Note - Always light the Front burner first. OPERATING INSTRUCTIONS Lighting Summary lighting instructions are OFF.(Push each burner control knob down and turn clockwise.) 22 DANGER Failure to light with a spark from Weber-Stephen Products Co., Customer Service Center or authorized dealer.

Owner Manual
Page 23
... lines. At the time of the cooking box. The Back burner ignites from the matchlight hole when lighting the barbecue. 5) Push Front burner control knob down and turn to START HI/SEAR. CAUTION: A new installation may take a few seconds for the air in the front of first ignition it may have air remaining in an explosive flame-up which can turn the Front burner control knob...
... lines. At the time of the cooking box. The Back burner ignites from the matchlight hole when lighting the barbecue. 5) Push Front burner control knob down and turn to START HI/SEAR. CAUTION: A new installation may take a few seconds for the air in the front of first ignition it may have air remaining in an explosive flame-up which can turn the Front burner control knob...
Owner Manual
Page 24
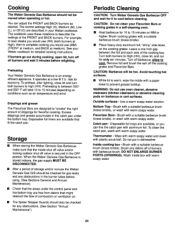
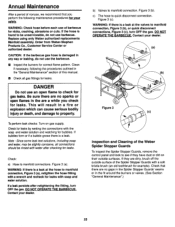
... the settings of storage and/or nonuse the Weber Genesis Gas Grill should not be moved when operating or hot. Catch pan - See your Weber cookbook. Flavorizer Bars - DO NOT ENLARGE BURNER PORTS (OPENINGS). Excess drippings and grease accumulate in the catch pan under the control panel and the•bottom tray are available that the inside shut off valve and/or locking outdoor shut...
... the settings of storage and/or nonuse the Weber Genesis Gas Grill should not be moved when operating or hot. Catch pan - See your Weber cookbook. Flavorizer Bars - DO NOT ENLARGE BURNER PORTS (OPENINGS). Excess drippings and grease accumulate in the catch pan under the control panel and the•bottom tray are available that the inside shut off valve and/or locking outdoor shut...
Owner Manual
Page 25
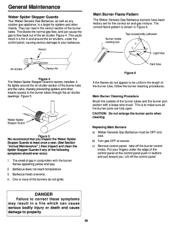
... DO NOT OPERATE THE BARBECUE. Check that you check for leaks. WARNING: Check hose before each use barbecue. CAUTION: If the barbecue gas hose is a leak at the valves to be unserviceable, do not use an open flames in the fit around the burners or valves. (See...gas leaks. Contact your dealer. (a) Figure 3 (b) r b- (c) Inspection and Cleaning of the Weber Spider Stopper Guards To inspect the Spider Stopper Guards, remove the control panel and look to manifold connections. Order from Weber-Stephen Products Co., Customer Service Center or authorized dealer. Check: a) Hose...
... DO NOT OPERATE THE BARBECUE. Check that you check for leaks. WARNING: Check hose before each use barbecue. CAUTION: If the barbecue gas hose is a leak at the valves to be unserviceable, do not use an open flames in the fit around the burners or valves. (See...gas leaks. Contact your dealer. (a) Figure 3 (b) r b- (c) Inspection and Cleaning of the Weber Spider Stopper Guards To inspect the Spider Stopper Guards, remove the control panel and look to manifold connections. Order from Weber-Stephen Products Co., Customer Service Center or authorized dealer. Check: a) Hose...
Owner Manual
Page 26
... control panel, causing serious damage to flow back out of the burners do not appear to make sure all the burner ports are fully open. One or more of the air shutter. Burner inside cooking box Tips occasionallyyellowish 0 0 0 Light blue Figure 6 Dark blue If the flames do not ignite. CAUTION: Do not enlarge the burner ports when cleaning. Replacing Main Burners a) Weber Genesis Gas Barbecue...
... control panel, causing serious damage to flow back out of the burners do not appear to make sure all the burner ports are fully open. One or more of the air shutter. Burner inside cooking box Tips occasionallyyellowish 0 0 0 Light blue Figure 6 Dark blue If the flames do not ignite. CAUTION: Do not enlarge the burner ports when cleaning. Replacing Main Burners a) Weber Genesis Gas Barbecue...
Owner Manual
Page 27
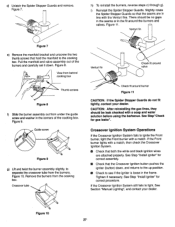
... the manifold and valve assembly out of the cooking box. Guide screw Figure 9 g) Lift and twist the burner assembly slightly, to light, See Section "Manual Lighting", and contact your dealer. Tighten if necessary; If the Crossover Ignition System still fails to separate the crossover tube from under the guide screw and washer in the frame. Figure 11. Crossover Ignition System Operations If the Crossover Ignition System...
... the manifold and valve assembly out of the cooking box. Guide screw Figure 9 g) Lift and twist the burner assembly slightly, to light, See Section "Manual Lighting", and contact your dealer. Tighten if necessary; If the Crossover Ignition System still fails to separate the crossover tube from under the guide screw and washer in the frame. Figure 11. Crossover Ignition System Operations If the Crossover Ignition System...
Owner Manual
Page 29
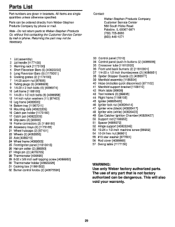
.... 29 Note - Parts List Part numbers are given in buttons (2) [4086936] 35 Crossover tube [11810005] 36 Front and back burners (2) [11810001] 37 1/4-20 x 1/2 inch thumbscrews(2) [4086951] 38 SpiderStopper Guards(2) [4086977] 39 Manifold assembly [1186504] 40 Hose (includes quick disconnect) [871102] 41 Manifold support bracket [1188110] 42 Work table [99839] 43 Tool holders (3) [99835] 44 Right frame [1188105] 45 Igniter [48826420] 46 Igniter lock nut [40826414...
.... 29 Note - Parts List Part numbers are given in buttons (2) [4086936] 35 Crossover tube [11810005] 36 Front and back burners (2) [11810001] 37 1/4-20 x 1/2 inch thumbscrews(2) [4086951] 38 SpiderStopper Guards(2) [4086977] 39 Manifold assembly [1186504] 40 Hose (includes quick disconnect) [871102] 41 Manifold support bracket [1188110] 42 Work table [99839] 43 Tool holders (3) [99835] 44 Right frame [1188105] 45 Igniter [48826420] 46 Igniter lock nut [40826414...
Owner Manual
Page 30
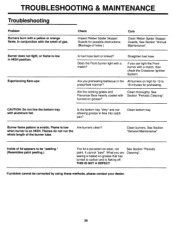
... using these methods,please contact your dealer. 30 If you can light the Front burner with aluminum foil. Clean bottom tray. Burner flame pattern is low in the All burners on grease that has turned to flow into catch pan? Clean burners, See Section "General Maintenance". Inside of gas. It cannot "peel". What you preheating barbecue in HIGH position. Are the cooking grates...
... using these methods,please contact your dealer. 30 If you can light the Front burner with aluminum foil. Clean bottom tray. Burner flame pattern is low in the All burners on grease that has turned to flow into catch pan? Clean burners, See Section "General Maintenance". Inside of gas. It cannot "peel". What you preheating barbecue in HIGH position. Are the cooking grates...


