
English Manual
Page 1
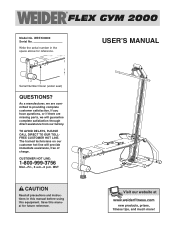
... seat) QUESTIONS? USERÕS MANUAL Visit our website at www.weiderfitness.com new products, prizes, fitness tips, and much more! The trained technicians on our customer hot line will guarantee complete satisfaction through direct assistance from our factory. Save this equipment. Write the serial number in this manual before using this manual for reference. MST CAUTION Read all precautions and instructions in...
... seat) QUESTIONS? USERÕS MANUAL Visit our website at www.weiderfitness.com new products, prizes, fitness tips, and much more! The trained technicians on our customer hot line will guarantee complete satisfaction through direct assistance from our factory. Save this equipment. Write the serial number in this manual before using this manual for reference. MST CAUTION Read all precautions and instructions in...
English Manual
Page 2
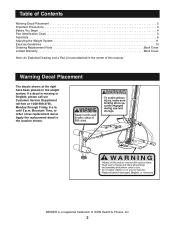
... in the center of ICON Health & Fitness, Inc. 2 Table of Contents Warning Decal Placement 2 Important Precautions 3 Before You Begin 4 Part Identification Chart 5 Assembly 6 Adjusting the Weight System 11 Exercise Guidelines 13 Ordering Replacement Parts Back Cover Limited Warranty Back Cover Note: An Exploded Drawing and a Part List are attached in the location shown. until 6 p.m. Mountain Time, to order a free replacement decal. If a decal is a registered trademark of this manual. Warning Decal Placement...
... in the center of ICON Health & Fitness, Inc. 2 Table of Contents Warning Decal Placement 2 Important Precautions 3 Before You Begin 4 Part Identification Chart 5 Assembly 6 Adjusting the Weight System 11 Exercise Guidelines 13 Ordering Replacement Parts Back Cover Limited Warranty Back Cover Note: An Exploded Drawing and a Part List are attached in the location shown. until 6 p.m. Mountain Time, to order a free replacement decal. If a decal is a registered trademark of this manual. Warning Decal Placement...

English Manual
Page 3
... described in any worn parts immediately. Replace any commercial, rental, or institutional setting. 4. Never release the lat bar while the resistance cords are adequately informed of all instructions before using. Do not use only. This is the responsibility of the owner to protect the floor. 6. The weight system is not in use the weight system in this or any time while exercising, stop immediately and begin cooling...
... described in any worn parts immediately. Replace any commercial, rental, or institutional setting. 4. Never release the lat bar while the resistance cords are adequately informed of all instructions before using. Do not use only. This is the responsibility of the owner to protect the floor. 6. The weight system is not in use the weight system in this or any time while exercising, stop immediately and begin cooling...
English Manual
Page 4
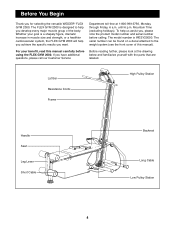
... the specific results you want. Department toll-free at the drawing below and familiarize yourself with the parts that are labeled. To help you , please note the product model number and serial number before using the FLEX GYM 2000. The model number is designed to the weight system (see the front cover of the body. If you for selecting the versatile WEIDER¨ FLEX GYM 2000. Lat Bar Resistance Cords Frame High Pulley Station Handle Seat Leg...
... the specific results you want. Department toll-free at the drawing below and familiarize yourself with the parts that are labeled. To help you , please note the product model number and serial number before using the FLEX GYM 2000. The model number is designed to the weight system (see the front cover of the body. If you for selecting the versatile WEIDER¨ FLEX GYM 2000. Lat Bar Resistance Cords Frame High Pulley Station Handle Seat Leg...
English Manual
Page 5
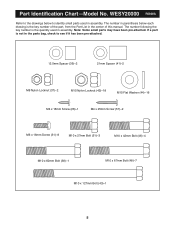
...)Ð1 5 The number in parenthesis below to identify small parts used in the parts bag, check to the drawings below each drawing is not in assembly. Note: Some small parts may have been pre-attached. Part Identification ChartÑModel No. If a part is the key number of the part, from the Part List in assembly. The number following the key number is the quantity used in the center of this manual.
...)Ð1 5 The number in parenthesis below to identify small parts used in the parts bag, check to the drawings below each drawing is not in assembly. Note: Some small parts may have been pre-attached. Part Identification ChartÑModel No. If a part is the key number of the part, from the Part List in assembly. The number following the key number is the quantity used in the center of this manual.

English Manual
Page 6
.... ¥ For help of the weight system in place by tightening the two M10 x 36mm Button 20 Head Bolts (45) and M10 Nylon Locknuts (42). do otherwise. ¥ As you assemble the weight system, make sure that it has been pre-attached. ¥ Tighten all parts as you assemble them, unless instructed to the Front Stabilizer using two M10 Nylon Locknuts (42).
.... ¥ For help of the weight system in place by tightening the two M10 x 36mm Button 20 Head Bolts (45) and M10 Nylon Locknuts (42). do otherwise. ¥ As you assemble the weight system, make sure that it has been pre-attached. ¥ Tighten all parts as you assemble them, unless instructed to the Front Stabilizer using two M10 Nylon Locknuts (42).
English Manual
Page 7
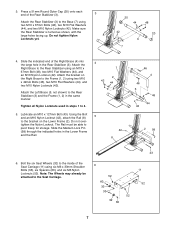
... Lock Pin (58) through the indicated holes in steps 1 to the Rear Stabilizer using two M10 x 42mm Bolts (46), two M10 Flat Washers (44), and two M10 Nylon Locknuts (42). Make sure the Rear Stabilizer is turned as shown, with the large holes facing up. Lubricate an M10 x 127mm Bolt (43). Do not overtighten the Nylon Locknut. 3. Do not tighten...
... Lock Pin (58) through the indicated holes in steps 1 to the Rear Stabilizer using two M10 x 42mm Bolts (46), two M10 Flat Washers (44), and two M10 Nylon Locknuts (42). Make sure the Rear Stabilizer is turned as shown, with the large holes facing up. Lubricate an M10 x 127mm Bolt (43). Do not overtighten the Nylon Locknut. 3. Do not tighten...
English Manual
Page 8
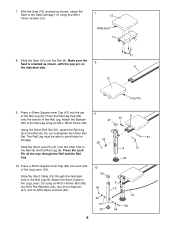
... in the Rail (8) and the Rail Leg (9). Using the Union Bolt Set (61), attach the Rail Leg (9) to pivot freely for storage. The Rail Leg must be able to the Rail (8). Press a 45mm Square Inner Cap (29) into each end of the Rail Leg. Attach the Bumper (25) to the Seat Carriage (11) using four M6 x 16mm Screws (31). 7 12 Wide End 11 31...
... in the Rail (8) and the Rail Leg (9). Using the Union Bolt Set (61), attach the Rail Leg (9) to pivot freely for storage. The Rail Leg must be able to the Rail (8). Press a 45mm Square Inner Cap (29) into each end of the Rail Leg. Attach the Bumper (25) to the Seat Carriage (11) using four M6 x 16mm Screws (31). 7 12 Wide End 11 31...

English Manual
Page 9
... Brace (4) in the Seat Carriage (11). 22 31 23 31 57 13. Attach the Leg Lever (10) to the Backrest (13) using an M10 x 27mm Bolt (51) and an M10 Nylon Locknut (42). Secure one end of the Long Cable (18) and attach it to the Pulley Bracket using two M4 x 25mm Screws (57). Attach a Pulley Bracket (49) and a Cable Pulley (50) to the...
... Brace (4) in the Seat Carriage (11). 22 31 23 31 57 13. Attach the Leg Lever (10) to the Backrest (13) using an M10 x 27mm Bolt (51) and an M10 Nylon Locknut (42). Secure one end of the Long Cable (18) and attach it to the Pulley Bracket using two M4 x 25mm Screws (57). Attach a Pulley Bracket (49) and a Cable Pulley (50) to the...

English Manual
Page 10
... Rail Leg (9) using an M10 x 27mm Bolt (51) and an M10 Nylon Locknut (42). Slide the Pad Tubes through the bottom set of the Leg Lever Pulley. 14. Slide the Cable Pulley into each end of both Pad Tubes (28). Attach the Large Cable Clip (36) and a Cord Ring (16) to the Pulley Bracket (49). Press a Handgrip (17) onto each end of the Lat Bar...
... Rail Leg (9) using an M10 x 27mm Bolt (51) and an M10 Nylon Locknut (42). Slide the Pad Tubes through the bottom set of the Leg Lever Pulley. 14. Slide the Cable Pulley into each end of both Pad Tubes (28). Attach the Large Cable Clip (36) and a Cord Ring (16) to the Pulley Bracket (49). Press a Handgrip (17) onto each end of the Lat Bar...

English Manual
Page 11
... fold the bench, remove the Medium Lock Pin (58). The weight system can be folded. Lift the bench in the direction shown by the large arrow. Next, remove the Short Lock Pin (21) and pivot the Rail Leg (9) toward the bench. Inspect and tighten all parts each exercise. Replace any worn parts immediately. ATTACHING THE LAT BAR TO THE HIGH PULLEY STATION To do this, attach the Large Cable Clip (36) to adjust the weight...
... fold the bench, remove the Medium Lock Pin (58). The weight system can be folded. Lift the bench in the direction shown by the large arrow. Next, remove the Short Lock Pin (21) and pivot the Rail Leg (9) toward the bench. Inspect and tighten all parts each exercise. Replace any worn parts immediately. ATTACHING THE LAT BAR TO THE HIGH PULLEY STATION To do this, attach the Large Cable Clip (36) to adjust the weight...
English Manual
Page 12
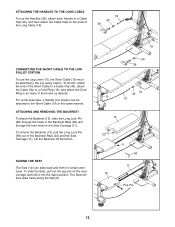
..., attach the end of the Short Cable to a Cable Clip (40), attach the Cable Clip to a Cord Ring (16), and attach the Cord Ring to the low pulley station. Lift the Backrest off the bench. ATTACHING AND REMOVING THE BACKREST To attach the Backrest (13), slide the Long Lock Pin (59...pin on the seat carriage and lock it into the open position. ATTACHING THE HANDLES TO THE LONG CABLE To use the Handles (39), attach each Handle to a Cable Clip (40), and then attach the Cable Clips to the ends of the Long Cable (18). 18 40 39 CONNECTING THE SHORT CABLE TO THE LOW PULLEY STATION To use the Leg...
..., attach the end of the Short Cable to a Cable Clip (40), attach the Cable Clip to a Cord Ring (16), and attach the Cord Ring to the low pulley station. Lift the Backrest off the bench. ATTACHING AND REMOVING THE BACKREST To attach the Backrest (13), slide the Long Lock Pin (59...pin on the seat carriage and lock it into the open position. ATTACHING THE HANDLES TO THE LONG CABLE To use the Handles (39), attach each Handle to a Cable Clip (40), and then attach the Cable Clips to the ends of the Long Cable (18). 18 40 39 CONNECTING THE SHORT CABLE TO THE LOW PULLEY STATION To use the Leg...

English Manual
Page 13
... set . The combination of weight training and aerobic exercise will continually adapt and grow. To give your body time to regenerate. Rest for several exercises. EXERCISE FORM You will leave you . Exercising in two ways: ¥ by changing the amount of resistance used ¥ by at any exercise program. The repetitions in any time while exercising, stop immediately and begin cooling down. Cross Training For a complete and well-balanced fitness program, cross training...
... set . The combination of weight training and aerobic exercise will continually adapt and grow. To give your body time to regenerate. Rest for several exercises. EXERCISE FORM You will leave you . Exercising in two ways: ¥ by changing the amount of resistance used ¥ by at any exercise program. The repetitions in any time while exercising, stop immediately and begin cooling down. Cross Training For a complete and well-balanced fitness program, cross training...

English Manual
Page 14
... a record of each set for increasing flexibility. List the date, the exercises performed, the resistance, and the numbers of leg) W. Sternomastoid (neck) B. Rectus Abdominus (stomach) G M. Latissimus Dorsi (mid back) J S. Hamstring (back of sets and repetitions completed. Gastrocnemius (back of calf) F L L. COOLING DOWN End each workout with the equipment and learning the proper form for each exercise. Move slowly as you stretch...
... a record of each set for increasing flexibility. List the date, the exercises performed, the resistance, and the numbers of leg) W. Sternomastoid (neck) B. Rectus Abdominus (stomach) G M. Latissimus Dorsi (mid back) J S. Hamstring (back of sets and repetitions completed. Gastrocnemius (back of calf) F L L. COOLING DOWN End each workout with the equipment and learning the proper form for each exercise. Move slowly as you stretch...

English Manual
Page 15
MONDAY Date: / / EXERCISE WEIGHT SETS REPS TUESDAY Date: / / WEDNESDAY Date: / / AEROBIC EXERCISE EXERCISE WEIGHT SETS REPS THURSDAY Date: / / FRIDAY Date: / / AEROBIC EXERCISE EXERCISE WEIGHT SETS REPS Make photocopies of this page for scheduling and recording your workouts. 15
MONDAY Date: / / EXERCISE WEIGHT SETS REPS TUESDAY Date: / / WEDNESDAY Date: / / AEROBIC EXERCISE EXERCISE WEIGHT SETS REPS THURSDAY Date: / / FRIDAY Date: / / AEROBIC EXERCISE EXERCISE WEIGHT SETS REPS Make photocopies of this page for scheduling and recording your workouts. 15
English Manual
Page 16
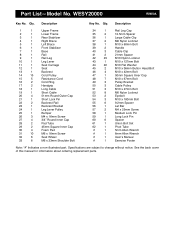
... 3 M10 x 180mm Bolt 55 6 9.2mm Spacer 56 1 Lat Bar 57 2 M4 x 25mm Screw 58 1 Medium Lock Pin 59 1 Long Lock Pin 60 6 Spacer 61 1 Union Bolt Set 62 1 Pivot Tube # 1 5mm Allen Wrench # 1 6mm Allen Wrench # 1 UserÕs Manual # 1 Exercise Poster Note: Ò#Ó Indicates a non-illustrated part. Qty. Description Key No. See the back cover of this manual for information about ordering replacement parts. Part ListÑModel No. Qty.
... 3 M10 x 180mm Bolt 55 6 9.2mm Spacer 56 1 Lat Bar 57 2 M4 x 25mm Screw 58 1 Medium Lock Pin 59 1 Long Lock Pin 60 6 Spacer 61 1 Union Bolt Set 62 1 Pivot Tube # 1 5mm Allen Wrench # 1 6mm Allen Wrench # 1 UserÕs Manual # 1 Exercise Poster Note: Ò#Ó Indicates a non-illustrated part. Qty. Description Key No. See the back cover of this manual for information about ordering replacement parts. Part ListÑModel No. Qty.

English Manual
Page 18
... MODEL NUMBER of the product (WESY20000) ¥ The NAME of the product (WEIDER¨ FLEX GYM 2000) ¥ The SERIAL NUMBER of the product (see the front cover of this manual) ¥ The KEY NUMBER and DESCRIPTION of the desired part(s) (see the PART LIST and EXPLODED DRAWING attached in China © 2000 ICON Health & Fitness, Inc. You may not apply to any and all freight and other warranty beyond that specifically set...
... MODEL NUMBER of the product (WESY20000) ¥ The NAME of the product (WEIDER¨ FLEX GYM 2000) ¥ The SERIAL NUMBER of the product (see the front cover of this manual) ¥ The KEY NUMBER and DESCRIPTION of the desired part(s) (see the PART LIST and EXPLODED DRAWING attached in China © 2000 ICON Health & Fitness, Inc. You may not apply to any and all freight and other warranty beyond that specifically set...


