

English Manual
Page 2
If a decal is missing or illegible, please call our Customer Service Department toll-free at 1800-999-3756, Monday through Friday, 6 a.m. WEIDER is a registered trademark of this product may result in the location shown. ! Remove the PART LIST/EXPLODED DRAWING before beginning assembly. until ...order a free replacement decal. WARNING • Misuse of this manual. Mountain Time, to use. • Do not allow children on the weight rack. WARNING DECAL PLACEMENT The decal shown here has been placed on or around machine. • Replace label if damaged, illegible, or removed.
If a decal is missing or illegible, please call our Customer Service Department toll-free at 1800-999-3756, Monday through Friday, 6 a.m. WEIDER is a registered trademark of this product may result in the location shown. ! Remove the PART LIST/EXPLODED DRAWING before beginning assembly. until ...order a free replacement decal. WARNING • Misuse of this manual. Mountain Time, to use. • Do not allow children on the weight rack. WARNING DECAL PLACEMENT The decal shown here has been placed on or around machine. • Replace label if damaged, illegible, or removed.

English Manual
Page 3
...important for foot protection while exercising. 9. Always make sure that the cables remain on the barbell or the weight carriage. 2. Do not place more than 150 pounds on the weight carriage. 14. If you to protect the floor. 12. Always move the bench out of all instructions ...before using . Always disconnect the lat bar from the weight rack when performing an exercise that all users of the weight rack are performing rack press exercises, squat exercises, or toe raise exercises, your physician. WARNING: Before beginning...
...important for foot protection while exercising. 9. Always make sure that the cables remain on the barbell or the weight carriage. 2. Do not place more than 150 pounds on the weight carriage. 14. If you to protect the floor. 12. Always move the bench out of all instructions ...before using . Always disconnect the lat bar from the weight rack when performing an exercise that all users of the weight rack are performing rack press exercises, squat exercises, or toe raise exercises, your physician. WARNING: Before beginning...

English Manual
Page 4
... serial number can be found on the drawings in muscle size and strength, or a healthier cardiovascular system, the WEIDER® PRO XT75 will help you for selecting the versatile WEIDER® PRO XT75 weight rack. For your goal is WEBE34111A. To help us assist you have additional questions, please call our Customer Service...
... serial number can be found on the drawings in muscle size and strength, or a healthier cardiovascular system, the WEIDER® PRO XT75 will help you for selecting the versatile WEIDER® PRO XT75 weight rack. For your goal is WEBE34111A. To help us assist you have additional questions, please call our Customer Service...

English Manual
Page 6
... Tighten all parts in a cleared area and remove the packing materials. Attach the Right and Left Bases (1, 3) to realize that the versatile weight rack has many parts and that the assembly process will be pre-assembled. Important: Some of the parts described in the assembly steps may be...socket set, a set of open-end or closed-end wrenches, or a set of the Weight Guide Base (4). 2 Attach the Foot Plate (5) and the Weight Guide Base (4) to do otherwise. • As you assemble the weight rack, make sure you assemble them, unless instructed to the Center Base (2), as you ...
... Tighten all parts in a cleared area and remove the packing materials. Attach the Right and Left Bases (1, 3) to realize that the versatile weight rack has many parts and that the assembly process will be pre-assembled. Important: Some of the parts described in the assembly steps may be...socket set, a set of open-end or closed-end wrenches, or a set of the Weight Guide Base (4). 2 Attach the Foot Plate (5) and the Weight Guide Base (4) to do otherwise. • As you assemble the weight rack, make sure you assemble them, unless instructed to the Center Base (2), as you ...

English Manual
Page 7
If they do not line up . Pull out the 5a Adjustment Knobs (22) and slide the Right Weight Spotter and the Right Weight Rest down . Secure the Right Weight Spotter (20) and the Right Weight Rest (19) to the right Uprights (7, 8) by tightening each of the Front Uprights (7) and two Joint ... the adjustment holes are facing the Rear Upright (8) and the number decals on the left Uprights (7, 8) in the Uprights. 20 Assemble the Left Weight Spotter (not shown) and Left Weight Rest (not shown) on the Front Uprights are at the same height. 7 21 22 21 22 21 8 7 3 29 8 7 31 3 6 31...
If they do not line up . Pull out the 5a Adjustment Knobs (22) and slide the Right Weight Spotter and the Right Weight Rest down . Secure the Right Weight Spotter (20) and the Right Weight Rest (19) to the right Uprights (7, 8) by tightening each of the Front Uprights (7) and two Joint ... the adjustment holes are facing the Rear Upright (8) and the number decals on the left Uprights (7, 8) in the Uprights. 20 Assemble the Left Weight Spotter (not shown) and Left Weight Rest (not shown) on the Front Uprights are at the same height. 7 21 22 21 22 21 8 7 3 29 8 7 31 3 6 31...

English Manual
Page 8
6. Press the two 51mm Round Inner Caps (46) into the Left Frame (12). Press the two Carriage Bushings (16) into the Weight Carriage (15), the Weight Bumpers (18), and the Weight Guide Base (4). Do not tighten the Nylon Locknuts yet. 33 13 31 6 7 31 7. Attach the Left Frame to the Front Uprights (7) using ...(35), four M8 Flat Washers (40), and two M8 Nylon Locknuts (32). 8 9 15 32 18 4 40 35 Tighten all Nylon Locknuts (31) used in the Weight Guide Base (4). Attach the lower Carriage Bushing using four M10 x 78mm Bolts (33) and four M10 Nylon Locknuts (31). Attach the...
6. Press the two 51mm Round Inner Caps (46) into the Left Frame (12). Press the two Carriage Bushings (16) into the Weight Carriage (15), the Weight Bumpers (18), and the Weight Guide Base (4). Do not tighten the Nylon Locknuts yet. 33 13 31 6 7 31 7. Attach the Left Frame to the Front Uprights (7) using ...(35), four M8 Flat Washers (40), and two M8 Nylon Locknuts (32). 8 9 15 32 18 4 40 35 Tighten all Nylon Locknuts (31) used in the Weight Guide Base (4). Attach the lower Carriage Bushing using four M10 x 78mm Bolts (33) and four M10 Nylon Locknuts (31). Attach the...
English Manual
Page 9
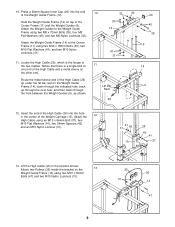
... High Cable (26) in the center of the two Cables. Attach two Pulleys (25) inside the bracket on the other end. Attach the Weight Guide Frame (14) to the Weight Guide Frame using two M10 x 78mm Bolts (33), two M10 Flat Washers (41), and two M10 Nylon Locknuts (31). 11. Press a 60mm... shown. Attach the 12 High Cable using two M10 x 50mm Bolts (47) and two M10 Nylon Locknuts (31). 9 25 31 26 14 47 Attach the Weight Guides to the Center Frame (11) using two M8 x 72mm Bolts (35), four M8 Flat Washers (40), and two M8 Nylon Locknuts (32). Notice that...
... High Cable (26) in the center of the two Cables. Attach two Pulleys (25) inside the bracket on the other end. Attach the Weight Guide Frame (14) to the Weight Guide Frame using two M10 x 78mm Bolts (33), two M10 Flat Washers (41), and two M10 Nylon Locknuts (31). 11. Press a 60mm... shown. Attach the 12 High Cable using two M10 x 50mm Bolts (47) and two M10 Nylon Locknuts (31). 9 25 31 26 14 47 Attach the Weight Guides to the Center Frame (11) using two M8 x 72mm Bolts (35), four M8 Flat Washers (40), and two M8 Nylon Locknuts (32). Notice that...

English Manual
Page 10
Attach a Pulley (25) inside the Weight Guide Frame (14) using an M10 x 75mm Bolt (36), two M10 Flat Washers (41), two 28mm Spacers (44), and an M10 Nylon Locknut (31). Hold a ... Pulleys (25) inside the bracket using an M10 x 45mm Bolt (34) and an M10 Nylon Locknut (31). Pull the High Cable (26) down in the Weight Guide Base (4). Lay the Low Cable (27) over a Pulley (25) as shown. 16 Attach a Cable Trap (24) and the two Pulley Plates (17) to the...
Attach a Pulley (25) inside the Weight Guide Frame (14) using an M10 x 75mm Bolt (36), two M10 Flat Washers (41), two 28mm Spacers (44), and an M10 Nylon Locknut (31). Hold a ... Pulleys (25) inside the bracket using an M10 x 45mm Bolt (34) and an M10 Nylon Locknut (31). Pull the High Cable (26) down in the Weight Guide Base (4). Lay the Low Cable (27) over a Pulley (25) as shown. 16 Attach a Cable Trap (24) and the two Pulley Plates (17) to the...

English Manual
Page 11
17. Make sure all remaining parts will be damaged if they are incorrectly routed. When weights are properly tightened. If the cables do not move smoothly over the pulleys. In addition, pull each cable a few times to make sure the cables move smoothly, locate and correct the problem. The use of all parts of the weight rack are used, the cables may be explained in ADJUSTMENTS, beginning on page 12. 11 Slide the Handgrips (30) onto the ends of soapy water. Wet the ends of the Lat Bar (38) with a small amount of the Lat Bar. 17 30 38 30 18.
17. Make sure all remaining parts will be damaged if they are incorrectly routed. When weights are properly tightened. If the cables do not move smoothly over the pulleys. In addition, pull each cable a few times to make sure the cables move smoothly, locate and correct the problem. The use of all parts of the weight rack are used, the cables may be explained in ADJUSTMENTS, beginning on page 12. 11 Slide the Handgrips (30) onto the ends of soapy water. Wet the ends of the Lat Bar (38) with a small amount of the Lat Bar. 17 30 38 30 18.

English Manual
Page 12
...) to sets of holes in the uprights that are best suited for important information about how to adjust the weight rack. Replace any worn parts immediately. Do not use the weight rack. Perform the exercise as shown in the picture). Note: Make sure the Adjustment Knobs (22) are performing... move the bench (not included) when you are fully tightened. 19 20 22 WARNING: Always set the Weight Rests (19, 48) and the Weight Spotters (20, 49) at a comfortable height for the Weight Rests should be cleaned with a damp cloth and a mild, non-abrasive detergent. Inspect and tighten all parts...
...) to sets of holes in the uprights that are best suited for important information about how to adjust the weight rack. Replace any worn parts immediately. Do not use the weight rack. Perform the exercise as shown in the picture). Note: Make sure the Adjustment Knobs (22) are performing... move the bench (not included) when you are fully tightened. 19 20 22 WARNING: Always set the Weight Rests (19, 48) and the Weight Spotters (20, 49) at a comfortable height for the Weight Rests should be cleaned with a damp cloth and a mild, non-abrasive detergent. Inspect and tighten all parts...

English Manual
Page 13
... using the Bolt and Nylon Locknut. Reattach the lower Pulley and Cable Trap to the High Cable (26) or the Low Cable (not shown) with Weight Clips (50). Remove the M10 x 45mm Bolt (34) and the M10 Nylon Locknut (31) attaching the lower Pulley (25) and Cable Trap (24) to the... two Pulley Plates (17). Always place the same amount of cable used on the Weight Carriage (see ATTACHING WEIGHTS TO THE WEIGHT CARRIAGE, above). If moving just the lower Pulley (25) does not sufficiently tighten the cables, you can stretch slightly after it is slack...
... using the Bolt and Nylon Locknut. Reattach the lower Pulley and Cable Trap to the High Cable (26) or the Low Cable (not shown) with Weight Clips (50). Remove the M10 x 45mm Bolt (34) and the M10 Nylon Locknut (31) attaching the lower Pulley (25) and Cable Trap (24) to the... two Pulley Plates (17). Always place the same amount of cable used on the Weight Carriage (see ATTACHING WEIGHTS TO THE WEIGHT CARRIAGE, above). If moving just the lower Pulley (25) does not sufficiently tighten the cables, you can stretch slightly after it is slack...

English Manual
Page 14
...difficulty, increase the amount of repetitions in each set " is an efficient way to develop most. Weight Loss To lose weight, use a low amount of weight and increase the number of weight. Cross Training Cross training is a series of repetitions.) The proper amount of rest. If you ...for more strenuous exercise by increasing circulation, raising your body temperature and delivering more sets rather than by using high amounts of weight. The exertion stage of each exercise you experience pain or dizziness at your own pace and be performed smoothly and without discomfort....
...difficulty, increase the amount of repetitions in each set " is an efficient way to develop most. Weight Loss To lose weight, use a low amount of weight and increase the number of weight. Cross Training Cross training is a series of repetitions.) The proper amount of rest. If you ...for more strenuous exercise by increasing circulation, raising your body temperature and delivering more sets rather than by using high amounts of weight. The exertion stage of each exercise you experience pain or dizziness at your own pace and be performed smoothly and without discomfort....

English Manual
Page 15
...proper form for each exercise. Move slowly as you stretch and do not bounce. List the date, the exercises performed, the weight used, and the numbers of arm) R. Hip Flexors (upper thigh) G. Rectus Abdominus (stomach) G M. Triceps (back ... (forearm) C F. Soleus (front of calf) N O P Q R S T U V W 15 Rhomboideus (upper back) P. Gastrocnemius (back of calf) F L L. Record your weight and key body measurements at the end of thigh) I Q. Obliques (waist) E. Abductor (outer thigh) D H. Tibialis Anterior (front of thigh) E J. Adductor (inner thigh) M N....
...proper form for each exercise. Move slowly as you stretch and do not bounce. List the date, the exercises performed, the weight used, and the numbers of arm) R. Hip Flexors (upper thigh) G. Rectus Abdominus (stomach) G M. Triceps (back ... (forearm) C F. Soleus (front of calf) N O P Q R S T U V W 15 Rhomboideus (upper back) P. Gastrocnemius (back of calf) F L L. Record your weight and key body measurements at the end of thigh) I Q. Obliques (waist) E. Abductor (outer thigh) D H. Tibialis Anterior (front of thigh) E J. Adductor (inner thigh) M N....

English Manual
Page 16
... be prepared to give the following information when calling: • The MODEL NUMBER of the product (WEBE34111A) • The NAME of the product (WEIDER® PRO XT75 weight rack) • The SERIAL NUMBER of the product (see the front cover of this manual) • The KEY NUMBER and DESCRIPTION of the desired...
... be prepared to give the following information when calling: • The MODEL NUMBER of the product (WEBE34111A) • The NAME of the product (WEIDER® PRO XT75 weight rack) • The SERIAL NUMBER of the product (see the front cover of this manual) • The KEY NUMBER and DESCRIPTION of the desired...

English Manual
Page 18
... M10 Flat Washer 24mm Spacer 51mm Spacer 28mm Spacer 18mm Spacer 51mm Round Inner Cap M10 x 50mm Bolt Left Weight Rest Left Weight Spotter Weight Clip Weight Clip Sleeve User's Manual Exercise Guide 7 Foot Barbell 2.5-lb. Weight 45-lb. PART LIST-Model No. Qty. 1 1 2 1 3 1 4 1 5 1 6 6 7 2 8 2 9 2 10 1 11 1 12 1 13 1 14 1 15 1 16 2 17 2 18 2 19 1 20...
... M10 Flat Washer 24mm Spacer 51mm Spacer 28mm Spacer 18mm Spacer 51mm Round Inner Cap M10 x 50mm Bolt Left Weight Rest Left Weight Spotter Weight Clip Weight Clip Sleeve User's Manual Exercise Guide 7 Foot Barbell 2.5-lb. Weight 45-lb. PART LIST-Model No. Qty. 1 1 2 1 3 1 4 1 5 1 6 6 7 2 8 2 9 2 10 1 11 1 12 1 13 1 14 1 15 1 16 2 17 2 18 2 19 1 20...


