

Instruction Manual
Page 1
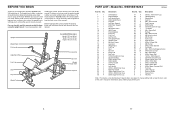
... questions, or if there are committed to give the following information: • the MODEL NUMBER of the product (WEEVBE1926.0) • the NAME of the product (WEIDER PRO 330 weight bench) • the SERIAL NUMBER of the product (see the front cover of this manual) • the KEY NUMBER and DESCRIPTION of the part(s) (see the...
... questions, or if there are committed to give the following information: • the MODEL NUMBER of the product (WEEVBE1926.0) • the NAME of the product (WEIDER PRO 330 weight bench) • the SERIAL NUMBER of the product (see the front cover of this manual) • the KEY NUMBER and DESCRIPTION of the part(s) (see the...
Instruction Manual
Page 3
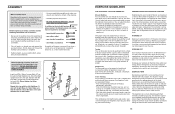
...Do not place more than 50 as described in any exercise program, consult your physi1cian. IC4O4 N assumes no responsibility for foo5t8protec- The weight bench that there is intended for home use of 35 or persons with an Olympic barbell. mount, and u2s7e5t8he43weigh3t8bench. 58 52 38 6.44lIyn.... WARNING: To reduce the risk of the barbell. 30 only. Use the weight bench only 32 on the weight bench b37efore using the weight bench. 1. Do not place more than 150 lbs. (68 kg) pounds the weight bench. lbs. (23 kg) pounds on each side of serious injury, read ...
...Do not place more than 50 as described in any exercise program, consult your physi1cian. IC4O4 N assumes no responsibility for foo5t8protec- The weight bench that there is intended for home use of 35 or persons with an Olympic barbell. mount, and u2s7e5t8he43weigh3t8bench. 58 52 38 6.44lIyn.... WARNING: To reduce the risk of the barbell. 30 only. Use the weight bench only 32 on the weight bench b37efore using the weight bench. 1. Do not place more than 150 lbs. (68 kg) pounds the weight bench. lbs. (23 kg) pounds on each side of serious injury, read ...
Instruction Manual
Page 4
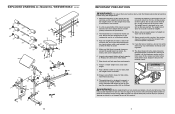
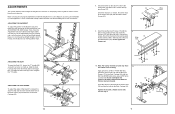
... weight bench offers a selection of weight stations designed to change without notice. If you for information about ordering replacement parts. 4 17 Before reading further, please review the drawing below and familiarize yourself with the parts that are subject to develop every major muscle group of the user's manual for selecting the versatile WEIDER PRO 330 weight bench. Specifications...
... weight bench offers a selection of weight stations designed to change without notice. If you for information about ordering replacement parts. 4 17 Before reading further, please review the drawing below and familiarize yourself with the parts that are subject to develop every major muscle group of the user's manual for selecting the versatile WEIDER PRO 330 weight bench. Specifications...
Instruction Manual
Page 6
...strength training workouts on Monday, Wednesday, and Friday. • Plan 20 to 30 minutes of aerobic exercise, such as you assemble the weight bench, make sure 1 you progressively increase the intensity of an individual exercise in two ways: • by pushing them close to their ...through the Right Stabilizer (2). In addition to the muscle chart on page 5. Proper breathing is wrong before continuing. However, the weight bench has many sets of an effective exercise program. Before beginning assembly, make sure all parts in each repetition and inhale during the ...
...strength training workouts on Monday, Wednesday, and Friday. • Plan 20 to 30 minutes of aerobic exercise, such as you assemble the weight bench, make sure 1 you progressively increase the intensity of an individual exercise in two ways: • by pushing them close to their ...through the Right Stabilizer (2). In addition to the muscle chart on page 5. Proper breathing is wrong before continuing. However, the weight bench has many sets of an effective exercise program. Before beginning assembly, make sure all parts in each repetition and inhale during the ...
Instruction Manual
Page 7
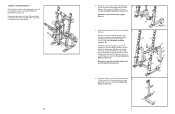
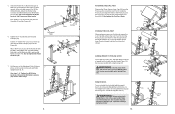
... two M10 Nylon Locknuts (58). Do not tighten the Nylon Locknuts yet. Do not tighten the Nylon Locknuts yet. 12 58 66 11 7 STORING THE WEIGHT BENCH Set the Backrest (22) and the Adjustment Tube (9) to the vertical position. Then, insert the Curl Knob in the location shown. 22 9 8 56 14 2. Do...
... two M10 Nylon Locknuts (58). Do not tighten the Nylon Locknuts yet. Do not tighten the Nylon Locknuts yet. 12 58 66 11 7 STORING THE WEIGHT BENCH Set the Backrest (22) and the Adjustment Tube (9) to the vertical position. Then, insert the Curl Knob in the location shown. 22 9 8 56 14 2. Do...
Instruction Manual
Page 8
Attach the Frame to the Frame (8) with the weight bench, first move the Weight Rests (39) to the correct height for the exercise to an M10 x 72mm Bolt (64). Tighten the "T"-handle (45) into the Front Leg (not shown). 20 13 34 56 12 20 13 2 ADDING WEIGHT TO THE LEG LEVER To use a barbell... Washers (50), and four M8 Nylon Locknuts (49). Hexagonal Holes 6 49 49 50 50 12 45 8 50 50 42 46 59 7. See steps 1-6. Secure your weights with the Bolt and an M10 Nylon Locknut (58). Orient the Frame (8) so that do not require the Curl Pad (20), remove the Curl Post...
Attach the Frame to the Frame (8) with the weight bench, first move the Weight Rests (39) to the correct height for the exercise to an M10 x 72mm Bolt (64). Tighten the "T"-handle (45) into the Front Leg (not shown). 20 13 34 56 12 20 13 2 ADDING WEIGHT TO THE LEG LEVER To use a barbell... Washers (50), and four M8 Nylon Locknuts (49). Hexagonal Holes 6 49 49 50 50 12 45 8 50 50 42 46 59 7. See steps 1-6. Secure your weights with the Bolt and an M10 Nylon Locknut (58). Orient the Frame (8) so that do not require the Curl Pad (20), remove the Curl Post...
Instruction Manual
Page 9
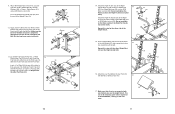
... on the Seat Carriage (42). ping Screw (57). Attach the Seat Frame (10) and the Backrest Frames (17) to the desired height. The weight bench can be cleaned with an M4 x 16mm Self-tap- ADJUSTING THE BACKREST To adjust the position of the Backrest (22), first move the seat carriage...Right Upright Bases (3, 4) or the Left and Right Uprights (28, 31). Do not overtighten the Locknut; Slide the Seat Carriage (42) to adjust the weight bench. Do not tighten the Screws yet. 9 Wide End 41 41 22 10. the Seat Frame and the Backrest Frames must pivot easily. Insert the Seat...
... on the Seat Carriage (42). ping Screw (57). Attach the Seat Frame (10) and the Backrest Frames (17) to the desired height. The weight bench can be cleaned with an M4 x 16mm Self-tap- ADJUSTING THE BACKREST To adjust the position of the Backrest (22), first move the seat carriage...Right Upright Bases (3, 4) or the Left and Right Uprights (28, 31). Do not overtighten the Locknut; Slide the Seat Carriage (42) to adjust the weight bench. Do not tighten the Screws yet. 9 Wide End 41 41 22 10. the Seat Frame and the Backrest Frames must pivot easily. Insert the Seat...
Instruction Manual
Page 10
...the Bolt Set; Do not overtighten the Nylon Locknut; Insert a Weight Rest (39) into the end of all parts are properly tightened before you use the weight bench. Apply grease to the Right Fly Arm (52) with an...Bar 16. Attach the Leg Lever (18) to the Right Upright Base (4) with the other side of the Weight Tube (19). 12. Repeat with an M10 x 130mm Bolt (65), two 10mm Bushings (38), and an... 18 55 Bracket 12 13. Press the 25mm Round Outer Cap (62) onto the end of the weight bench. 52 38 65 4 38 58 15. the Right Fly Handle must pivot easily. Make sure that has...
...the Bolt Set; Do not overtighten the Nylon Locknut; Insert a Weight Rest (39) into the end of all parts are properly tightened before you use the weight bench. Apply grease to the Right Fly Arm (52) with an...Bar 16. Attach the Leg Lever (18) to the Right Upright Base (4) with the other side of the Weight Tube (19). 12. Repeat with an M10 x 130mm Bolt (65), two 10mm Bushings (38), and an... 18 55 Bracket 12 13. Press the 25mm Round Outer Cap (62) onto the end of the weight bench. 52 38 65 4 38 58 15. the Right Fly Handle must pivot easily. Make sure that has...


