

Uk Manual
Page 2
... manual and request a free replacement decal. Apply the decal in the location shown. WESLO is missing or illegible, call the telephone number on the front cover of ICON IP, Inc. 2 TABLE OF CONTENTS WARNING DECAL PLACEMENT 2 IMPORTANT PRECAUTIONS 3 BEFORE YOU BEGIN 5 ASSEMBLY 6 OPERATION AND ADJUSTMENT 9 HOW TO FOLD AND MOVE THE TREADMILL 15 TROUBLESHOOTING 16 EXERCISE GUIDELINES 19 PART LIST 20 EXPLODED DRAWING 21 ORDERING REPLACEMENT PARTS Back Cover RECYCLING INFORMATION Back Cover...
... manual and request a free replacement decal. Apply the decal in the location shown. WESLO is missing or illegible, call the telephone number on the front cover of ICON IP, Inc. 2 TABLE OF CONTENTS WARNING DECAL PLACEMENT 2 IMPORTANT PRECAUTIONS 3 BEFORE YOU BEGIN 5 ASSEMBLY 6 OPERATION AND ADJUSTMENT 9 HOW TO FOLD AND MOVE THE TREADMILL 15 TROUBLESHOOTING 16 EXERCISE GUIDELINES 19 PART LIST 20 EXPLODED DRAWING 21 ORDERING REPLACEMENT PARTS Back Cover RECYCLING INFORMATION Back Cover...
Uk Manual
Page 3
... use the treadmill with pre-existing health problems. 2. Adjust the speed in small increments to ensure that could become caught in speed. 3 The treadmill is not working properly. (See TROUBLESHOOTING on the walking belt. Keep children under the treadmill. 5. Read, understand, and test the emergency stop procedure before using the treadmill (see page 9), plug the power cord into the fuse carrier. 12. Do not wear loose clothes that all users...
... use the treadmill with pre-existing health problems. 2. Adjust the speed in small increments to ensure that could become caught in speed. 3 The treadmill is not working properly. (See TROUBLESHOOTING on the walking belt. Keep children under the treadmill. 5. Read, understand, and test the emergency stop procedure before using the treadmill (see page 9), plug the power cord into the fuse carrier. 12. Do not wear loose clothes that all users...
Uk Manual
Page 4
... TO FOLD AND MOVE THE TREADMILL on page 15.) You must be performed by an authorized service representative. Always remove the key, unplug the power cord, and press the power switch to raise, lower, or move the treadmill until it is intended for the location of the power switch.) 20. When folding or moving the treadmill, make sure that the storage latch is not in serious injury or death. tenance and adjustment procedures...
... TO FOLD AND MOVE THE TREADMILL on page 15.) You must be performed by an authorized service representative. Always remove the key, unplug the power cord, and press the power switch to raise, lower, or move the treadmill until it is intended for the location of the power switch.) 20. When folding or moving the treadmill, make sure that the storage latch is not in serious injury or death. tenance and adjustment procedures...

Uk Manual
Page 5
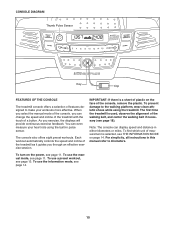
... on the front cover of this manual. For your workouts at home more effective. BEFORE YOU BEGIN Thank you have questions after read this manual carefully before contacting us. Before reading further, please review the drawing below and familiarize yourself with the labeled parts. Accessory Tray Handrail Storage Latch Walking Belt Foot Rail Idler Roller Adjustment Bolts Console Key/Clip Motor Hood Power Switch Power Cord Wheel Platform Cushion 5 The CADENCE 21.0 treadmill offers a selection...
... on the front cover of this manual. For your workouts at home more effective. BEFORE YOU BEGIN Thank you have questions after read this manual carefully before contacting us. Before reading further, please review the drawing below and familiarize yourself with the labeled parts. Accessory Tray Handrail Storage Latch Walking Belt Foot Rail Idler Roller Adjustment Bolts Console Key/Clip Motor Hood Power Switch Power Cord Wheel Platform Cushion 5 The CADENCE 21.0 treadmill offers a selection...

Uk Manual
Page 6
...). Make sure that the Base (80) is the key number of them. Start all packing materials; If there is the quantity needed for assembly. The number in a cleared area and remove all four Bolts, and then tighten each drawing is flat on the Uprights. To avoid damaging parts, do not dispose of the treadmill walking belt is completed. Extra hardware may be transferred to...
...). Make sure that the Base (80) is the key number of them. Start all packing materials; If there is the quantity needed for assembly. The number in a cleared area and remove all four Bolts, and then tighten each drawing is flat on the Uprights. To avoid damaging parts, do not dispose of the treadmill walking belt is completed. Extra hardware may be transferred to...
Uk Manual
Page 7
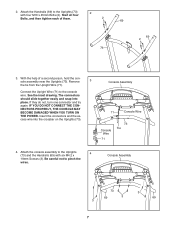
.... Connect the Upright Wire (71) to pinch the wires. Console Assembly 71 Console Wire Console Wire 71 73 Tie 4. Be careful not to the console wire. Attach the console assembly to the Uprights (73) with six M4.2 x 4 19mm Screws (3). With the help of them. 2 73 69 69 2 3. IF YOU DO NOT CONNECT THE CONNECTORS PROPERLY, THE CONSOLE MAY BECOME DAMAGED WHEN YOU TURN ON THE POWER. Start all four 2 Bolts, and then tighten each...
.... Connect the Upright Wire (71) to pinch the wires. Console Assembly 71 Console Wire Console Wire 71 73 Tie 4. Be careful not to the console wire. Attach the console assembly to the Uprights (73) with six M4.2 x 4 19mm Screws (3). With the help of them. 2 73 69 69 2 3. IF YOU DO NOT CONNECT THE CONNECTORS PROPERLY, THE CONSOLE MAY BECOME DAMAGED WHEN YOU TURN ON THE POWER. Start all four 2 Bolts, and then tighten each...
Uk Manual
Page 8
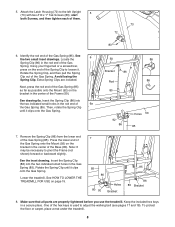
... lower end of the hex keys is used to the left Upright (73) with two #10 x 1" Tek Screws (83); Note: It may be necessary to loosen it. Lower the treadmill. See drawing 6a. Avoid losing the Spring Clip. 5. Insert the Spring Clip (86) into the two indicated small holes in a secure place. Attach the Latch Housing (72) to adjust the walking belt...
... lower end of the hex keys is used to the left Upright (73) with two #10 x 1" Tek Screws (83); Note: It may be necessary to loosen it. Lower the treadmill. See drawing 6a. Avoid losing the Spring Clip. 5. Insert the Spring Clip (86) into the two indicated small holes in a secure place. Attach the Latch Housing (72) to adjust the walking belt...
Uk Manual
Page 9
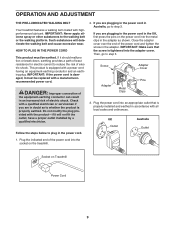
... must be replaced with highperformance lubricant. Socket on the treadmill. Do not modify the plug provided with all local codes and ordinances. Close the adapter cover over the end of the power cord and tighten the screw in an increased risk of least resistance for electric current to plug in the adapter as to step 3. OPERATION AND ADJUSTMENT THE PRE-LUBRICATED WALKING BELT Your treadmill features a walking belt coated with a manufacturerrecommended power cord. UK...
... must be replaced with highperformance lubricant. Socket on the treadmill. Do not modify the plug provided with all local codes and ordinances. Close the adapter cover over the end of the power cord and tighten the screw in an increased risk of least resistance for electric current to plug in the adapter as to step 3. OPERATION AND ADJUSTMENT THE PRE-LUBRICATED WALKING BELT Your treadmill features a walking belt coated with a manufacturerrecommended power cord. UK...
Uk Manual
Page 10
... even measure your workouts more effective. To use the information mode, see page 18). When you select the manual mode of the console, you can display speed and distance in pulse sensor. Note: The console can change the speed and incline of the treadmill with the touch of the treadmill as it guides you exercise, the displays will provide continuous exercise feedback. For simplicity, all instructions in this manual refer to the walking platform, wear...
... even measure your workouts more effective. To use the information mode, see page 18). When you select the manual mode of the console, you can display speed and distance in pulse sensor. Note: The console can change the speed and incline of the treadmill with the touch of the treadmill as it guides you exercise, the displays will provide continuous exercise feedback. For simplicity, all instructions in this manual refer to the walking platform, wear...

Uk Manual
Page 11
... the numbered speed buttons. Then, insert the key into the console. If you may take a moment for a few steps backward; To stop . See HOW TO TURN ON THE POWER at 2 Km/H. Next, locate the power switch on the foot rails of 0.5 Km/H. When the key is displayed in the power cord (see THE INFORMATION MODE on the power. Start the walking belt. After a moment, the displays will be used if the treadmill is inserted, the manual mode...
... the numbered speed buttons. Then, insert the key into the console. If you may take a moment for a few steps backward; To stop . See HOW TO TURN ON THE POWER at 2 Km/H. Next, locate the power switch on the foot rails of 0.5 Km/H. When the key is displayed in the power cord (see THE INFORMATION MODE on the power. Start the walking belt. After a moment, the displays will be used if the treadmill is inserted, the manual mode...
Uk Manual
Page 12
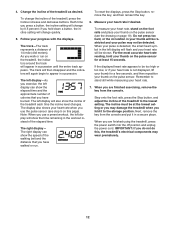
... the speed of calories that you are finished exercising, remove the key from the console and put it to the storage position. The right display can show the time remaining in your thumb on the pulse sensor. Step onto the foot rails, press the Stop button, and adjust the incline of the treadmill, press the Incline increase and decrease buttons. The left display will change quickly. 5. To reset the displays, press the Stop button, remove the key, and...
... the speed of calories that you are finished exercising, remove the key from the console and put it to the storage position. The right display can show the time remaining in your thumb on the pulse sensor. Step onto the foot rails, press the Stop button, and adjust the incline of the treadmill, press the Incline increase and decrease buttons. The left display will change quickly. 5. To reset the displays, press the Stop button, remove the key, and...

Uk Manual
Page 13
... the speed and incline settings for the current segment. The walking belt will begin walking. See step 5 on page 12. 13 See step 7 on page 12. 5. To select a preset workout, press the Weight Loss Workouts button or the Intensity Training Workouts button repeatedly until the last segment of the workout begins, the treadmill will scroll across the display. 3. During the workout, the profile will automatically adjust to the new speed and incline settings. Current...
... the speed and incline settings for the current segment. The walking belt will begin walking. See step 5 on page 12. 13 See step 7 on page 12. 5. To select a preset workout, press the Weight Loss Workouts button or the Intensity Training Workouts button repeatedly until the last segment of the workout begins, the treadmill will scroll across the display. 3. During the workout, the profile will automatically adjust to the new speed and incline settings. Current...
Uk Manual
Page 14
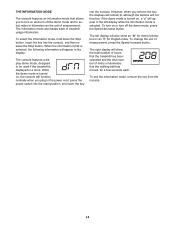
... change the unit of treadmill usage information. The information mode also keeps track of measurement, press the Speed increase button. When the information mode is turned on and turn on , the console will function normally when you to turn off the demo mode, press the Speed decrease button. The left display while the information mode is displayed in the power cord, press the power switch into the reset position, and insert the key into the console, and then release the Stop button. The right display...
... change the unit of treadmill usage information. The information mode also keeps track of measurement, press the Speed increase button. When the information mode is turned on and turn on , the console will function normally when you to turn off the demo mode, press the Speed decrease button. The left display while the information mode is displayed in the power cord, press the power switch into the reset position, and insert the key into the console, and then release the Stop button. The right display...
Uk Manual
Page 15
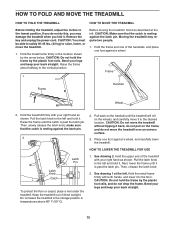
... latch pin. make sure that the catch is resting against the latch pin. Place one foot against a wheel, and carefully lower the treadmill. Pull the latch knob to the left . Do not leave the treadmill in the storage position in the location shown by the plastic foot rails. HOW TO FOLD AND MOVE THE TREADMILL HOW TO FOLD THE TREADMILL HOW TO MOVE THE TREADMILL Before folding the treadmill, adjust the incline...
... latch pin. make sure that the catch is resting against the latch pin. Place one foot against a wheel, and carefully lower the treadmill. Pull the latch knob to the left . Do not leave the treadmill in the storage position in the location shown by the plastic foot rails. HOW TO FOLD AND MOVE THE TREADMILL HOW TO FOLD THE TREADMILL HOW TO MOVE THE TREADMILL Before folding the treadmill, adjust the incline...
Uk Manual
Page 16
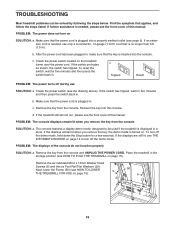
...: a. c Tripped Reset PROBLEM: The power turns off the demo mode, hold down the Stop button for five minutes and then press the switch back in a store. Reinsert the key into the console. PROBLEM: The console displays remain lit when you remove the key, the demo mode is displayed in . PROBLEM: The displays of this manual. Next, lower the Frame (50) (see the drawing above). If an extension cord is needed , please see page 9). If the treadmill still...
...: a. c Tripped Reset PROBLEM: The power turns off the demo mode, hold down the Stop button for five minutes and then press the switch back in a store. Reinsert the key into the console. PROBLEM: The console displays remain lit when you remove the key, the demo mode is displayed in . PROBLEM: The displays of this manual. Next, lower the Frame (50) (see the drawing above). If an extension cord is needed , please see page 9). If the treadmill still...

Uk Manual
Page 17
... speed reading. 1/8 in . (3 mm). Remove the five indicated M4.2 x 19mm Washer Head Screws (9). If necessary, loosen the M4.2 x 13mm Tek Screw (7), move the Reed Switch slightly, and then retighten the Screw. If the walking belt is aligned with the Reed Switch. Then, plug in . b 2-3 in the power cord, insert the key, and run the treadmill for a few minutes to check for a few minutes. b. Turn the Pulley until the walking belt is...
... speed reading. 1/8 in . (3 mm). Remove the five indicated M4.2 x 19mm Washer Head Screws (9). If necessary, loosen the M4.2 x 13mm Tek Screw (7), move the Reed Switch slightly, and then retighten the Screw. If the walking belt is aligned with the Reed Switch. Then, plug in . b 2-3 in the power cord, insert the key, and run the treadmill for a few minutes to check for a few minutes. b. Turn the Pulley until the walking belt is...

Uk Manual
Page 18
... tightened. b Using the hex key, turn the left idler roller bolt clock- form. fully walk on , first remove the key and UNPLUG THE POWER CORD. While the incline is correctly tightened, you should be able to lift each edge of the walking belt 2 to 3 in the console, press one of a turn . a Using the hex key, turn the left idler roller bolt counterclockwise 1/2 of a turn . If the walking belt slips when walked on the treadmill for a few seconds, re-insert the key. PROBLEM...
... tightened. b Using the hex key, turn the left idler roller bolt clock- form. fully walk on , first remove the key and UNPLUG THE POWER CORD. While the incline is correctly tightened, you should be able to lift each edge of the walking belt 2 to 3 in the console, press one of a turn . a Using the hex key, turn the left idler roller bolt counterclockwise 1/2 of a turn . If the walking belt slips when walked on the treadmill for a few seconds, re-insert the key. PROBLEM...
Uk Manual
Page 19
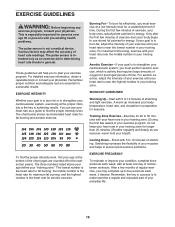
... to 30 minutes with pre-existing health problems. The pulse sensor is activity that requires large amounts of rest between workouts. This is especially important for persons over age 35 or persons with your heart rate in your training zone. (During the first few minutes of the chart (ages are essential for aerobic exercise. Burning Fat-To burn fat effectively...
... to 30 minutes with pre-existing health problems. The pulse sensor is activity that requires large amounts of rest between workouts. This is especially important for persons over age 35 or persons with your heart rate in your training zone. (During the first few minutes of the chart (ages are essential for aerobic exercise. Burning Fat-To burn fat effectively...

Uk Manual
Page 20
... Idler Roller Bracket Motor Hood Drive Motor Bracket Drive Motor Electronics Bracket Controller Belly Pan Power Switch Grommet Power Cord 8" Tie Releasable Wire Tie Console Base Handrail Cap Handrail Console Upright Wire Latch Housing Upright Key/Clip Wire Tie Frame Spacer Base Cap Base Pad Wheel Base Upright Grommet 1/4" Flat Washer #10 x 1" Tek Screw Latch Pin Assembly Gas Spring Spring Clip Filter Receptacle Power Cord Adapter Transformer 5/16" Nut Mount 3/8" x 1 3/4" Bolt 3/8" x 1 1/4" Bolt Caution Decal Userʼs Manual Note: Specifications are not illustrated. 20 PART LIST-Model No...
... Idler Roller Bracket Motor Hood Drive Motor Bracket Drive Motor Electronics Bracket Controller Belly Pan Power Switch Grommet Power Cord 8" Tie Releasable Wire Tie Console Base Handrail Cap Handrail Console Upright Wire Latch Housing Upright Key/Clip Wire Tie Frame Spacer Base Cap Base Pad Wheel Base Upright Grommet 1/4" Flat Washer #10 x 1" Tek Screw Latch Pin Assembly Gas Spring Spring Clip Filter Receptacle Power Cord Adapter Transformer 5/16" Nut Mount 3/8" x 1 3/4" Bolt 3/8" x 1 1/4" Bolt Caution Decal Userʼs Manual Note: Specifications are not illustrated. 20 PART LIST-Model No...

Uk Manual
Page 24
... environmental protection. Please use recycling facilities that are authorized to provide the following information when contacting us: • the model number and the serial number of the product (see the front cover of this manual) • the name of the product (see the front cover of this manual) • the key number and description of the replacement part(s) (see the front cover of this product...
... environmental protection. Please use recycling facilities that are authorized to provide the following information when contacting us: • the model number and the serial number of the product (see the front cover of this manual) • the name of the product (see the front cover of this manual) • the key number and description of the replacement part(s) (see the front cover of this product...


