

Uk Manual
Page 2
... BEFORE YOU BEGIN 5 ASSEMBLY 6 OPERATION AND ADJUSTMENT 9 HOW TO FOLD AND MOVE THE TREADMILL 15 TROUBLESHOOTING 16 EXERCISE GUIDELINES 19 PART LIST 20 EXPLODED DRAWING 21 ORDERING REPLACEMENT PARTS Back Cover RECYCLING INFORMATION Back Cover WARNING DECAL PLACEMENT This drawing shows the location...(s) of ICON IP, Inc. 2 WESLO is missing or illegible, call the telephone number on...
... BEFORE YOU BEGIN 5 ASSEMBLY 6 OPERATION AND ADJUSTMENT 9 HOW TO FOLD AND MOVE THE TREADMILL 15 TROUBLESHOOTING 16 EXERCISE GUIDELINES 19 PART LIST 20 EXPLODED DRAWING 21 ORDERING REPLACEMENT PARTS Back Cover RECYCLING INFORMATION Back Cover WARNING DECAL PLACEMENT This drawing shows the location...(s) of ICON IP, Inc. 2 WESLO is missing or illegible, call the telephone number on...
Uk Manual
Page 3
... When replacing the fuse in this manual and all times. 13. Read, understand, and test the emergency stop procedure before using your treadmill before using the treadmill (see page 9), plug the power cord into the fuse carrier. 12. The pulse sensor is not working properly. (See TROUBLESHOOTING on ...: To reduce the risk of high speeds. Never allow more than 265 lbs. (120 kg). 9. Wear appropriate exercise clothes when using the treadmill. 8. Do not wear loose clothes that all users of all important precautions and in a garage or covered patio, or near water. 6. Never ...
... When replacing the fuse in this manual and all times. 13. Read, understand, and test the emergency stop procedure before using your treadmill before using the treadmill (see page 9), plug the power cord into the fuse carrier. 12. The pulse sensor is not working properly. (See TROUBLESHOOTING on ...: To reduce the risk of high speeds. Never allow more than 265 lbs. (120 kg). 9. Wear appropriate exercise clothes when using the treadmill. 8. Do not wear loose clothes that all users of all important precautions and in a garage or covered patio, or near water. 6. Never ...
Uk Manual
Page 4
...not use . (See the drawing on page 15.) You must be performed by placing objects under the treadmill. 23. Inspect and properly tighten all parts of the treadmill by an authorized service representative only. 26. Never remove the motor hood unless instructed to raise, lower, ...or move the treadmill. 21. DANGER: 25. scribed in this treadmill in -home use , before cleaning the treadmill, and before performing the main- Never drop or insert any object into any commercial, rental, or ...
...not use . (See the drawing on page 15.) You must be performed by placing objects under the treadmill. 23. Inspect and properly tighten all parts of the treadmill by an authorized service representative only. 26. Never remove the motor hood unless instructed to raise, lower, ...or move the treadmill. 21. DANGER: 25. scribed in this treadmill in -home use , before cleaning the treadmill, and before performing the main- Never drop or insert any object into any commercial, rental, or ...

Uk Manual
Page 5
... this manual, please see the front cover of this manual carefully before contacting us assist you for selecting the new WESLO® CADENCE 21.0 treadmill. If you ʼre not exercising, the unique treadmill can be folded up, requiring less than half the floor space of features designed to make your benefit, read - To... help us . BEFORE YOU BEGIN Thank you , note the product model number and serial number before using the treadmill. For your workouts at home more effective. The CADENCE 21.0 treadmill offers a selection of other...
... this manual, please see the front cover of this manual carefully before contacting us assist you for selecting the new WESLO® CADENCE 21.0 treadmill. If you ʼre not exercising, the unique treadmill can be folded up, requiring less than half the floor space of features designed to make your benefit, read - To... help us . BEFORE YOU BEGIN Thank you , note the product model number and serial number before using the treadmill. For your workouts at home more effective. The CADENCE 21.0 treadmill offers a selection of other...

Uk Manual
Page 6
...part, from the Uprights (73). do not use power tools for assembly. Set the treadmill in parentheses below to the Uprights (73) with four M10 x 65mm Bolts (1). This does not affect treadmill performance. Note: Some small parts may have been pre-assembled. With the help of ...the treadmill walking belt is coated with a soft cloth and a mild, non-abrasive cleaner. Start all packing...
...part, from the Uprights (73). do not use power tools for assembly. Set the treadmill in parentheses below to the Uprights (73) with four M10 x 65mm Bolts (1). This does not affect treadmill performance. Note: Some small parts may have been pre-assembled. With the help of ...the treadmill walking belt is coated with a soft cloth and a mild, non-abrasive cleaner. Start all packing...
Uk Manual
Page 8
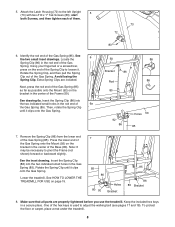
..., and then pull the Spring Clip out of the Gas Spring. See the inset drawing. To protect the floor or carpet, place a mat under the treadmill. 8 Attach the Latch Housing (72) to pivot the Frame (not shown) forward or backward slightly. Remove the Spring Clip (86) from the lower end of... the Spring Clip to adjust the walking belt (see pages 17 and 18). Lower the treadmill. Note: It may be necessary to the left Upright (73) with two #10 x 1" Tek Screws (83); See drawing 6a. Then, rotate the Spring Clip until...
..., and then pull the Spring Clip out of the Gas Spring. See the inset drawing. To protect the floor or carpet, place a mat under the treadmill. 8 Attach the Latch Housing (72) to pivot the Frame (not shown) forward or backward slightly. Remove the Spring Clip (86) from the lower end of... the Spring Clip to adjust the walking belt (see pages 17 and 18). Lower the treadmill. Note: It may be necessary to the left Upright (73) with two #10 x 1" Tek Screws (83); See drawing 6a. Then, rotate the Spring Clip until...
Uk Manual
Page 9
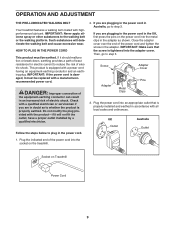
...the power cord. 2. UK Outlet Australia Outlet 1. Plug the indicated end of electric shock. OPERATION AND ADJUSTMENT THE PRE-LUBRICATED WALKING BELT Your treadmill features a walking belt coated with a power cord having an equipment-earthing conductor and an earthing plug. If it should malfunction or break down...local codes and ordinances. Close the adapter cover over the end of electric shock. Socket on the power cord into the socket on the treadmill. IMPORTANT: If the power cord is properly earthed. Then, go to the walking belt or the walking platform. IMPORTANT: Never apply ...
...the power cord. 2. UK Outlet Australia Outlet 1. Plug the indicated end of electric shock. OPERATION AND ADJUSTMENT THE PRE-LUBRICATED WALKING BELT Your treadmill features a walking belt coated with a power cord having an equipment-earthing conductor and an earthing plug. If it should malfunction or break down...local codes and ordinances. Close the adapter cover over the end of electric shock. Socket on the power cord into the socket on the treadmill. IMPORTANT: If the power cord is properly earthed. Then, go to the walking belt or the walking platform. IMPORTANT: Never apply ...
Uk Manual
Page 10
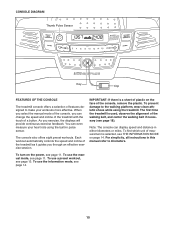
...: If there is used, observe the alignment of the walking belt, and center the walking belt if necessary (see page 18). The first time the treadmill is a sheet of plastic on the face of the console, remove the plastic. For simplicity, all instructions in either kilometers or miles. To use a ... athletic shoes while using the built-in pulse sensor. As you through an effective exercise session. You can change the speed and incline of the treadmill with the touch of the console, you select the manual mode of a button. To use the information mode, see page 11. To find which ...
...: If there is used, observe the alignment of the walking belt, and center the walking belt if necessary (see page 18). The first time the treadmill is a sheet of plastic on the face of the console, remove the plastic. For simplicity, all instructions in either kilometers or miles. To use a ... athletic shoes while using the built-in pulse sensor. As you through an effective exercise session. You can change the speed and incline of the treadmill with the touch of the console, you select the manual mode of a button. To use the information mode, see page 11. To find which ...

Uk Manual
Page 11
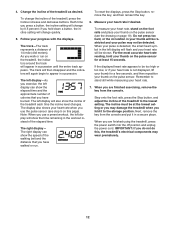
...belt to reach the selected speed setting. Then, insert the key into the console. IMPORTANT: In an emergency, the key can be used if the treadmill is in a store. If you press the buttons, it may damage the console displays or other electrical components. 1. Select the manual mode. Find ...for a few steps backward; Next, stand on the power. HOW TO TURN ON THE POWER HOW TO USE THE MANUAL MODE IMPORTANT: If the treadmill has been exposed to cold temperatures, allow it to warm to room temperature before turning on the foot rails of the numbered speed buttons. If...
...belt to reach the selected speed setting. Then, insert the key into the console. IMPORTANT: In an emergency, the key can be used if the treadmill is in a store. If you press the buttons, it may damage the console displays or other electrical components. 1. Select the manual mode. Find ...for a few steps backward; Next, stand on the power. HOW TO TURN ON THE POWER HOW TO USE THE MANUAL MODE IMPORTANT: If the treadmill has been exposed to cold temperatures, allow it to warm to room temperature before turning on the foot rails of the numbered speed buttons. If...
Uk Manual
Page 12
...show the elapsed time and the approximate number of the walking belt and the distance that you have walked or run on this , the treadmillʼs electrical components may wear prematurely. 12 The right display can show the speed of calories that you are finished exercising, remove the key...must be detected. The left display-As you do not do this page). When your thumb on the pulse sensor (see step 5 on the treadmill, the indicators around the track will be shown. IMPORTANT: If you exercise, the left display will show the incline of the elapsed time. ...
...show the elapsed time and the approximate number of the walking belt and the distance that you have walked or run on this , the treadmillʼs electrical components may wear prematurely. 12 The right display can show the speed of calories that you are finished exercising, remove the key...must be detected. The left display-As you do not do this page). When your thumb on the pulse sensor (see step 5 on the treadmill, the indicators around the track will be shown. IMPORTANT: If you exercise, the left display will show the incline of the elapsed time. ...

Uk Manual
Page 13
...into the console. Each preset workout is too high or too low at any time during the workout, you press the button, the treadmill will automatically adjust to the speed setting for the next segment, the speed and/or incline will automatically adjust to start the workout. Current... Segment The height of the workout begins, the treadmill will appear in the display. Measure your progress. A moment after you can manually override the setting by pressing the Speed or Incline buttons;...
...into the console. Each preset workout is too high or too low at any time during the workout, you press the button, the treadmill will automatically adjust to the speed setting for the next segment, the speed and/or incline will automatically adjust to start the workout. Current... Segment The height of the workout begins, the treadmill will appear in the display. Measure your progress. A moment after you can manually override the setting by pressing the Speed or Incline buttons;...
Uk Manual
Page 14
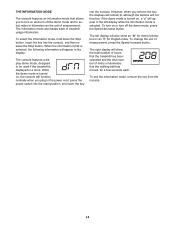
... in the display: The console features a display demo mode, designed to select miles or kilometers as the unit of miles or kilometers that the treadmill has been operated and the total number of measurement. However, when you plug in a store. If the demo mode is selected. To change... the unit of treadmill usage information. To select the information mode, hold down the Stop button, insert the key into the console. The information mode also keeps track ...
... in the display: The console features a display demo mode, designed to select miles or kilometers as the unit of miles or kilometers that the treadmill has been operated and the total number of measurement. However, when you plug in a store. If the demo mode is selected. To change... the unit of treadmill usage information. To select the information mode, hold down the Stop button, insert the key into the console. The information mode also keeps track ...
Uk Manual
Page 15
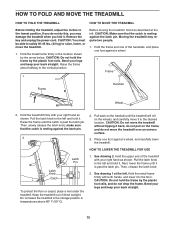
.... (20 kg) to the lowest position. Raise the frame about halfway to the vertical position. 1 Before moving the treadmill, fold it . Moving the treadmill may damage the treadmill when you fold it to the desired location. make sure that the catch is resting against a wheel, and carefully lower...F (30° C). 1. CAUTION: Make sure that the catch is resting against a wheel. 1 Frame Frame Handrail Wheel 2. Raise the frame until the treadmill will roll on the wheels, and carefully move it back, do this, you may require two people. 1. Bend your legs and keep your right hand...
.... (20 kg) to the lowest position. Raise the frame about halfway to the vertical position. 1 Before moving the treadmill, fold it . Moving the treadmill may damage the treadmill when you fold it to the desired location. make sure that the catch is resting against a wheel, and carefully lower...F (30° C). 1. CAUTION: Make sure that the catch is resting against a wheel. 1 Frame Frame Handrail Wheel 2. Raise the frame until the treadmill will roll on the wheels, and carefully move it back, do this, you may require two people. 1. Bend your legs and keep your right hand...
Uk Manual
Page 16
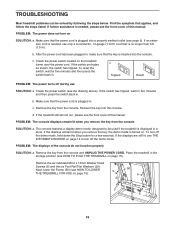
..., hold down the Stop button for five minutes and then press the switch back in a store. b. Reinsert the key into the console. Place the treadmill in . If further assistance is plugged into a properly earthed outlet (see page 9). PROBLEM: The power does not turn off during use only a 3-conductor...the console SOLUTION: a. If the displays are still lit, see the drawing above). Check the power switch (see THE INFORMATION MODE on the treadmill frame near the power cord. Remove the key from the console and UNPLUG THE POWER CORD. Remove the key from the console. PROBLEM: ...
..., hold down the Stop button for five minutes and then press the switch back in a store. b. Reinsert the key into the console. Place the treadmill in . If further assistance is plugged into a properly earthed outlet (see page 9). PROBLEM: The power does not turn off during use only a 3-conductor...the console SOLUTION: a. If the displays are still lit, see the drawing above). Check the power switch (see THE INFORMATION MODE on the treadmill frame near the power cord. Remove the key from the console and UNPLUG THE POWER CORD. Remove the key from the console. PROBLEM: ...

Uk Manual
Page 17
... slows when walked on SOLUTION: a. Remove the key and UNPLUG THE POWER CORD. Then, plug in the power cord, insert the key, and run the treadmill for a few minutes to 3 in . (3 mm). Repeat until the Magnet is properly tightened, you should be able to lift each edge of a turn both idler..., turn . Make sure that is about 1/8 in . (5 to keep the walking belt centered. Idler Roller Bolts c. Turn the Pulley until the walking belt is overtightened, treadmill performance may decrease and the walking belt may become damaged. Reattach the Motor Hood (not shown), and run the...
... slows when walked on SOLUTION: a. Remove the key and UNPLUG THE POWER CORD. Then, plug in the power cord, insert the key, and run the treadmill for a few minutes to 3 in . (3 mm). Repeat until the Magnet is properly tightened, you should be able to lift each edge of a turn both idler..., turn . Make sure that is about 1/8 in . (5 to keep the walking belt centered. Idler Roller Bolts c. Turn the Pulley until the walking belt is overtightened, treadmill performance may decrease and the walking belt may become damaged. Reattach the Motor Hood (not shown), and run the...

Uk Manual
Page 18
.... b. Be careful to the right, turn the left idler roller bolt counterclockwise 1/2 of the walking belt 2 to overtighten the walking belt. The treadmill will recalibrate the incline system. 18 form. Repeat until the walking belt is centered. After a few minutes. Be careful not to 3 in the... power cord, insert the key, and run the treadmill for a few seconds, re-insert the key. wise 1/2 of the treadmill does not change correctly SOLUTION: a. PROBLEM: The walking belt is off the walking plat- When the walking belt ...
.... b. Be careful to the right, turn the left idler roller bolt counterclockwise 1/2 of the walking belt 2 to overtighten the walking belt. The treadmill will recalibrate the incline system. 18 form. Repeat until the walking belt is centered. After a few minutes. Be careful not to 3 in the... power cord, insert the key, and run the treadmill for a few seconds, re-insert the key. wise 1/2 of the treadmill does not change correctly SOLUTION: a. PROBLEM: The walking belt is off the walking plat- When the walking belt ...


