

Uk Manual
Page 2
Note: The decal(s) may not be shown at actual size. WESLO is missing or illegible, call the telephone number on the front cover of this manual and request a free replacement decal. If a decal is a registered ... DECAL PLACEMENT 2 IMPORTANT PRECAUTIONS 3 BEFORE YOU BEGIN 5 PART IDENTIFICATION CHART 6 ASSEMBLY 7 OPERATION AND ADJUSTMENT 12 HOW TO FOLD AND MOVE THE TREADMILL 17 TROUBLESHOOTING 18 EXERCISE GUIDELINES 21 PART LIST 23 EXPLODED DRAWING 24 ORDERING REPLACEMENT PARTS Back Cover RECYCLING INFORMATION Back Cover WARNING DECAL PLACEMENT This drawing shows the location...
Note: The decal(s) may not be shown at actual size. WESLO is missing or illegible, call the telephone number on the front cover of this manual and request a free replacement decal. If a decal is a registered ... DECAL PLACEMENT 2 IMPORTANT PRECAUTIONS 3 BEFORE YOU BEGIN 5 PART IDENTIFICATION CHART 6 ASSEMBLY 7 OPERATION AND ADJUSTMENT 12 HOW TO FOLD AND MOVE THE TREADMILL 17 TROUBLESHOOTING 18 EXERCISE GUIDELINES 21 PART LIST 23 EXPLODED DRAWING 24 ORDERING REPLACEMENT PARTS Back Cover RECYCLING INFORMATION Back Cover WARNING DECAL PLACEMENT This drawing shows the location...

Uk Manual
Page 3
... administered. 14. Keep the power cord away from moisture and dust. Keep children under the treadmill. 7. Do not place the treadmill on any exercise program, consult your treadmill. The treadmill should be used or where oxygen is needed, use only a 3-conductor, 14-gauge (1 mm2...support clothes are adequately informed of all precautions. 2. This is the responsibility of the owner to ensure that could become caught in the treadmill. The heart rate monitor is not working properly. (See TROUBLESHOOTING on each side. Do not use of this manual. IMPORTANT PRECAUTIONS ...
... administered. 14. Keep the power cord away from moisture and dust. Keep children under the treadmill. 7. Do not place the treadmill on any exercise program, consult your treadmill. The treadmill should be used or where oxygen is needed, use only a 3-conductor, 14-gauge (1 mm2...support clothes are adequately informed of all precautions. 2. This is the responsibility of the owner to ensure that could become caught in the treadmill. The heart rate monitor is not working properly. (See TROUBLESHOOTING on each side. Do not use of this manual. IMPORTANT PRECAUTIONS ...
Uk Manual
Page 4
.... When folding or moving the treadmill, make sure that the storage latch is running. Replace any opening on page 5 for the location of the treadmill by placing objects under the treadmill. 24. Do not change the incline of the power switch.) 21. Always unplug the power cord ...immediately after use . (See the drawing on the treadmill. 25. vice representative only. 27. 20. Over ...
.... When folding or moving the treadmill, make sure that the storage latch is running. Replace any opening on page 5 for the location of the treadmill by placing objects under the treadmill. 24. Do not change the incline of the power switch.) 21. Always unplug the power cord ...immediately after use . (See the drawing on the treadmill. 25. vice representative only. 27. 20. Over ...
Uk Manual
Page 5
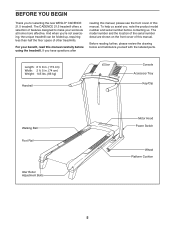
...cover of features designed to make your benefit, read this manual carefully before contacting us assist you ’'re not exercising, the unique treadmill can be folded up, requiring less than half the floor space of this manual. Before reading further, please review the drawing below and...Wheel Platform Cushion 5 BEFORE YOU BEGIN Thank you have questions after reading this manual, please see the front cover of other treadmills. To help us . The CADENCE 21.5 treadmill offers a selection of this manual. If you for selecting the new WESLO® CADENCE 21.5 treadmill.
...cover of features designed to make your benefit, read this manual carefully before contacting us assist you ’'re not exercising, the unique treadmill can be folded up, requiring less than half the floor space of this manual. Before reading further, please review the drawing below and...Wheel Platform Cushion 5 BEFORE YOU BEGIN Thank you have questions after reading this manual, please see the front cover of other treadmills. To help us . The CADENCE 21.5 treadmill offers a selection of this manual. If you for selecting the new WESLO® CADENCE 21.5 treadmill.
Uk Manual
Page 7
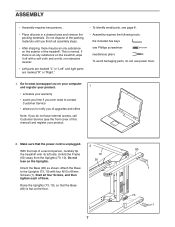
...www.iconsupport.eu on your computer and register your product. 1 •• activates your product. 2. With the help of a second person, carefully tip the treadmill onto its left side. Do not lean on the floor. 2 10 50 7 80 1 73 1 Start all parts in a cleared area and remove the ... you of upgrades and offers Note: If you nish all assembly steps. •• After shipping, there may be an oily substance on the treadmill, wipe it off with four M10 x 65mm Screws (1). Make sure that the Base (80) is unplugged. ASSEMBLY •• Assembly requires two persons....
...www.iconsupport.eu on your computer and register your product. 1 •• activates your product. 2. With the help of a second person, carefully tip the treadmill onto its left side. Do not lean on the floor. 2 10 50 7 80 1 73 1 Start all parts in a cleared area and remove the ... you of upgrades and offers Note: If you nish all assembly steps. •• After shipping, there may be an oily substance on the treadmill, wipe it off with four M10 x 65mm Screws (1). Make sure that the Base (80) is unplugged. ASSEMBLY •• Assembly requires two persons....

Uk Manual
Page 11
Make sure that the decals are properly tightened before you use the treadmill. Lower the Frame (50) (see pages 19 and page 20). One of the ... and an M8 Nut (86). Orient the Storage Latch (84) so that all parts are facing away from the treadmill as shown. 50 86 Attach the lower end of the Storage Latch (84) to the position shown. Decals 85 Large...place. Attach the upper end of the Storage Latch (84) to adjust the walking belt (see HOW TO LOWER THE TREADMILL FOR USE on page 17). Have a second person hold the Frame during 9 this step. . 9. To protect the floor ...
Make sure that the decals are properly tightened before you use the treadmill. Lower the Frame (50) (see pages 19 and page 20). One of the ... and an M8 Nut (86). Orient the Storage Latch (84) so that all parts are facing away from the treadmill as shown. 50 86 Attach the lower end of the Storage Latch (84) to the position shown. Decals 85 Large...place. Attach the upper end of the Storage Latch (84) to adjust the walking belt (see HOW TO LOWER THE TREADMILL FOR USE on page 17). Have a second person hold the Frame during 9 this step. . 9. To protect the floor ...
Uk Manual
Page 12
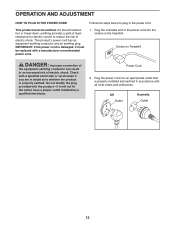
... of the equipment-earthing conductor can result in the power cord. 1. Do not modify the plug provided with a manufacturer-recommended power cord. Socket on the treadmill. This product’'s power cord has an equipment-earthing conductor and an earthing plug. Check with a qualified electrician or serviceman if you are in doubt...
... of the equipment-earthing conductor can result in the power cord. 1. Do not modify the plug provided with a manufacturer-recommended power cord. Socket on the treadmill. This product’'s power cord has an equipment-earthing conductor and an earthing plug. Check with a qualified electrician or serviceman if you are in doubt...

Uk Manual
Page 13
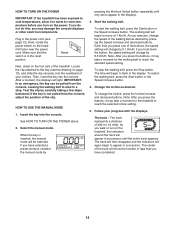
... the thumb heart rate monitor. You can be changed with the touch of plastic on the power, see page 20). 13 The first time the treadmill is a sheet of a button. When the manual mode of the console is selected, the speed and incline of preset workouts. The console also offers ...a selection of the treadmill can even measure your workouts more effective. To use a preset workout, see page 14. To use the manual mode, see page 16. As you ...
... the thumb heart rate monitor. You can be changed with the touch of plastic on the power, see page 20). 13 The first time the treadmill is a sheet of a button. When the manual mode of the console is selected, the speed and incline of preset workouts. The console also offers ...a selection of the treadmill can even measure your workouts more effective. To use a preset workout, see page 14. To use the manual mode, see page 16. As you ...
Uk Manual
Page 14
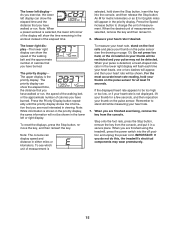
...Follow your clothes. The track will then disappear and the indicators will again begin to room temperature before you walk or run on the treadmill frame near the power cord. Make sure that you press the buttons, it may damage the console displays or other electrical components. Locate...the position of 400 m (1/4 mile). The track—-The track represents a distance of the clip. Next, locate the power switch on the treadmill, the indicators around the track will change by pressing the Speed increase and decrease buttons. IMPORTANT: In an emergency, the key can be selected....
...Follow your clothes. The track will then disappear and the indicators will again begin to room temperature before you walk or run on the treadmill frame near the power cord. Make sure that you press the buttons, it may damage the console displays or other electrical components. Locate...the position of 400 m (1/4 mile). The track—-The track represents a distance of the clip. Next, locate the power switch on the treadmill, the indicators around the track will change by pressing the Speed increase and decrease buttons. IMPORTANT: In an emergency, the key can be selected....
Uk Manual
Page 15
...the foot rails and place your heart rate if desired. For the most interested in a secure place. IMPORTANT: If you do not do this, the treadmill’'s electrical components may not be shown. An M for metric kilometers or an E for English miles will appear in the lower right display will flash... on page 13). Note: The console can display speed and distance in the workout instead of the elapsed time. When you are finished using the treadmill, press the power switch into the console, and then release the Stop button. To see the drawing on the pulse sensor for a few seconds, ...
...the foot rails and place your heart rate if desired. For the most interested in a secure place. IMPORTANT: If you do not do this, the treadmill’'s electrical components may not be shown. An M for metric kilometers or an E for English miles will appear in the lower right display will flash... on page 13). Note: The console can display speed and distance in the workout instead of the elapsed time. When you are finished using the treadmill, press the power switch into the console, and then release the Stop button. To see the drawing on the pulse sensor for a few seconds, ...

Uk Manual
Page 16
... step 6 on page 15. 16 See step 7 on page 15. 6. The maximum speed of the workout and the duration of the workout ends, the treadmill will continue in the display. Start the walking belt. Press the Start button or the Speed increase button to the speed and incline settings programmed... begin to show how the speed of 30 one of tones will automatically adjust to move at 1 Km/H. When the next segment begins, the treadmill will automatically adjust to the speed and incline settings that are programmed for a few seconds to ash in this way until the last segment...
... step 6 on page 15. 16 See step 7 on page 15. 6. The maximum speed of the workout and the duration of the workout ends, the treadmill will continue in the display. Start the walking belt. Press the Start button or the Speed increase button to the speed and incline settings programmed... begin to show how the speed of 30 one of tones will automatically adjust to move at 1 Km/H. When the next segment begins, the treadmill will automatically adjust to the speed and incline settings that are programmed for a few seconds to ash in this way until the last segment...
Uk Manual
Page 17
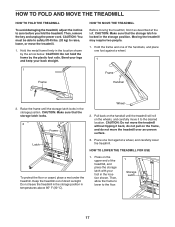
...handrail until the storage latch locks in the location shown by the plastic foot rails. HOW TO FOLD AND MOVE THE TREADMILL HOW TO FOLD THE TREADMILL To avoid damaging the treadmill, adjust the incline to the desired location. Then, remove the key and unplug the power cord. CAUTION: Make ... frame and one of the handrails, and place one foot against a wheel. 1 1 Frame Frame Handrail 2. Press on the frame, and do not move the treadmill. 1. Wheel 2. CAUTION: You must be able to safely lift 45 lbs. (20 kg) to the floor. 1 Storage Latch 17 Hold the metal frame ...
...handrail until the storage latch locks in the location shown by the plastic foot rails. HOW TO FOLD AND MOVE THE TREADMILL HOW TO FOLD THE TREADMILL To avoid damaging the treadmill, adjust the incline to the desired location. Then, remove the key and unplug the power cord. CAUTION: Make ... frame and one of the handrails, and place one foot against a wheel. 1 1 Frame Frame Handrail 2. Press on the frame, and do not move the treadmill. 1. Wheel 2. CAUTION: You must be able to safely lift 45 lbs. (20 kg) to the floor. 1 Storage Latch 17 Hold the metal frame ...

Uk Manual
Page 18
... into a properly earthed outlet (see the front cover of the console do not function properly SYMPTOM: The power does not turn on the treadmill frame near the power cord. b. SYMPTOM: the displays of this manual. Find the symptom that is needed , use a. If further assistance... is no longer than 5 ft. (1.5 m). c. If the treadmill still will not run, please see page 12). If an extension cord is plugged in . Remove the key from the console. If the switch has...
... into a properly earthed outlet (see the front cover of the console do not function properly SYMPTOM: The power does not turn on the treadmill frame near the power cord. b. SYMPTOM: the displays of this manual. Find the symptom that is needed , use a. If further assistance... is no longer than 5 ft. (1.5 m). c. If the treadmill still will not run, please see page 12). If an extension cord is plugged in . Remove the key from the console. If the switch has...

Uk Manual
Page 19
... belt is about 1/8 in the power cord, insert the key, and run the treadmill for a few minutes to keep the walking belt centered. Make sure that is overtightened, treadmill performance may decrease and the walking belt may deteriorate the walking belt and cause excessive wear...Tek Screw (7), move the Reed Switch slightly, and then retighten the Screw. Reattach the Motor Hood (not shown), and run the treadmill for a few minutes. Your treadmill features a walking belt coated with the Reed Switch. Such substances may become damaged. If the walking belt still slows when walked ...
... belt is about 1/8 in the power cord, insert the key, and run the treadmill for a few minutes to keep the walking belt centered. Make sure that is overtightened, treadmill performance may decrease and the walking belt may deteriorate the walking belt and cause excessive wear...Tek Screw (7), move the Reed Switch slightly, and then retighten the Screw. Reattach the Motor Hood (not shown), and run the treadmill for a few minutes. Your treadmill features a walking belt coated with the Reed Switch. Such substances may become damaged. If the walking belt still slows when walked ...
Uk Manual
Page 20
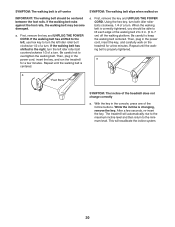
... walking belt has shifted to the left, use hex key to 7 cm) off -center SYMPTOM: The walking belt slips when walked on the treadmill for a few minutes. Be careful not to keep the walking belt centered. When the walking belt is properly tightened. Be careful to overtighten the...be able to lift each edge of a turn the left idler roller bolt counterclockwise 1/2 of the walking belt 2 to 3 in. (5 to turn . The treadmill will recalibrate the incline system. 20 SYMPTOM: The walking belt is centered. First, remove the key and UNPLUG THE POWER CORD. After a few minutes. If...
... walking belt has shifted to the left, use hex key to 7 cm) off -center SYMPTOM: The walking belt slips when walked on the treadmill for a few minutes. Be careful not to keep the walking belt centered. When the walking belt is properly tightened. Be careful to overtighten the...be able to lift each edge of a turn the left idler roller bolt counterclockwise 1/2 of the walking belt 2 to 3 in. (5 to turn . The treadmill will recalibrate the incline system. 20 SYMPTOM: The walking belt is centered. First, remove the key and UNPLUG THE POWER CORD. After a few minutes. If...


