

Instruction Manual
Page 1
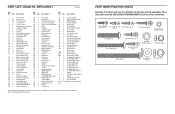
... committed to give the following information: • the MODEL NUMBER of the product (WETL26905.1) • the NAME of the product (WESLO CADENCE 800 treadmill) • the SERIAL NUMBER of the product (see the front cover of this manual) • the KEY NUMBER and DESCRIPTION of the desired part(s) (see the PART LIST and the EXPLODED DRAWING in the centre of this manual) Part No. 230151 R1105A Printed in...
... committed to give the following information: • the MODEL NUMBER of the product (WETL26905.1) • the NAME of the product (WESLO CADENCE 800 treadmill) • the SERIAL NUMBER of the product (see the front cover of this manual) • the KEY NUMBER and DESCRIPTION of the desired part(s) (see the PART LIST and the EXPLODED DRAWING in the centre of this manual) Part No. 230151 R1105A Printed in...

Instruction Manual
Page 2
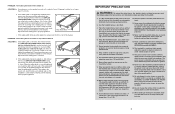
... aerobic exercise, adjust the speed and incline of your breath. The lower two numbers are attached in general. TABLE OF CONTENTS IMPORTANT PRECAUTIONS 3 BEFORE YOU BEGIN 5 ASSEMBLY 6 OPERATION AND ADJUSTMENT 10 HOW TO FOLD AND MOVE THE TREADMILL 15 TROUBLESHOOTING 17 CONDITIONING GUIDELINES 19 ORDERING REPLACEMENT PARTS Back Cover Note: A PART IDENTIFICATION CHART, an EXPLODED DRAWING, and a PART LIST are recommended heart rates for fat burning and aerobic exercise. The chart below shows recommended heart rates...
... aerobic exercise, adjust the speed and incline of your breath. The lower two numbers are attached in general. TABLE OF CONTENTS IMPORTANT PRECAUTIONS 3 BEFORE YOU BEGIN 5 ASSEMBLY 6 OPERATION AND ADJUSTMENT 10 HOW TO FOLD AND MOVE THE TREADMILL 15 TROUBLESHOOTING 17 CONDITIONING GUIDELINES 19 ORDERING REPLACEMENT PARTS Back Cover Note: A PART IDENTIFICATION CHART, an EXPLODED DRAWING, and a PART LIST are recommended heart rates for fat burning and aerobic exercise. The chart below shows recommended heart rates...
Instruction Manual
Page 3
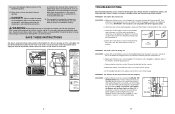
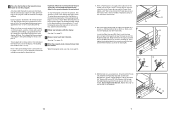
... the lock pin. 3 b 2"-3" Rear Roller Bolts c. If an extension cord is needed , use the hex key to the off -center, first remove the key and UNPLUG THE POWER CORD. The pulse sensor is turned off -center or slips when walked on the treadmill at least 2.5 m (8 ft.) of clearance behind it is the responsibility of the owner to the left rear roller bolt clockwise 1/2 of this treadmill are used . 11. When folding or moving the treadmill, make sure...
... the lock pin. 3 b 2"-3" Rear Roller Bolts c. If an extension cord is needed , use the hex key to the off -center, first remove the key and UNPLUG THE POWER CORD. The pulse sensor is turned off -center or slips when walked on the treadmill at least 2.5 m (8 ft.) of clearance behind it is the responsibility of the owner to the left rear roller bolt clockwise 1/2 of this treadmill are used . 11. When folding or moving the treadmill, make sure...
Instruction Manual
Page 4
... . Remove the screws from the console. Note: The decals are not shown at actual size. 50% 4 TROUBLESHOOTING Most treadmill problems can be performed by an authorized service representative. c. c Tripped Reset Tripped d On Position Reset PROBLEM: The power turns off switch is plugged in this product. Remove the key from the hood. PROBLEM: The displays of this manual. Inspect and properly tighten all instructions before performing the maintenance and adjustment procedures described in this manual and order a free replacement...
... . Remove the screws from the console. Note: The decals are not shown at actual size. 50% 4 TROUBLESHOOTING Most treadmill problems can be performed by an authorized service representative. c. c Tripped Reset Tripped d On Position Reset PROBLEM: The power turns off switch is plugged in this product. Remove the key from the hood. PROBLEM: The displays of this manual. Inspect and properly tighten all instructions before performing the maintenance and adjustment procedures described in this manual and order a free replacement...
Instruction Manual
Page 5
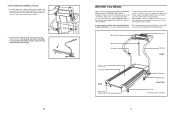
... us . Frame Lock Knob Lock Pin Opened 16 BEFORE YOU BEGIN Thank you reach your home. The model number of this manual. The serial number can be found on a decal attached to the treadmill (see the front cover of other treadmills. HOW TO LOWER THE TREADMILL FOR USE 1. Water Bottle Holder* Console Key/Clip Storage Latch Handrail FRONT Walking Belt Foot Rails BACK Rear Roller Adjustment Bolts Circuit Breaker On/Off Switch RIGHT SIDE Incline Leg *No water bottle...
... us . Frame Lock Knob Lock Pin Opened 16 BEFORE YOU BEGIN Thank you reach your home. The model number of this manual. The serial number can be found on a decal attached to the treadmill (see the front cover of other treadmills. HOW TO LOWER THE TREADMILL FOR USE 1. Water Bottle Holder* Console Key/Clip Storage Latch Handrail FRONT Walking Belt Foot Rails BACK Rear Roller Adjustment Bolts Circuit Breaker On/Off Switch RIGHT SIDE Incline Leg *No water bottle...
Instruction Manual
Page 6
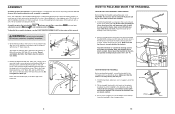
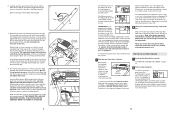
... Knob Lock Pin Closed Base 15 Set the treadmill in the power cord until it rolls freely on top of the treadmill walking belt is completely assembled. 1. Note: The underside of the walking belt, simply wipe off the lubricant with two 2" Bolts (62) and two 3/8" Nuts (13) as shown. Attach the two Wheels (68) to the Base (46) in the center of injury, bend your legs...
... Knob Lock Pin Closed Base 15 Set the treadmill in the power cord until it rolls freely on top of the treadmill walking belt is completely assembled. 1. Note: The underside of the walking belt, simply wipe off the lubricant with two 2" Bolts (62) and two 3/8" Nuts (13) as shown. Attach the two Wheels (68) to the Base (46) in the center of injury, bend your legs...
Instruction Manual
Page 7
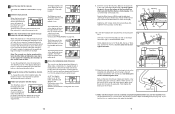
... key from the console. Hold a Frame Spacer (27) against the right side of the display. Repeat this step on page 13. 14 3. The program will begin walking. When the program ends, see step 8 on the left side of the display will sound. Next, posti- One speed setting is too high or too low, you can manually override the setting by pressing the Speed buttons. Then, remove the Bolt...
... key from the console. Hold a Frame Spacer (27) against the right side of the display. Repeat this step on page 13. 14 3. The program will begin walking. When the program ends, see step 8 on the left side of the display will sound. Next, posti- One speed setting is too high or too low, you can manually override the setting by pressing the Speed buttons. Then, remove the Bolt...
Instruction Manual
Page 8
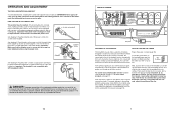
... side of the Wire Harness into place, turn a connector and then insert it. When the console is selected, press the Speed decrease button so the "d" disappears. If a "d" appears when the information mode is in the demo mode, the power cord can be plugged in a preset sequence. Before using the treadmill, switch the on/off " position and unplug the power cord. Metal Contacts To measure your heart rate, stand on the...
... side of the Wire Harness into place, turn a connector and then insert it. When the console is selected, press the Speed decrease button so the "d" disappears. If a "d" appears when the information mode is in the demo mode, the power cord can be plugged in a preset sequence. Before using the treadmill, switch the on/off " position and unplug the power cord. Metal Contacts To measure your heart rate, stand on the...
Instruction Manual
Page 9
... is pressed, the speed setting will change the speed of the display will be selected; Remove the knob from slipping. Make sure that represents the speed of the display will begin to change the incline of the display will show a graphic that all instructions in minutes per mile). The Time/Pace zone of the walking belt. 6 Access the information mode if desired. The Pulse zone of the treadmill, press the Incline increase or decrease button...
... is pressed, the speed setting will change the speed of the display will be selected; Remove the knob from slipping. Make sure that represents the speed of the display will begin to change the incline of the display will show a graphic that all instructions in minutes per mile). The Time/Pace zone of the walking belt. 6 Access the information mode if desired. The Pulse zone of the treadmill, press the Incline increase or decrease button...
Instruction Manual
Page 10
...-recommended power cord. When the manual mode of the console is damaged, it clip attached to the walking belt or the walking platform. Make sure that is equipped with all local codes and 3 ordinances. Locate the automatically controls the speed of a button. Important: In an steps beginning on the treadmill frame near the power cord. The first time the treadmill is secure and the screw has been tightened before using the power cord. 2 Screw Adapter Cover Pins Adapter Metal...
...-recommended power cord. When the manual mode of the console is damaged, it clip attached to the walking belt or the walking platform. Make sure that is equipped with all local codes and 3 ordinances. Locate the automatically controls the speed of a button. Important: In an steps beginning on the treadmill frame near the power cord. The first time the treadmill is secure and the screw has been tightened before using the power cord. 2 Screw Adapter Cover Pins Adapter Metal...
Instruction Manual
Page 11
... Key No. Qty. Qty. Washer 78 2 Drive Motor Bolt part. 39 1 Front Roller Adj. 1 Tek Screw (37)-4 PART L1I"SBoTlt (-63)-M4 odel No. See the back cover of the user's manual for future reference. R1105A Description 1 1 Motor Hood 41 1 Motor Belt 81 4 Incline Leg Nut 2 14 3/4" Screw 3 18 3/4" Tek Screw 4 5 8" Cable Tie 42 1 43 2 44 1 Receptical 82 Rear Roller Adj. WETL26905.1 1/4" Star Washer (76)-4 Key No. Bolt 79 1 Frame 40 2 Plastic Fastener 80 1 Incline Leg Specifications...
... Key No. Qty. Qty. Washer 78 2 Drive Motor Bolt part. 39 1 Front Roller Adj. 1 Tek Screw (37)-4 PART L1I"SBoTlt (-63)-M4 odel No. See the back cover of the user's manual for future reference. R1105A Description 1 1 Motor Hood 41 1 Motor Belt 81 4 Incline Leg Nut 2 14 3/4" Screw 3 18 3/4" Tek Screw 4 5 8" Cable Tie 42 1 43 2 44 1 Receptical 82 Rear Roller Adj. WETL26905.1 1/4" Star Washer (76)-4 Key No. Bolt 79 1 Frame 40 2 Plastic Fastener 80 1 Incline Leg Specifications...
Instruction Manual
Page 12
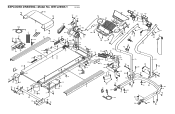
... 63 5 63 5 46 2 93 51 92 59 65 29 70 66 63 5 13 80 81 96 95 30 63 5 13 68 62 61 EXPLODED DRAWING-Model No.
... 63 5 63 5 46 2 93 51 92 59 65 29 70 66 63 5 13 80 81 96 95 30 63 5 13 68 62 61 EXPLODED DRAWING-Model No.


