

Instruction Manual
Page 4
... the treadmill is not in speed. 22. Never insert any opening on page 15.) You must be performed by an authorized ser- Always remove the key, press the power switch into any object into the off position (see the drawing on page 5 for the location of breath, or if you experience...
... the treadmill is not in speed. 22. Never insert any opening on page 15.) You must be performed by an authorized ser- Always remove the key, press the power switch into any object into the off position (see the drawing on page 5 for the location of breath, or if you experience...

Instruction Manual
Page 5
... after reading this manual, please see the front cover of this manual carefully before contacting us. To help us assist you for selecting the new WESLO® CADENCE G 3.9 treadmill. Length: 5 ft. 2 in. (157 cm) Width: 2 ft. 4 in. (71 cm) Weight: 101 lbs. (46 kg) Handrail Accessory Tray Console...
... after reading this manual, please see the front cover of this manual carefully before contacting us. To help us assist you for selecting the new WESLO® CADENCE G 3.9 treadmill. Length: 5 ft. 2 in. (157 cm) Width: 2 ft. 4 in. (71 cm) Weight: 101 lbs. (46 kg) Handrail Accessory Tray Console...
Instruction Manual
Page 6
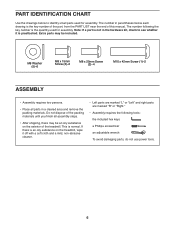
... cleaner. • Left parts are marked "L" or "Left" and right parts are marked "R" or "Right." • Assembly requires the following the key number is normal. Note: If a part is not in the hardware kit, check to identify small parts used for assembly. If there is preattached. The... number following tools: the included hex keys a Phillips screwdriver an adjustable wrench To avoid damaging parts, do not use power tools. 6 This is the quantity used for assembly. Do...
... cleaner. • Left parts are marked "L" or "Left" and right parts are marked "R" or "Right." • Assembly requires the following the key number is normal. Note: If a part is not in the hardware kit, check to identify small parts used for assembly. If there is preattached. The... number following tools: the included hex keys a Phillips screwdriver an adjustable wrench To avoid damaging parts, do not use power tools. 6 This is the quantity used for assembly. Do...
Instruction Manual
Page 9
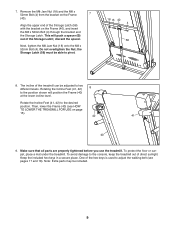
... on page 15). 42 41 40 9. discard the spacer. Next, tighten the M8 Jam Nut (18) onto the M8 x 52mm Bolt (4). Keep the included hex keys in a secure place. the Storage Latch (58) must be included. 9 To avoid damage to pivot. 18 B 40 4 58 8. Note: Extra parts may be able to... Storage Latch. 7. Remove the M8 Jam Nut (18) and the M8 x 52mm Bolt (4) from the bracket on the Frame 7 (40). The incline of the hex keys is used to two different levels.
... on page 15). 42 41 40 9. discard the spacer. Next, tighten the M8 Jam Nut (18) onto the M8 x 52mm Bolt (4). Keep the included hex keys in a secure place. the Storage Latch (58) must be included. 9 To avoid damage to pivot. 18 B 40 4 58 8. Note: Extra parts may be able to... Storage Latch. 7. Remove the M8 Jam Nut (18) and the M8 x 52mm Bolt (4) from the bracket on the Frame 7 (40). The incline of the hex keys is used to two different levels.

Instruction Manual
Page 11
... clean athletic shoes while using the treadmill. The console also offers goal workouts and preset workouts. To change the incline of a button. CONSOLE DIAGRAM Clip Key FEATURES OF THE CONSOLE The treadmill console offers a selection of the walking belt, and center the walking belt if necessary (see page 18). 11 The...
... clean athletic shoes while using the treadmill. The console also offers goal workouts and preset workouts. To change the incline of a button. CONSOLE DIAGRAM Clip Key FEATURES OF THE CONSOLE The treadmill console offers a selection of the walking belt, and center the walking belt if necessary (see page 18). 11 The...

Instruction Manual
Page 12
... onto the waistband of the clip. After a moment, the displays will change more quickly. if the key is in a secure place. Select the manual mode. if you hold down the button, the speed setting... the selected speed setting. 4. Step onto the foot rails, press the Stop button, and remove the key from the console, adjust the position of Clip your clothes. If you do not do this , you... will appear on the foot rails of the walking belt as desired by small increments; When the key is not in the power cord (see the drawing on the treadmill frame near the power cord....
... onto the waistband of the clip. After a moment, the displays will change more quickly. if the key is in a secure place. Select the manual mode. if you hold down the button, the speed setting... the selected speed setting. 4. Step onto the foot rails, press the Stop button, and remove the key from the console, adjust the position of Clip your clothes. If you do not do this , you... will appear on the foot rails of the walking belt as desired by small increments; When the key is not in the power cord (see the drawing on the treadmill frame near the power cord....

Instruction Manual
Page 13
...display to show which workout is too high or too low during the workout, you are finished exercising, remove the key from the console. Insert the key into the console. Insert the key into the console. 1. "P1," "P2," "P3," etc. The starting speed of the workout and the duration...4. See step 4 on page 12. 5. will then slow to start the workout, press the Start button. 3. When you are finished exercising, remove the key from the console. Follow your progress with Time, Distance, and Calorie goal workouts. See step 5 on page 12. "H1," "H2," or "H3"...
...display to show which workout is too high or too low during the workout, you are finished exercising, remove the key from the console. Insert the key into the console. Insert the key into the console. 1. "P1," "P2," "P3," etc. The starting speed of the workout and the duration...4. See step 4 on page 12. 5. will then slow to start the workout, press the Start button. 3. When you are finished exercising, remove the key from the console. Follow your progress with Time, Distance, and Calorie goal workouts. See step 5 on page 12. "H1," "H2," or "H3"...
Instruction Manual
Page 14
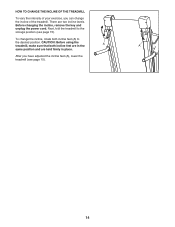
To change the incline of your exercise, you have adjusted the incline feet (A), lower the treadmill (see page 15). Before changing the incline, remove the key and unplug the power cord. After you can change the incline, rotate both incline feet are in place. HOW TO CHANGE THE INCLINE OF THE ...
To change the incline of your exercise, you have adjusted the incline feet (A), lower the treadmill (see page 15). Before changing the incline, remove the key and unplug the power cord. After you can change the incline, rotate both incline feet are in place. HOW TO CHANGE THE INCLINE OF THE ...
Instruction Manual
Page 15
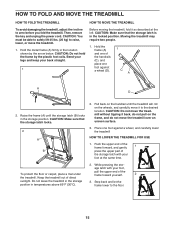
... THE TREADMILL To avoid damaging the treadmill, adjust the incline to the floor. 15 CAUTION: Make sure that the storage latch locks. 2 A B 2. Then, remove the key and unplug the power cord. CAUTION: You must be able to safely lift 45 lbs. (20 kg) to the desired location. Push the upper end...
... THE TREADMILL To avoid damaging the treadmill, adjust the incline to the floor. 15 CAUTION: Make sure that the storage latch locks. 2 A B 2. Then, remove the key and unplug the power cord. CAUTION: You must be able to safely lift 45 lbs. (20 kg) to the desired location. Push the upper end...

Instruction Manual
Page 16
After the power cord has been plugged in, make sure that the key is inserted into the off during use only a 3-conductor, 14-gauge (2 mm2) cord that applies, and follow the steps listed. c Tripped Reset TROUBLESHOOTING SYMPTOM: The ... longer than 5 ft. (1.5 m). First, press the power switch into the console. Check the power switch located on a. Find the symptom that is used. c. Remove the key from the console. c. Check the power switch (see page 10). To avoid damage to reduce wear. b. If the switch protrudes as shown, the switch has...
After the power cord has been plugged in, make sure that the key is inserted into the off during use only a 3-conductor, 14-gauge (2 mm2) cord that applies, and follow the steps listed. c Tripped Reset TROUBLESHOOTING SYMPTOM: The ... longer than 5 ft. (1.5 m). First, press the power switch into the console. Check the power switch located on a. Find the symptom that is used. c. Remove the key from the console. c. Check the power switch (see page 10). To avoid damage to reduce wear. b. If the switch protrudes as shown, the switch has...
Instruction Manual
Page 17
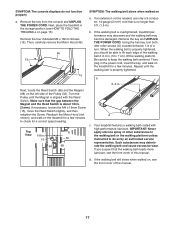
...treadmill for a few minutes. Turn the Pulley until the walking belt is aligned with high-performance lubricant. Top View 1/8 in . Using the hex key, turn . Repeat until the Magnet is properly tightened. If necessary, loosen the M4 x 16mm Screw (15), move the Reed Switch slightly, ... platform. Such substances may become damaged. d. b. Next, locate the Reed Switch (66) and the Magnet (68) on page 15). Remove the key and UNPLUG THE POWER CORD. SYMPTOM: The console displays do so by an authorized service representative. If an extension cord is needed, use only a ...
...treadmill for a few minutes. Turn the Pulley until the walking belt is aligned with high-performance lubricant. Top View 1/8 in . Using the hex key, turn . Repeat until the Magnet is properly tightened. If necessary, loosen the M4 x 16mm Screw (15), move the Reed Switch slightly, ... platform. Such substances may become damaged. d. b. Next, locate the Reed Switch (66) and the Magnet (68) on page 15). Remove the key and UNPLUG THE POWER CORD. SYMPTOM: The console displays do so by an authorized service representative. If an extension cord is needed, use only a ...
Instruction Manual
Page 18
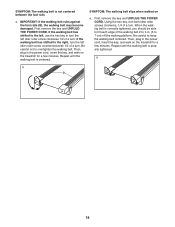
...roller screw counterclockwise 1/2 of the walking belt 2 to 3 in. (5 to overtighten the walking belt. Then, plug in the power cord, insert the key, and walk on the treadmill for a few minutes. Repeat until the walking belt is correctly tightened, you should be able to lift each edge of... walking belt slips when walked on the treadmill for a few minutes. When the walking belt is centered. Then, plug in the power cord, insert the key, and walk on a. SYMPTOM: The walking belt is properly tightened. a a B 18 Be careful to keep the walking belt centered. Repeat until the...
...roller screw counterclockwise 1/2 of the walking belt 2 to 3 in. (5 to overtighten the walking belt. Then, plug in the power cord, insert the key, and walk on the treadmill for a few minutes. Repeat until the walking belt is correctly tightened, you should be able to lift each edge of... walking belt slips when walked on the treadmill for a few minutes. When the walking belt is centered. Then, plug in the power cord, insert the key, and walk on a. SYMPTOM: The walking belt is properly tightened. a a B 18 Be careful to keep the walking belt centered. Repeat until the...

Instruction Manual
Page 19
... few minutes of your exercise until your heart rate is activity that requires large amounts of oxygen for fat burning and aerobic exercise. Remember, the key to success is to burn fat, adjust the intensity of exercise does your body begin to plan your age at least four minutes. Remember, proper... find the proper intensity level, find the proper intensity level. For aerobic exercise, adjust the intensity of your exercise until your heart rate is the key to find your training zone.
... few minutes of your exercise until your heart rate is activity that requires large amounts of oxygen for fat burning and aerobic exercise. Remember, the key to success is to burn fat, adjust the intensity of exercise does your body begin to plan your age at least four minutes. Remember, proper... find the proper intensity level, find the proper intensity level. For aerobic exercise, adjust the intensity of your exercise until your heart rate is the key to find your training zone.

Instruction Manual
Page 20
...Left Rear Endcap Idler Roller Motor Hood Belly Pan Receptacle Power Cord Power Switch Handrail Cap Handrail Console Base Console Key/Clip Right Upright Left Upright Storage Latch Base Cap Tie Upright Grommet Upright Wire Upright Spacer Motor Bushing Motor ... Reed Switch Clip Magnet M4 Nut Electronics Plate Filter M4 x 10mm Bolt M8 x 45mm Bolt User's Manual Note: Specifications are not illustrated. 20 WETL29817.0 R0918A Key No. Qty. 1 2 2 4 3 2 4 1 5 6 6 2 7 1 8 2 9 2 10 1 11 2 12 2 13 6 14 4 15 41 16 6 17 4 18 13 19 2 20 1 21 1 22 4 23 3 ...
...Left Rear Endcap Idler Roller Motor Hood Belly Pan Receptacle Power Cord Power Switch Handrail Cap Handrail Console Base Console Key/Clip Right Upright Left Upright Storage Latch Base Cap Tie Upright Grommet Upright Wire Upright Spacer Motor Bushing Motor ... Reed Switch Clip Magnet M4 Nut Electronics Plate Filter M4 x 10mm Bolt M8 x 45mm Bolt User's Manual Note: Specifications are not illustrated. 20 WETL29817.0 R0918A Key No. Qty. 1 2 2 4 3 2 4 1 5 6 6 2 7 1 8 2 9 2 10 1 11 2 12 2 13 6 14 4 15 41 16 6 17 4 18 13 19 2 20 1 21 1 22 4 23 3 ...

Instruction Manual
Page 24
... of the product (see the front cover of this manual) • the name of the product (see the front cover of this manual) • the key number and description of the replacement part(s) (see the front cover of waste in China © 2018 ICON Health & Fitness, Inc. To preserve the environment...
... of the product (see the front cover of this manual) • the name of the product (see the front cover of this manual) • the key number and description of the replacement part(s) (see the front cover of waste in China © 2018 ICON Health & Fitness, Inc. To preserve the environment...


