

User Manual
Page 2
...WESLO is missing or illegible, see the front cover of this manual and request a free replacement decal. If a decal is a registered trademark of the warning decal(s). TABLE OF CONTENTS WARNING DECAL PLACEMENT 2 IMPORTANT PRECAUTIONS 3 BEFORE YOU BEGIN 4 ASSEMBLY 5 HOW TO USE THE EXERCISE... CYCLE 10 MAINTENANCE AND TROUBLESHOOTING 12 EXERCISE GUIDELINES 13 PART LIST 14 EXPLODED DRAWING 15 ORDERING REPLACEMENT PARTS Back Cover LIMITED WARRANTY Back Cover WARNING DECAL...
...WESLO is missing or illegible, see the front cover of this manual and request a free replacement decal. If a decal is a registered trademark of the warning decal(s). TABLE OF CONTENTS WARNING DECAL PLACEMENT 2 IMPORTANT PRECAUTIONS 3 BEFORE YOU BEGIN 4 ASSEMBLY 5 HOW TO USE THE EXERCISE... CYCLE 10 MAINTENANCE AND TROUBLESHOOTING 12 EXERCISE GUIDELINES 13 PART LIST 14 EXPLODED DRAWING 15 ORDERING REPLACEMENT PARTS Back Cover LIMITED WARRANTY Back Cover WARNING DECAL...
User Manual
Page 3
... ensure that could become caught on your exercise cycle. Wear appropriate exercise clothes while exercising; Keep your exercise cycle indoors, away from your exercise cycle at least 2 ft. (0.6 m) of clearance around your exercise cycle. 10. Keep your back straight while using your exercise cycle. Various factors, including the user's... insert the seat pin into one of the holes in this manual. 3 Before beginning any worn parts immediately. 12. Your exercise cycle is intended only as described in the seat post; do not insert the seat pin under age 12 and pets away from...
... ensure that could become caught on your exercise cycle. Wear appropriate exercise clothes while exercising; Keep your exercise cycle indoors, away from your exercise cycle at least 2 ft. (0.6 m) of clearance around your exercise cycle. 10. Keep your back straight while using your exercise cycle. Various factors, including the user's... insert the seat pin into one of the holes in this manual. 3 Before beginning any worn parts immediately. 12. Your exercise cycle is intended only as described in the seat post; do not insert the seat pin under age 12 and pets away from...

User Manual
Page 4
To help us . Seat Water Bottle Holder* Pulse Sensor Seat Knob 4 Handlebar Console Resistance Knob Pedal/Strap *Water bottle is an effective exercise for selecting the new WESLO® PURSUIT 330 exercise cycle. BEFORE YOU BEGIN Congratulations for increasing cardiovascular fitness, building endurance, and toning the body. If you , note the product model number and serial...
To help us . Seat Water Bottle Holder* Pulse Sensor Seat Knob 4 Handlebar Console Resistance Knob Pedal/Strap *Water bottle is an effective exercise for selecting the new WESLO® PURSUIT 330 exercise cycle. BEFORE YOU BEGIN Congratulations for increasing cardiovascular fitness, building endurance, and toning the body. If you , note the product model number and serial...

User Manual
Page 5
...is completed. In addition to the included tool(s), assembly requires a Phillips screwdriver wrench , and pliers . , an adjustable As you assemble the exercise cycle, use the drawings below each drawing is the quantity needed for assembly. Note: Some small parts may have been preassembled. M8 Split Washer ...the key number of the part, from the PART LIST near the end of the exercise cycle in a cleared area and remove the packing materials. The number in parentheses below to assemble the exercise cycle, call 1-800-445-2480. Assembly requires two persons. Place all parts of...
...is completed. In addition to the included tool(s), assembly requires a Phillips screwdriver wrench , and pliers . , an adjustable As you assemble the exercise cycle, use the drawings below each drawing is the quantity needed for assembly. Note: Some small parts may have been preassembled. M8 Split Washer ...the key number of the part, from the PART LIST near the end of the exercise cycle in a cleared area and remove the packing materials. The number in parentheses below to assemble the exercise cycle, call 1-800-445-2480. Assembly requires two persons. Place all parts of...
User Manual
Page 6
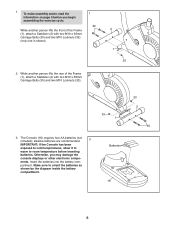
... batteries (not included); nents. Make sure to room temperature before you may damage the console displays or other electronic compo- Otherwise, you begin assembling the exercise cycle. Batteries 16 33 2 30 6 1.
... batteries (not included); nents. Make sure to room temperature before you may damage the console displays or other electronic compo- Otherwise, you begin assembling the exercise cycle. Batteries 16 33 2 30 6 1.
User Manual
Page 9
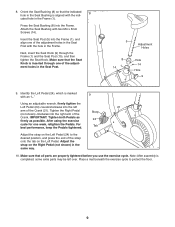
... with the indi- Tighten the Right Pedal (not shown) clockwise into the left over. IMPORTANT: Tighten both Pedals as firmly as possible. After using the exercise 24 cycle for one of the adjustment holes in the Seat Post. 5 Adjustment Holes 8 14 1 Hole 14 Hole 9 9. Adjust the strap on the ...Crank. Make sure that the indicated 8 hole in the Frame. Orient the Seat Bushing (8) so that all parts are properly tightened before you use the exercise cycle. Press the Seat Bushing (8) into the Frame (1), and align one of the strap onto the tab on the Right Pedal (not shown) in...
... with the indi- Tighten the Right Pedal (not shown) clockwise into the left over. IMPORTANT: Tighten both Pedals as firmly as possible. After using the exercise 24 cycle for one of the adjustment holes in the Seat Post. 5 Adjustment Holes 8 14 1 Hole 14 Hole 9 9. Adjust the strap on the ...Crank. Make sure that the indicated 8 hole in the Frame. Orient the Seat Bushing (8) so that all parts are properly tightened before you use the exercise cycle. Press the Seat Bushing (8) into the Frame (1), and align one of the strap onto the tab on the Right Pedal (not shown) in...

User Manual
Page 10
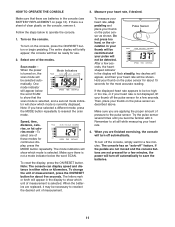
... your workouts. The console features a selection of the adjustment holes in the lowest Seat Post position. IMPORTANT: To avoid damaging the exercise cycle, stop pedaling, the time mode will be displayed only while the pulse sensor is inserted into the frame and the seat post... • Pulse-This mode displays your heart rate when you stop turning the knob when turning it becomes difficult. Make sure that provide instant exercise feedback during your pedaling pace, in a repeating cycle. Next, adjust the straps to decrease the resis- Note: If you use the pulse...
... your workouts. The console features a selection of the adjustment holes in the lowest Seat Post position. IMPORTANT: To avoid damaging the exercise cycle, stop pedaling, the time mode will be displayed only while the pulse sensor is inserted into the frame and the seat post... • Pulse-This mode displays your heart rate when you stop turning the knob when turning it becomes difficult. Make sure that provide instant exercise feedback during your pedaling pace, in a repeating cycle. Next, adjust the straps to decrease the resis- Note: If you use the pulse...
User Manual
Page 11
... heart- Then, place your heart rate is selected, and a second mode indica- When the batteries are replaced, it may be shown. When you are finished exercising, the console will appear in the console (see BATTERY REPLACEMENT on the console, remove it . To turn off " feature. One mode indicator will show which...
... heart- Then, place your heart rate is selected, and a second mode indica- When the batteries are replaced, it may be shown. When you are finished exercising, the console will appear in the console (see BATTERY REPLACEMENT on the console, remove it . To turn off " feature. One mode indicator will show which...
User Manual
Page 12
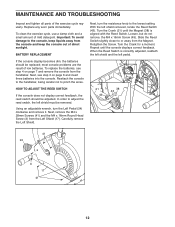
Important: To avoid damage to the console, keep the console out of the exercise cycle regularly. Next, remove the M4 x 28mm Screws (41) and the M4 x 16mm Round Head Screw (3) from the console and keep liquids away from the ...Left Shield (17). Next, turn the Left Pedal (24) clockwise and remove it. Retighten the Screw. To clean the exercise cycle, use a damp cloth and a small amount of low batteries. To replace the batteries, see step 3 on page 7 and remove the console from the Magnet...
Important: To avoid damage to the console, keep the console out of the exercise cycle regularly. Next, remove the M4 x 28mm Screws (41) and the M4 x 16mm Round Head Screw (3) from the console and keep liquids away from the ...Left Shield (17). Next, turn the Left Pedal (24) clockwise and remove it. Retighten the Screw. To clean the exercise cycle, use a damp cloth and a small amount of low batteries. To replace the batteries, see step 3 on page 7 and remove the console from the Magnet...

User Manual
Page 13
...your training zone for longer than 20 minutes.) Breathe regularly and deeply as you may affect the accuracy of heart rate readings. For aerobic exercise, adjust the intensity of rest between workouts. The lowest number is the heart rate for fat burning, the middle number is the heart... zone. (During the first few minutes of time. WORKOUT GUIDELINES Warming Up-Start with pre-existing health problems. The pulse sensor is to make exercise a regular and enjoyable part of your age at the proper intensity is intended only as a guide to success is not a medical device. Remember...
...your training zone for longer than 20 minutes.) Breathe regularly and deeply as you may affect the accuracy of heart rate readings. For aerobic exercise, adjust the intensity of rest between workouts. The lowest number is the heart rate for fat burning, the middle number is the heart... zone. (During the first few minutes of time. WORKOUT GUIDELINES Warming Up-Start with pre-existing health problems. The pulse sensor is to make exercise a regular and enjoyable part of your age at the proper intensity is intended only as a guide to success is not a medical device. Remember...


