Installation Guide
Page 1
Y Table of Contents (complete 2 Requesting of Service Assistance 2 1 cmpoftant Inf of mation ...3 Before You Begin .......... 4 Installing the Ice Maker 6 1 Installing the I Water une 16 Final installation .,........ 22 Starting the ice Maker 24 TrOubleshOOting .......... 25 MODULAR ICEMAKER KIT PART NO. 2155462 Rev. A
Y Table of Contents (complete 2 Requesting of Service Assistance 2 1 cmpoftant Inf of mation ...3 Before You Begin .......... 4 Installing the Ice Maker 6 1 Installing the I Water une 16 Final installation .,........ 22 Starting the ice Maker 24 TrOubleshOOting .......... 25 MODULAR ICEMAKER KIT PART NO. 2155462 Rev. A
Installation Guide
Page 2
...Whirlpool have failed to : Major Appliance Consumer Action Program 20 North Wacker Drive Chicago, IL 60606 MACAP will, in turn, inform us of your action. 3 If you are not satisfied with this kit for bottom freezers only 11 Mounting the water valve 12 Connecting the water valve tubing.. ...... .I3 Mounting the ice maker... 22 Connecting the power/ leveling the unit 23 Starting the ice Maker 24 Troubleshooting 25 Operational notes 25 Troubleshooting chart 25 The modular ice maker service sheet .... 26 Ice maker replacement parts list 27 Requesting Assistance or Service If you need...
...Whirlpool have failed to : Major Appliance Consumer Action Program 20 North Wacker Drive Chicago, IL 60606 MACAP will, in turn, inform us of your action. 3 If you are not satisfied with this kit for bottom freezers only 11 Mounting the water valve 12 Connecting the water valve tubing.. ...... .I3 Mounting the ice maker... 22 Connecting the power/ leveling the unit 23 Starting the ice Maker 24 Troubleshooting 25 Operational notes 25 Troubleshooting chart 25 The modular ice maker service sheet .... 26 Ice maker replacement parts list 27 Requesting Assistance or Service If you need...
Installation Guide
Page 3
... serious personal injury if the suggested procedures are not observed. @ThisInstallation Guide gives you complete instructions on how to install the Ice Maker Kit in your refrigerator-freezer and connect a water line to it. Also, make sure that you to potentially dangerous conditions.... ICUSTOMER INSTALLATION IS NOT WARRANTED BY THE REFRIGERATOR OR ICE MAKER MANUFACTURER. I R These conditions can install it carefully SOyou are familiar with an auto- You can purchase one at most hardware or...
... serious personal injury if the suggested procedures are not observed. @ThisInstallation Guide gives you complete instructions on how to install the Ice Maker Kit in your refrigerator-freezer and connect a water line to it. Also, make sure that you to potentially dangerous conditions.... ICUSTOMER INSTALLATION IS NOT WARRANTED BY THE REFRIGERATOR OR ICE MAKER MANUFACTURER. I R These conditions can install it carefully SOyou are familiar with an auto- You can purchase one at most hardware or...
Installation Guide
Page 5
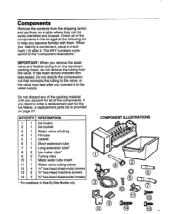
.... KEY QTY. 1 1 2 1 3 1 4 1 5 1 6 1 7 1 8 2 9 2 10 1 11 1 12 4 13 2 14 2 DESCRIPTION Ice maker Ice bucket Water valve w/tubing Fill tube Gasket Short extension tube Long extension tube* ice maker clips* Tubing clips Metal water tube insert Water valve tubing clamp % ' hex-head sheet-metal screws N'hex-head machine...mark ( 3) after you need to the "Component Illustrations." Do not discard any of the packing material until you account for the Ice Maker, a replacement parts list is provided on a table where they can be easily identified and located. COMPONENT ILLUSTRATIONS Check all of the...
.... KEY QTY. 1 1 2 1 3 1 4 1 5 1 6 1 7 1 8 2 9 2 10 1 11 1 12 4 13 2 14 2 DESCRIPTION Ice maker Ice bucket Water valve w/tubing Fill tube Gasket Short extension tube Long extension tube* ice maker clips* Tubing clips Metal water tube insert Water valve tubing clamp % ' hex-head sheet-metal screws N'hex-head machine...mark ( 3) after you need to the "Component Illustrations." Do not discard any of the packing material until you account for the Ice Maker, a replacement parts list is provided on a table where they can be easily identified and located. COMPONENT ILLUSTRATIONS Check all of the...

Installation Guide
Page 6
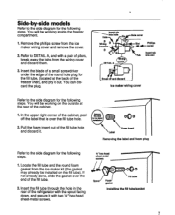
Installing the Ice Maker Making preparations Refer to do not force the door against the stop ,... that you enough room to access the areas to install the ice maker. 3.On an appliance with a bottom freezer, remove the slide-out basket, the ice cube trays, and the wire ice cube holder (if necessary, refer to "Top/ bottom freezer models...page 7. This should only have a refrigerator with a top or a bottom freezer, open the freezer door to support the ice bucket. Set these items aside. Carefully pull the refrigerator away from the AC wall outlet. If you should give you can...
Installing the Ice Maker Making preparations Refer to do not force the door against the stop ,... that you enough room to access the areas to install the ice maker. 3.On an appliance with a bottom freezer, remove the slide-out basket, the ice cube trays, and the wire ice cube holder (if necessary, refer to "Top/ bottom freezer models...page 7. This should only have a refrigerator with a top or a bottom freezer, open the freezer door to support the ice bucket. Set these items aside. Carefully pull the refrigerator away from the AC wall outlet. If you should give you can...
Installation Guide
Page 7
... and discard them. 3. Pull the foam insert out of the freezer liner), and pry it with a pair of the cabinet, peel off and discard Ice maker wiring cover 000 Foam insert Removing the label and foam plug Refer to the side diagram for the fill tube, (located at the rear of... to the side diagram for the following steps. 1. Locate the fill tube and the round foam gasket from the ice maker wiring cover and remove the cover. 2. Remove the phillips screw from the ice maker kit (the gasket may already be working on the fill tube). spout / Foam I gasket I I Installing the fill ...
... and discard them. 3. Pull the foam insert out of the freezer liner), and pry it with a pair of the cabinet, peel off and discard Ice maker wiring cover 000 Foam insert Removing the label and foam plug Refer to the side diagram for the fill tube, (located at the rear of... to the side diagram for the following steps. 1. Locate the fill tube and the round foam gasket from the ice maker wiring cover and remove the cover. 2. Remove the phillips screw from the ice maker kit (the gasket may already be working on the fill tube). spout / Foam I gasket I I Installing the fill ...
Installation Guide
Page 9
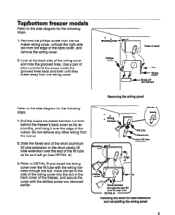
... cover over the edge of the freezer, and secure the cover with the wiring harness through the slot. Remove the phillips screw from the ice maker wiring cover, unhook the right side tab from the cutout. 2. Hook the tab in the side of the wiring cover into the slot...Removing the wiring panel DETAlL A d 14 extension ab Installing the short fill tube extension and reinstalling the wiring panel Phillips 2. Pull the 4-wire ice maker harness out from the wiring cover. Top/bottom freezer models Refer to the side diagram for the following steps. 1. Refer to the side diagram for...
... cover over the edge of the freezer, and secure the cover with the wiring harness through the slot. Remove the phillips screw from the ice maker wiring cover, unhook the right side tab from the cutout. 2. Hook the tab in the side of the wiring cover into the slot...Removing the wiring panel DETAlL A d 14 extension ab Installing the short fill tube extension and reinstalling the wiring panel Phillips 2. Pull the 4-wire ice maker harness out from the wiring cover. Top/bottom freezer models Refer to the side diagram for the following steps. 1. Refer to the side diagram for...

Installation Guide
Page 13
... the free end of the fill tube spout and discard it is made for the following steps. 1. Locate the water valve tubing clamp (from the ice maker kit), and note that it . 2. Refer to the fill tube If it all the way into the two clips (see DETAILS A and 6). II - P DETAlL B -.. . . tubing...
... the free end of the fill tube spout and discard it is made for the following steps. 1. Locate the water valve tubing clamp (from the ice maker kit), and note that it . 2. Refer to the fill tube If it all the way into the two clips (see DETAILS A and 6). II - P DETAlL B -.. . . tubing...
Installation Guide
Page 14
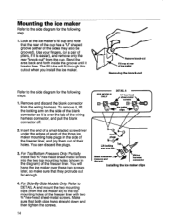
... blank connector off. 2. Bend the area back and forth inside the groove until it breaks free. Remove and discard the blank connector from the ice maker kit) to the top mounting holes of the sides may also be grooved). PlYJet' 1 Lift locking arm over these two screws later, so...the following /-' DETAlLA . You can discard the plugs. 3. Insert the end of a small-bladed screwdriver under the edges of each of the three ice maker mounting hole plugs in the diagram) of their holes. For Top/Bottom Freezers Only: Partially install two %" hex-head sheet-metal screws into the two...
... blank connector off. 2. Bend the area back and forth inside the groove until it breaks free. Remove and discard the blank connector from the ice maker kit) to the top mounting holes of the sides may also be grooved). PlYJet' 1 Lift locking arm over these two screws later, so...the following /-' DETAlLA . You can discard the plugs. 3. Insert the end of a small-bladed screwdriver under the edges of each of the three ice maker mounting hole plugs in the diagram) of their holes. For Top/Bottom Freezers Only: Partially install two %" hex-head sheet-metal screws into the two...

Installation Guide
Page 15
...the raised tab). The connectors will snap over the tabs and lock into place (you installed earlier. screw Mounting the ice maker (top and bottom freezers) 3. bracket connectors Mounting the ice maker (sideby-side models) 15 Refer to the freezer liner mounting hole with the mounting hole in the freezer liner, then... arm will fit together only one way. 2. Mount the bottom bracket of the freezer liner. For Side-By-Side Models Only: Position the ice maker so that the bottom mounting bracket hole is aligned with a %" hex-head sheet-metal screw. For Top/Bottom Freezers Only: Hang the...
...the raised tab). The connectors will snap over the tabs and lock into place (you installed earlier. screw Mounting the ice maker (top and bottom freezers) 3. bracket connectors Mounting the ice maker (sideby-side models) 15 Refer to the freezer liner mounting hole with the mounting hole in the freezer liner, then... arm will fit together only one way. 2. Mount the bottom bracket of the freezer liner. For Side-By-Side Models Only: Position the ice maker so that the bottom mounting bracket hole is aligned with a %" hex-head sheet-metal screw. For Top/Bottom Freezers Only: Hang the...

Installation Guide
Page 23
Place a level on top of the ice maker. If you need to relevel the refrigerator, follow the procedure to be adjusted, loosen the bottom bracket screws (see the side diagram) and position the ... it is -IT crooked and needs to adjust the front casters, as desired, then tighten the bracket screws. Leveling acrew Sheet-metal screw Leveling the ice maker 23 the unit 2. Plug the power cord into its AC outlet, and carefully push the refrigerator back against the wall. Check the position of the...
Place a level on top of the ice maker. If you need to relevel the refrigerator, follow the procedure to be adjusted, loosen the bottom bracket screws (see the side diagram) and position the ... it is -IT crooked and needs to adjust the front casters, as desired, then tighten the bracket screws. Leveling acrew Sheet-metal screw Leveling the ice maker 23 the unit 2. Plug the power cord into its AC outlet, and carefully push the refrigerator back against the wall. Check the position of the...
Installation Guide
Page 24
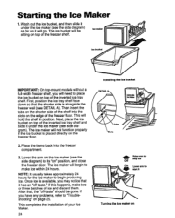
... notice that the shorter side is available, you have any problems, refer to Turning the ice maker on " position, and close the freezer door. Wash out the ice bucket, and then slide it under the ice maker (see the side diagram) as far as it has an 'off Lower arm to '...see the side diagram) to * stop ice off taste." Place the items back into the slots on page 25. The ice bucket will go. Next, place the ice bucket on top of your Ice Maker. 24 Installing the ice bucket Raise arm to its 'on The ice maker will hold the shelf in position. This...
... notice that the shorter side is available, you have any problems, refer to Turning the ice maker on " position, and close the freezer door. Wash out the ice bucket, and then slide it under the ice maker (see the side diagram) as far as it has an 'off Lower arm to '...see the side diagram) to * stop ice off taste." Place the items back into the slots on page 25. The ice bucket will go. Next, place the ice bucket on top of your Ice Maker. 24 Installing the ice bucket Raise arm to its 'on The ice maker will hold the shelf in position. This...
Installation Guide
Page 25
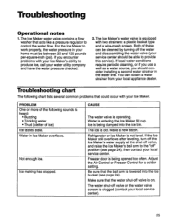
... should consider installing a second water strainer in the water line. Troubleshooting chart The following sounds is old. Ice making has stopped. Refrigerator or Ice Maker is clogged (contact your water utility company and have the water pressure checked. 2. Adjust the Air Control ...clatter of these can obtain a water strainer from your home must be able to work properly, the water pressure in Ice Maker overflows. then contact your Ice Maker. The Ice Maker's water valve is operating. CAUSE The water valve is equipped with two strainers: a plastic basket type and a ...
... should consider installing a second water strainer in the water line. Troubleshooting chart The following sounds is old. Ice making has stopped. Refrigerator or Ice Maker is clogged (contact your water utility company and have the water pressure checked. 2. Adjust the Air Control ...clatter of these can obtain a water strainer from your home must be able to work properly, the water pressure in Ice Maker overflows. then contact your Ice Maker. The Ice Maker's water valve is operating. CAUSE The water valve is equipped with two strainers: a plastic basket type and a ...
Installation Guide
Page 26
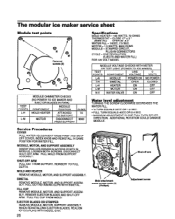
...AND WATER FILL) FOR 120 VOLT MODEL MODULE VOLTAGE CHECKS WITH METER OR TEST LIGHT (POWER TO ICE MAKER) TEST I I LINE I 0 MODULE OHMMETER CHECKS (NO POWER TO ICE MAKER AND EJECTOR BLADES IN PARK) TEST 1 I MODULE I Service Procedures COVER PULL WATER ADJUSTMENT KNOB ...IS ONE FULL TURN EITHER DIRECTION. MOTOR -u WAlTS, 8800 OHMS MODULE -STAMPED CIRCUIT, PLUG-IN CONNECTORS CYCLE - REINSERT TO FULL DEPTH. The modular ice maker Module test points Removal wrewe (3) service sheet Specifications MOLD HEATER - 185 WAllS, 72 OHMS THERMOSTAT - CLOSE 17" * 3 o (BIMETAL) OPEN ...
...AND WATER FILL) FOR 120 VOLT MODEL MODULE VOLTAGE CHECKS WITH METER OR TEST LIGHT (POWER TO ICE MAKER) TEST I I LINE I 0 MODULE OHMMETER CHECKS (NO POWER TO ICE MAKER AND EJECTOR BLADES IN PARK) TEST 1 I MODULE I Service Procedures COVER PULL WATER ADJUSTMENT KNOB ...IS ONE FULL TURN EITHER DIRECTION. MOTOR -u WAlTS, 8800 OHMS MODULE -STAMPED CIRCUIT, PLUG-IN CONNECTORS CYCLE - REINSERT TO FULL DEPTH. The modular ice maker Module test points Removal wrewe (3) service sheet Specifications MOLD HEATER - 185 WAllS, 72 OHMS THERMOSTAT - CLOSE 17" * 3 o (BIMETAL) OPEN ...
Installation Guide
Page 27
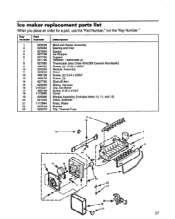
Ice maker replacement parts list When you place an order for a part, use the "Part Number," not the "Key Number." Key Number 1 3 Part Number 628228 628356 Description ... Module, Assembly 11 628258 Motor 12 489136 Screw, (2) 3-24 x 23AX" 13 489276 Screw, (3) 14 627792 Shut-off Arm 15 628256 Wiring, Harness 16 2155021 Clip, Ice Maker 17 489128 Screw, 8-32 x 27164" 18 1115846 Cover 19 628366 Module Assembly (Includes Items 10, 11, and 12) 20 627929 Valve, Solenoid 21 1115844 Knob...
Ice maker replacement parts list When you place an order for a part, use the "Part Number," not the "Key Number." Key Number 1 3 Part Number 628228 628356 Description ... Module, Assembly 11 628258 Motor 12 489136 Screw, (2) 3-24 x 23AX" 13 489276 Screw, (3) 14 627792 Shut-off Arm 15 628256 Wiring, Harness 16 2155021 Clip, Ice Maker 17 489128 Screw, 8-32 x 27164" 18 1115846 Cover 19 628366 Module Assembly (Includes Items 10, 11, and 12) 20 627929 Valve, Solenoid 21 1115844 Knob...
Installation Guide
Page 28
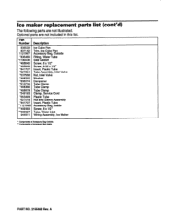
A Ice maker replacement parts The following parts are not included in this list. Part Number 939529 837142 1121997 l 836489 '1106508 l 488645 '488649 l 841707 '627854 '537588 l 488292 l 836074 l 51 0716 l 488366 '488878 l 549193 l 653499 '627018 l 841707 l l 121995 "489069 l *939027 944811 Description ice Cube Pan Trim, Ice Cube Pan Accessory Bag, Outside ..., Service Cord Plastic Tube Nut and Sleeve Assembly Insert, Plastic Tube Accessory Bag, Inside Screw, 8 x l/2' Tube, Water Inlet Wiring Assembly, Ice Maker list (cont'd) PART NO. 2156462 Rev. Optional parts are not illustrated.
A Ice maker replacement parts The following parts are not included in this list. Part Number 939529 837142 1121997 l 836489 '1106508 l 488645 '488649 l 841707 '627854 '537588 l 488292 l 836074 l 51 0716 l 488366 '488878 l 549193 l 653499 '627018 l 841707 l l 121995 "489069 l *939027 944811 Description ice Cube Pan Trim, Ice Cube Pan Accessory Bag, Outside ..., Service Cord Plastic Tube Nut and Sleeve Assembly Insert, Plastic Tube Accessory Bag, Inside Screw, 8 x l/2' Tube, Water Inlet Wiring Assembly, Ice Maker list (cont'd) PART NO. 2156462 Rev. Optional parts are not illustrated.


