Installation Guide
Page 2
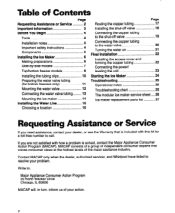
... dealer, authorized servicer, and Whirlpool have failed to : Major Appliance Consumer Action Program 20 North Wacker Drive Chicago, IL 60606 MACAP will, in turn, inform us of your action. 3 Table of Contents Page Requesting Assistance or Service 2 important Information 3 Before You Begin 4 Tools 4 Installation notes 4 Important safety instructions 4 Components 5 installing the ice Maker 6 Making preparations 6 Side...
... dealer, authorized servicer, and Whirlpool have failed to : Major Appliance Consumer Action Program 20 North Wacker Drive Chicago, IL 60606 MACAP will, in turn, inform us of your action. 3 Table of Contents Page Requesting Assistance or Service 2 important Information 3 Before You Begin 4 Tools 4 Installation notes 4 Important safety instructions 4 Components 5 installing the ice Maker 6 Making preparations 6 Side...
Installation Guide
Page 3
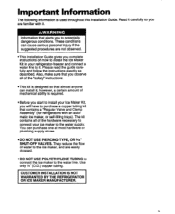
... USE PIERCING-TYPE, OR %r" SHUT-OFF VALVES. l Before you start to install your Ice Maker Kit, you complete instructions on how to install the Ice Maker Kit in your ice maker to the water line. matic ice maker, or self-filling trays). They reduce the flow of the 'safety" instructions. *This kit is designed so that contains a "Regular Valve and Clamp Assembly...
... USE PIERCING-TYPE, OR %r" SHUT-OFF VALVES. l Before you start to install your Ice Maker Kit, you complete instructions on how to install the Ice Maker Kit in your ice maker to the water line. matic ice maker, or self-filling trays). They reduce the flow of the 'safety" instructions. *This kit is designed so that contains a "Regular Valve and Clamp Assembly...
Installation Guide
Page 4
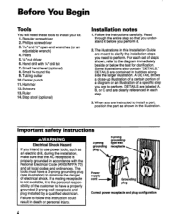
Pliers 5.%* nut driver 6. Hammer 12. Step stool (optional) Installation notes 1. Small hand level (optional) 8. Follow the instructions carefully. Important safety instructions Electrical Shock Hazard If you intend to use power tools, such as shown in accordance with 1/4*drill bit 7. ... refer to minimize the danger of a specific step you are to perform. When you are instructed to install a part, position the part as an electric drill, during the installation, make sure that you understand it before you perform it is the personal responsibility of the ...
Pliers 5.%* nut driver 6. Hammer 12. Step stool (optional) Installation notes 1. Small hand level (optional) 8. Follow the instructions carefully. Important safety instructions Electrical Shock Hazard If you intend to use power tools, such as shown in accordance with 1/4*drill bit 7. ... refer to minimize the danger of a specific step you are to perform. When you are instructed to install a part, position the part as an electric drill, during the installation, make sure that you understand it before you perform it is the personal responsibility of the ...
Installation Guide
Page 16
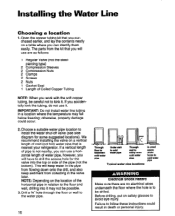
... in relation to avoid eye injury. Failure to install the water shut-off valve (see side diagram for the valve into it may fall below freezing; If you will have to be possible. 3. Choose a suitable water pipe location to follow these instructions could occur. 2. Drill a %'hole through the... you will keep water in the pipe from flowing down onto the drill, and also keep sediment from the kit that is nearest your refrigerator. Installing the Water Line Choosing a location 1. NOTE: Depending on a vertical length of the pipe (not the bottom). This will use it . The...
... in relation to avoid eye injury. Failure to install the water shut-off valve (see side diagram for the valve into it may fall below freezing; If you will have to be possible. 3. Choose a suitable water pipe location to follow these instructions could occur. 2. Drill a %'hole through the... you will keep water in the pipe from flowing down onto the drill, and also keep sediment from the kit that is nearest your refrigerator. Installing the Water Line Choosing a location 1. NOTE: Depending on a vertical length of the pipe (not the bottom). This will use it . The...
Installation Guide
Page 17
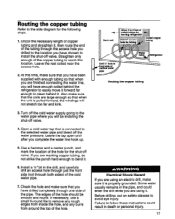
...Shock Hazard If you will have chosen to install the shut-off valve. Before drilling, put on safety glasses to remove any rough edges from inside the hole, and any burrs from around the top of the cold water pipe. 7. Failure to follow these instructions could enter the drill while you are.... 1. Also make sure that when the unit is properly grounded. Use a hammer and a center punch, and mark the location of the hole should be installing the shut-off the water pressure. Check the hole and make sure that the coils are marking copper tubing, do not strike the punch hard...
...Shock Hazard If you will have chosen to install the shut-off valve. Before drilling, put on safety glasses to remove any rough edges from inside the hole, and any burrs from around the top of the cold water pipe. 7. Failure to follow these instructions could enter the drill while you are.... 1. Also make sure that when the unit is properly grounded. Use a hammer and a center punch, and mark the location of the hole should be installing the shut-off the water pressure. Check the hole and make sure that the coils are marking copper tubing, do not strike the punch hard...