Installation Guide
Page 1
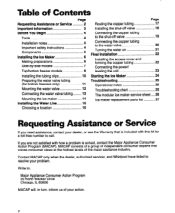
Y Table of Contents (complete 2 Requesting of Service Assistance 2 1 cmpoftant Inf of mation ...3 Before You Begin .......... 4 Installing the Ice Maker 6 1 Installing the I Water une 16 Final installation .,........ 22 Starting the ice Maker 24 TrOubleshOOting .......... 25 MODULAR ICEMAKER KIT PART NO. 2155462 Rev. A
Y Table of Contents (complete 2 Requesting of Service Assistance 2 1 cmpoftant Inf of mation ...3 Before You Begin .......... 4 Installing the Ice Maker 6 1 Installing the I Water une 16 Final installation .,........ 22 Starting the ice Maker 24 TrOubleshOOting .......... 25 MODULAR ICEMAKER KIT PART NO. 2155462 Rev. A
Installation Guide
Page 2
...dealer, authorized servicer, and Whirlpool have failed to resolve ... You Begin 4 Tools 4 Installation notes 4 Important safety instructions 4 Components 5 installing the ice Maker 6 Making preparations 6 Side-by-side models 7 Top/bottom freezer models 9 Installing the ... 12 Connecting the water valve tubing.. ...... .I3 Mounting the ice maker 14 installing the Water Line 16 Choosing a location 16 Page Routing...23 Starting the ice Maker 24 Troubleshooting 25 Operational notes 25 Troubleshooting chart 25 The modular ice maker service sheet .... 26 Ice maker replacement parts list ...
...dealer, authorized servicer, and Whirlpool have failed to resolve ... You Begin 4 Tools 4 Installation notes 4 Important safety instructions 4 Components 5 installing the ice Maker 6 Making preparations 6 Side-by-side models 7 Top/bottom freezer models 9 Installing the ... 12 Connecting the water valve tubing.. ...... .I3 Mounting the ice maker 14 installing the Water Line 16 Choosing a location 16 Page Routing...23 Starting the ice Maker 24 Troubleshooting 25 Operational notes 25 Troubleshooting chart 25 The modular ice maker service sheet .... 26 Ice maker replacement parts list ...
Installation Guide
Page 3
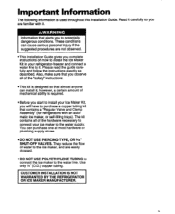
... self-filling trays). Use only '!4" (O.D.) copper tubing. information that alerts you complete instructions on how to install the Ice Maker Kit in your ice maker to potentially dangerous conditions. Please read the guide carefully and follow the instructions exactly as described. They reduce the flow of mechanical ability is required. ...
... self-filling trays). Use only '!4" (O.D.) copper tubing. information that alerts you complete instructions on how to install the Ice Maker Kit in your ice maker to potentially dangerous conditions. Please read the guide carefully and follow the instructions exactly as described. They reduce the flow of mechanical ability is required. ...
Installation Guide
Page 4
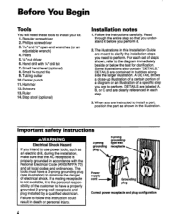
... configuration A Failure to follow this instruction could result in this Installation Guide are meant to clarify the installation steps you are instructed to install your kit. 1. Phillips screwdriver 3. %6" and l/i' open-end wrenches (or an adjustable wrench) 4. Center punch 11. A DETAIL shows a close-up illustration of a certain portion of a diagram or an...
... configuration A Failure to follow this instruction could result in this Installation Guide are meant to clarify the installation steps you are instructed to install your kit. 1. Phillips screwdriver 3. %6" and l/i' open-end wrenches (or an adjustable wrench) 4. Center punch 11. A DETAIL shows a close-up illustration of a certain portion of a diagram or an...
Installation Guide
Page 5
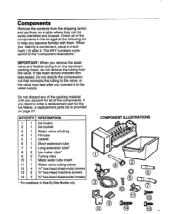
...tube Gasket Short extension tube Long extension tube* ice maker clips* Tubing clips Metal water tube insert Water valve tubing clamp % ' hex-head sheet-metal screws N'hex-head machine screws %' hex-head sheet-metal screws l For installation in the kit against the following list to order a replacement... part for all of the components. IMPORTANT: When you account for the Ice Maker, a replacement parts list is provided on a table where they can be easily ...
...tube Gasket Short extension tube Long extension tube* ice maker clips* Tubing clips Metal water tube insert Water valve tubing clamp % ' hex-head sheet-metal screws N'hex-head machine screws %' hex-head sheet-metal screws l For installation in the kit against the following list to order a replacement... part for all of the components. IMPORTANT: When you account for the Ice Maker, a replacement parts list is provided on a table where they can be easily ...
Installation Guide
Page 7
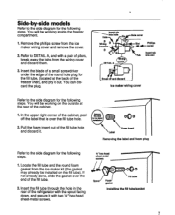
You can discard the plug. Locate the fill tube and the round foam gasket from the ice maker kit (the gasket may already be working inside the freezer compartment. 1. If not already done, slide the... off the label that is over the end of pliers, break away the tabs from the ice maker wiring cover and remove the cover. 2. You will be installed on the outside at the back of the cabinet..., peel off and discard Ice maker wiring cover 000 Foam insert Removing the label and foam plug Refer to the side diagram for the...
You can discard the plug. Locate the fill tube and the round foam gasket from the ice maker kit (the gasket may already be working inside the freezer compartment. 1. If not already done, slide the... off the label that is over the end of pliers, break away the tabs from the ice maker wiring cover and remove the cover. 2. You will be installed on the outside at the back of the cabinet..., peel off and discard Ice maker wiring cover 000 Foam insert Removing the label and foam plug Refer to the side diagram for the...

Installation Guide
Page 8
Some kits may have a long straight plastic extension in place of the freezer liner so it will be working inside the freezer compartment. 1. I -%5 &s- Insert the tab at ... fill tube as far as it locks into the freezer liner slot. an pm Ihole qliole cover HOI 0 Wring harnesa c) 0Wiring cover Replacing the ke maker wiring cover 8 Refer to the side diagram for the following step. Press the pin on page 10. Position the long aluminum fill tube extension so...
Some kits may have a long straight plastic extension in place of the freezer liner so it will be working inside the freezer compartment. 1. I -%5 &s- Insert the tab at ... fill tube as far as it locks into the freezer liner slot. an pm Ihole qliole cover HOI 0 Wring harnesa c) 0Wiring cover Replacing the ke maker wiring cover 8 Refer to the side diagram for the following step. Press the pin on page 10. Position the long aluminum fill tube extension so...

Installation Guide
Page 13
... A and 6). tubing 4. Press the tubing into the clamp with a loop at the bottom of the tubing later. 6. Locate the water valve tubing clamp (from the ice maker kit), and note that it all the way into spout a8 far a8 poesible I = 'Tighten\ wrew on spout a8 much as necessary up , and slide it...
... A and 6). tubing 4. Press the tubing into the clamp with a loop at the bottom of the tubing later. 6. Locate the water valve tubing clamp (from the ice maker kit), and note that it all the way into spout a8 far a8 poesible I = 'Tighten\ wrew on spout a8 much as necessary up , and slide it...
Installation Guide
Page 14
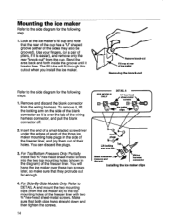
... enough. Remove knockout Removing the knockout Refer to the side diagram for the following /-' DETAlLA . You will fit through this cutout when you install the ice maker. steps. 1 SXS MODELS W hex-head 1. For Side-By-Side Models Only: Refer to DETAIL A and mount the two mounting clips (from the wiring harness... and note that the rear of the cup has a "U" shaped groove (either of their holes. Remove and discard the blank connector from the ice maker kit) to the top mounting holes of the blank connector so it , lift the locking arm on the side of the freezer liner with two S'hex...
... enough. Remove knockout Removing the knockout Refer to the side diagram for the following /-' DETAlLA . You will fit through this cutout when you install the ice maker. steps. 1 SXS MODELS W hex-head 1. For Side-By-Side Models Only: Refer to DETAIL A and mount the two mounting clips (from the wiring harness... and note that the rear of the cup has a "U" shaped groove (either of their holes. Remove and discard the blank connector from the ice maker kit) to the top mounting holes of the blank connector so it , lift the locking arm on the side of the freezer liner with two S'hex...
Installation Guide
Page 16
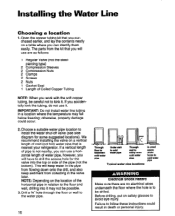
... horizontal pipe in the pipe from flowing down onto the drill, and also keep sediment from the kit that you will keep water in relation to follow these instructions could occur. 2. Open the copper tubing kit that is nearest your refrigerator. This will have to avoid eye injury. NOTE: Depending on a vertical...
... horizontal pipe in the pipe from flowing down onto the drill, and also keep sediment from the kit that you will keep water in relation to follow these instructions could occur. 2. Open the copper tubing kit that is nearest your refrigerator. This will have to avoid eye injury. NOTE: Depending on a vertical...
Installation Guide
Page 18
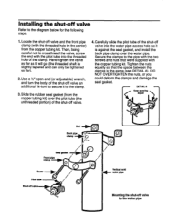
... additional l/e-turn the body of the shut-off valve and the front pipe clamp (with the threaded hole in the center) from the copper tubing kit) over the water pipe. Then, being careful not to the diagram below for the following steps. 1. Slide the rubber seal gasket (from the copper tubing... kit. Tighten the nuts equally so that were supplied with the two screws and nuts that the space between the clamps is slightly tapered and can ...
... additional l/e-turn the body of the shut-off valve and the front pipe clamp (with the threaded hole in the center) from the copper tubing kit) over the water pipe. Then, being careful not to the diagram below for the following steps. 1. Slide the rubber seal gasket (from the copper tubing... kit. Tighten the nuts equally so that were supplied with the two screws and nuts that the space between the clamps is slightly tapered and can ...