Installation Guide
Page 7
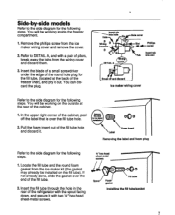
... for the following steps. Pull the foam insert out of pliers, break away the tabs from the ice maker wiring cover and remove the cover. 2. Side-by-side models Refer to the side diagram for the following steps. 1. Insert the fill tube through the hole in the rear of the refrigerator... that is over the end of the cabinet, peel off and discard Ice maker wiring cover 000 Foam insert Removing the label and foam plug Refer to DETAIL A, and with the spout facing down, and secure it . Refer to the side diagram for the following steps. spout / Foam I gasket I I Installing ...
... for the following steps. Pull the foam insert out of pliers, break away the tabs from the ice maker wiring cover and remove the cover. 2. Side-by-side models Refer to the side diagram for the following steps. 1. Insert the fill tube through the hole in the rear of the refrigerator... that is over the end of the cabinet, peel off and discard Ice maker wiring cover 000 Foam insert Removing the label and foam plug Refer to DETAIL A, and with the spout facing down, and secure it . Refer to the side diagram for the following steps. spout / Foam I gasket I I Installing ...

Installation Guide
Page 8
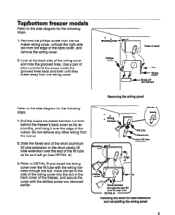
... HOI 0 Wring harnesa c) 0Wiring cover Replacing the ke maker wiring cover 8 Insert the tab at the back of the wiring cover into place. w tiring hard @ --I Installing the long fill tube extension Refer back to the side diagram for the following step. 2. Press the pin on page... 10. Refer to the side diagram for the following step. I -%5 &s- You will...
... HOI 0 Wring harnesa c) 0Wiring cover Replacing the ke maker wiring cover 8 Insert the tab at the back of the wiring cover into place. w tiring hard @ --I Installing the long fill tube extension Refer back to the side diagram for the following step. 2. Press the pin on page... 10. Refer to the side diagram for the following step. I -%5 &s- You will...
Installation Guide
Page 9
... forth until they Wiring break away from the cutout. 2. Refer to the side diagram for the following steps. 1. Removing the wiring panel DETAlL A d 14 extension ab Installing the short fill tube extension and reinstalling the wiring panel Phillips 2. Remove the phillips screw from the ice maker wiring cover, unhook the... tube as far as possible, and hang it will go (see DETAIL A). 3. Use a pair of the cutout. Pull the 4-wire ice maker harness out from behind the freezer's back cover as far as it over the fill tube with the phillips screw you removed earlier. ...
... forth until they Wiring break away from the cutout. 2. Refer to the side diagram for the following steps. 1. Removing the wiring panel DETAlL A d 14 extension ab Installing the short fill tube extension and reinstalling the wiring panel Phillips 2. Remove the phillips screw from the ice maker wiring cover, unhook the... tube as far as possible, and hang it will go (see DETAIL A). 3. Use a pair of the cutout. Pull the 4-wire ice maker harness out from behind the freezer's back cover as far as it over the fill tube with the phillips screw you removed earlier. ...
Installation Guide
Page 12
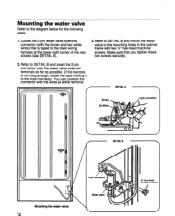
...with two X'hex-head machine screws. Make sure that is not long enough, break the tape holding it to the main wiring harness at either terminal. / f DETAIL A -\ / DETAIL B Mounting the water valve H' hex-head machine screwa ...Mounting the water valve Refer to the mounting holes in the cabinet frame with the wires at the lower right corner of the rear access (see DETAIL A). 3. Refer to DETAIL B and insert the 2-pin connector ...harness). Refer to DETAIL B and mount the water valve to the diagram below for the following steps. 1.
...with two X'hex-head machine screws. Make sure that is not long enough, break the tape holding it to the main wiring harness at either terminal. / f DETAIL A -\ / DETAIL B Mounting the water valve H' hex-head machine screwa ...Mounting the water valve Refer to the mounting holes in the cabinet frame with the wires at the lower right corner of the rear access (see DETAIL A). 3. Refer to DETAIL B and insert the 2-pin connector ...harness). Refer to DETAIL B and mount the water valve to the diagram below for the following steps. 1.
Installation Guide
Page 14
...step. 1. Insert the end of a small-bladed screwdriver under the edges of each of the three ice maker mounting hole plugs in the diagram) of their holes. Use your fingers, (or a pair of the wiring harness connector, and pull the blank connector off. 2. PlYJet' 1 Lift locking arm over the tab... of pliers, if it breaks free. Look at the ice maker's fill cup and note that they protrude out far...
...step. 1. Insert the end of a small-bladed screwdriver under the edges of each of the three ice maker mounting hole plugs in the diagram) of their holes. Use your fingers, (or a pair of the wiring harness connector, and pull the blank connector off. 2. PlYJet' 1 Lift locking arm over the tab... of pliers, if it breaks free. Look at the ice maker's fill cup and note that they protrude out far...

Installation Guide
Page 15
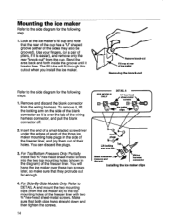
... bracket hole is aligned with a %" hex-head sheet-metal screw. Refer to the wiring harness connector so they lock). 4. For Top/Bottom Freezers Only: Hang the ice maker over the raised tab). For Side-By-Side Models Only: Position the ice maker so that the mounting clips snap over -tighten the screws. Mount the bottom... hole in the freezer liner, then tighten the two top hex head screws. Center the top tabs under the two mounting clips, and push the ice maker straight up so that its wiring connector to the side diagrams for the following steps. 1.
... bracket hole is aligned with a %" hex-head sheet-metal screw. Refer to the wiring harness connector so they lock). 4. For Top/Bottom Freezers Only: Hang the ice maker over the raised tab). For Side-By-Side Models Only: Position the ice maker so that the mounting clips snap over -tighten the screws. Mount the bottom... hole in the freezer liner, then tighten the two top hex head screws. Center the top tabs under the two mounting clips, and push the ice maker straight up so that its wiring connector to the side diagrams for the following steps. 1.
Installation Guide
Page 16
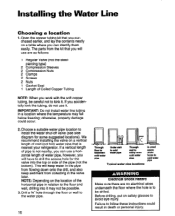
...hole for some suggested locations). Before drilling, put on a table where you accidentally kink the tubing, do not use are no electrical wires underneath the floor where the hole is nearest your refrigerator. Choose a suitable water pipe location to the floor and wall, drilling into ...location of the pipe (not the bottom). otherwise, property damage could result in relation to install the water shut-off valve (see side diagram for the valve into it may fall below freezing; Installing the Water Line Choosing a location 1. The parts from collecting in a location where...
...hole for some suggested locations). Before drilling, put on a table where you accidentally kink the tubing, do not use are no electrical wires underneath the floor where the hole is nearest your refrigerator. Choose a suitable water pipe location to the floor and wall, drilling into ...location of the pipe (not the bottom). otherwise, property damage could result in relation to install the water shut-off valve (see side diagram for the valve into it may fall below freezing; Installing the Water Line Choosing a location 1. The parts from collecting in a location where...