Installation Guide
Page 2
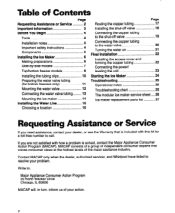
... only when the dealer, authorized servicer, and Whirlpool have failed to resolve your action. 3 Table of Contents Page Requesting Assistance or Service 2 important Information 3 Before You Begin 4 Tools 4 Installation notes 4 Important safety instructions 4 Components 5 installing the ice Maker 6 Making preparations 6 Side-by-side models 7 Top/bottom freezer models 9 Installing the tubing clips 10 Preparing the...
... only when the dealer, authorized servicer, and Whirlpool have failed to resolve your action. 3 Table of Contents Page Requesting Assistance or Service 2 important Information 3 Before You Begin 4 Tools 4 Installation notes 4 Important safety instructions 4 Components 5 installing the ice Maker 6 Making preparations 6 Side-by-side models 7 Top/bottom freezer models 9 Installing the tubing clips 10 Preparing the...
Installation Guide
Page 5
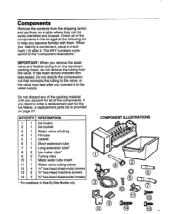
... Remove the contents from the valve. The KEY numbers correspond to order a replacement part for all of the components. IMPORTANT: When you account for the Ice Maker, a replacement parts list is provided on a table where they can be easily identified and located. COMPONENT ILLUSTRATIONS It has been factory-installed and leak-tested... the Styrofoam packing insert, do not remove the tubing from the shipping carton and set them . Check all of the components in Side-By-Side Models only.
... Remove the contents from the valve. The KEY numbers correspond to order a replacement part for all of the components. IMPORTANT: When you account for the Ice Maker, a replacement parts list is provided on a table where they can be easily identified and located. COMPONENT ILLUSTRATIONS It has been factory-installed and leak-tested... the Styrofoam packing insert, do not remove the tubing from the shipping carton and set them . Check all of the components in Side-By-Side Models only.

Installation Guide
Page 6
...-freezers Set these items aside. receptacle receptacle ly P>wer cord \: plug ant K receptac lop freezer model Bottom freezer model Sk&by -side models" on page 9. Installing the Ice Maker Making preparations Refer to the illustration below . Failure to do not force the door against the stop , the door will... the door. If you can easily access the rear panel. On top-mount models without a full-width freezer shelf, remove the ice tray shelf. If you enough room to access the areas to install the ice maker. 3.On an appliance with a bottom freezer, remove the slide-out basket, ...
...-freezers Set these items aside. receptacle receptacle ly P>wer cord \: plug ant K receptac lop freezer model Bottom freezer model Sk&by -side models" on page 9. Installing the Ice Maker Making preparations Refer to the illustration below . Failure to do not force the door against the stop , the door will... the door. If you can easily access the rear panel. On top-mount models without a full-width freezer shelf, remove the ice tray shelf. If you enough room to access the areas to install the ice maker. 3.On an appliance with a bottom freezer, remove the slide-out basket, ...
Installation Guide
Page 7
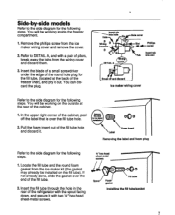
.... Refer to the side diagram for the following steps. Side-by-side models Refer to the side diagram for the following steps. You can discard the plug. Locate the fill tube and the round foam gasket from the ice maker kit (the gasket may already be installed on the outside at the back... plug for the following steps. 1. You will be working inside the freezer compartment. 1. Pull the foam insert out of the cabinet, peel off and discard Ice maker wiring cover 000 Foam insert Removing the label and foam plug Refer to the side diagram for the fill tube, (located at the rear of...
.... Refer to the side diagram for the following steps. Side-by-side models Refer to the side diagram for the following steps. You can discard the plug. Locate the fill tube and the round foam gasket from the ice maker kit (the gasket may already be installed on the outside at the back... plug for the following steps. 1. You will be working inside the freezer compartment. 1. Pull the foam insert out of the cabinet, peel off and discard Ice maker wiring cover 000 Foam insert Removing the label and foam plug Refer to the side diagram for the fill tube, (located at the rear of...
Installation Guide
Page 9
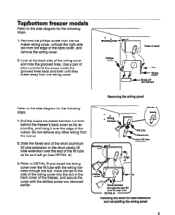
... over the fill tube with the phillips screw you removed earlier. Refer to the side diagram for the following steps. 1. Top/bottom freezer models Refer to the side diagram for the following steps. 1. Look at the back side of pliers and bend the areas inside the Tab grooved... fill tube extension and reinstalling the wiring panel Use a pair of the wiring cover screw and note the grooved lines. Pull the 4-wire ice maker harness out from the wiring cover. Phillips 2. Slide the flared end of the short aluminum fill tube extension or the short plastic fill tube...
... over the fill tube with the phillips screw you removed earlier. Refer to the side diagram for the following steps. 1. Top/bottom freezer models Refer to the side diagram for the following steps. 1. Look at the back side of pliers and bend the areas inside the Tab grooved... fill tube extension and reinstalling the wiring panel Use a pair of the wiring cover screw and note the grooved lines. Pull the 4-wire ice maker harness out from the wiring cover. Phillips 2. Slide the flared end of the short aluminum fill tube extension or the short plastic fill tube...
Installation Guide
Page 14
...your fingers, (or a pair of their holes. Insert the end of a small-bladed screwdriver under the edges of each of the three ice maker mounting hole plugs in the diagram) of the wiring harness connector, and pull the blank connector off. 2. For Top/Bottom Freezers Only:...so it breaks free. steps. 1 SXS MODELS W hex-head 1. Mounting the ice maker Refer to the side diagram for the following step. 1. The fill tube will hang the ice maker over tab I Blank connector a (remove and discard) Installing Wring harness -1 connector the ice maker clips 4. You will fit through this ...
...your fingers, (or a pair of their holes. Insert the end of a small-bladed screwdriver under the edges of each of the three ice maker mounting hole plugs in the diagram) of the wiring harness connector, and pull the blank connector off. 2. For Top/Bottom Freezers Only:...so it breaks free. steps. 1 SXS MODELS W hex-head 1. Mounting the ice maker Refer to the side diagram for the following step. 1. The fill tube will hang the ice maker over tab I Blank connector a (remove and discard) Installing Wring harness -1 connector the ice maker clips 4. You will fit through this ...

Installation Guide
Page 15
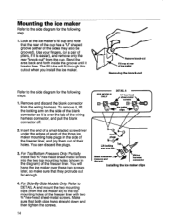
... (you installed earlier. screw Mounting the ice maker (top and bottom freezers) 3. Be careful not to the side diagrams for the following steps. 1. The connectors will snap over the raised tab). bracket connectors Mounting the ice maker (sideby-side models) 15 Center the top tabs under the... two mounting clips, and push the ice maker straight up so that the bottom mounting bracket hole is aligned with a %" hex-...
... (you installed earlier. screw Mounting the ice maker (top and bottom freezers) 3. Be careful not to the side diagrams for the following steps. 1. The connectors will snap over the raised tab). bracket connectors Mounting the ice maker (sideby-side models) 15 Center the top tabs under the... two mounting clips, and push the ice maker straight up so that the bottom mounting bracket hole is aligned with a %" hex-...
Installation Guide
Page 24
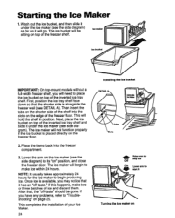
...'off -taste" should be sitting on top of the inverted ice tray shelf. Next, place the ice bucket on " position, and close the freezer door. After that it under the ice maker (see side diagram). IMPORTANT: On top-mount models without a full-width freezer shelf, you may notice that ,... the "off taste." Lower the arm on the ice maker (see DETAIL A). Once ice is alongside the freezer wall (see the side diagram)...
...'off -taste" should be sitting on top of the inverted ice tray shelf. Next, place the ice bucket on " position, and close the freezer door. After that it under the ice maker (see side diagram). IMPORTANT: On top-mount models without a full-width freezer shelf, you may notice that ,... the "off taste." Lower the arm on the ice maker (see DETAIL A). Once ice is alongside the freezer wall (see the side diagram)...
Installation Guide
Page 26
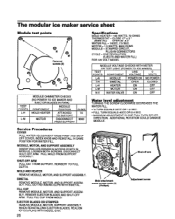
... IS ONE FULL TURN EITHER DIRECTION. ONE REVOLUTION (EJECTS AND WATER FILL) FOR 120 VOLT MODEL MODULE VOLTAGE CHECKS WITH METER OR TEST LIGHT (POWER TO ICE MAKER) TEST I I LINE I 0 MODULE OHMMETER CHECKS (NO POWER TO ICE MAKER AND EJECTOR BLADES IN PARK) TEST 1 I MODULE I Service Procedures COVER PULL WATER ADJUSTMENT ... AND REINSTALL IN SAME POSITION FOR WATER FILL. REINSERT TO FULL DEPTH. FILL CUP REMOVE MODULE, MOTOR, AND SUPPORT ASSEMBLY. The modular ice maker Module test points Removal wrewe (3) service sheet Specifications MOLD HEATER - 185 WAllS, 72 OHMS THERMOSTAT -
... IS ONE FULL TURN EITHER DIRECTION. ONE REVOLUTION (EJECTS AND WATER FILL) FOR 120 VOLT MODEL MODULE VOLTAGE CHECKS WITH METER OR TEST LIGHT (POWER TO ICE MAKER) TEST I I LINE I 0 MODULE OHMMETER CHECKS (NO POWER TO ICE MAKER AND EJECTOR BLADES IN PARK) TEST 1 I MODULE I Service Procedures COVER PULL WATER ADJUSTMENT ... AND REINSTALL IN SAME POSITION FOR WATER FILL. REINSERT TO FULL DEPTH. FILL CUP REMOVE MODULE, MOTOR, AND SUPPORT ASSEMBLY. The modular ice maker Module test points Removal wrewe (3) service sheet Specifications MOLD HEATER - 185 WAllS, 72 OHMS THERMOSTAT -
