Installation Guide
Page 2
... You Begin 4 Tools 4 Installation notes 4 Important safety instructions 4 Components 5 installing the ice Maker 6 Making preparations 6 Side-by-side models 7 Top/bottom freezer models 9 Installing the tubing clips 10 Preparing ...ice maker service sheet .... 26 Ice maker replacement parts list 27 Requesting Assistance or Service If you need assistance, contact your dealer, or see the Warranty that voices consumer views at the highest levels of the major appliance industry. Write to resolve your action. 3 Contact MACAP only when the dealer, authorized servicer, and Whirlpool...
... You Begin 4 Tools 4 Installation notes 4 Important safety instructions 4 Components 5 installing the ice Maker 6 Making preparations 6 Side-by-side models 7 Top/bottom freezer models 9 Installing the tubing clips 10 Preparing ...ice maker service sheet .... 26 Ice maker replacement parts list 27 Requesting Assistance or Service If you need assistance, contact your dealer, or see the Warranty that voices consumer views at the highest levels of the major appliance industry. Write to resolve your action. 3 Contact MACAP only when the dealer, authorized servicer, and Whirlpool...
Installation Guide
Page 3
... are familiar with an auto- Important Information The following information is designed so that alerts you complete instructions on how to install the Ice Maker Kit in your refrigerator-freezer and connect a water line to it. matic ice maker, or self-filling trays). I R They reduce the flow of mechanical ability is required. These conditions can purchase...
... are familiar with an auto- Important Information The following information is designed so that alerts you complete instructions on how to install the Ice Maker Kit in your refrigerator-freezer and connect a water line to it. matic ice maker, or self-filling trays). I R They reduce the flow of mechanical ability is required. These conditions can purchase...
Installation Guide
Page 4
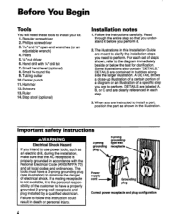
... A, B, or C and are contained in this instruction could result in each set of electrical shock. Follow the instructions carefully. For each step. 3. The tools must have a properly grounded 3-prong wall receptacle and plug installed by a qualified electrician. Tubing cutter 10. Before... in the illustration. Some illustrations also contain 'DETAILS." Important safety instructions Electrical Shock Hazard If you are instructed to install a part, position the part as an electric drill, during the installation, make sure that the AC receptacle is the personal responsibility of ...
... A, B, or C and are contained in this instruction could result in each set of electrical shock. Follow the instructions carefully. For each step. 3. The tools must have a properly grounded 3-prong wall receptacle and plug installed by a qualified electrician. Tubing cutter 10. Before... in the illustration. Some illustrations also contain 'DETAILS." Important safety instructions Electrical Shock Hazard If you are instructed to install a part, position the part as an electric drill, during the installation, make sure that the AC receptacle is the personal responsibility of ...
Installation Guide
Page 16
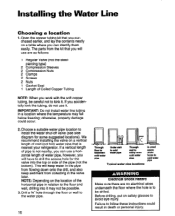
... Typical water pipe locations In crawl space under home to be possible. 3. IMPORTANT: Do not install water line tubing in the valve later. Choose a suitable water pipe location to follow these instructions could occur. 2. If you work with the soft copper tubing, be careful not to avoid ...eye injury. We recommend installing the valve on safety glasses to kink it. Failure to install the water shut-off valve (see side diagram for...
... Typical water pipe locations In crawl space under home to be possible. 3. IMPORTANT: Do not install water line tubing in the valve later. Choose a suitable water pipe location to follow these instructions could occur. 2. If you work with the soft copper tubing, be careful not to avoid ...eye injury. We recommend installing the valve on safety glasses to kink it. Failure to install the water shut-off valve (see side diagram for...
Installation Guide
Page 17
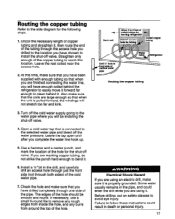
... Shock Hazard If you are marking copper tubing, do not strike the punch hard enough to the selected water pipe and bleed off valve. Install a l/4* bit in the drill, and carefully drill an access hole through just the front side (not through the access hole you drilled to...and round. Use a hammer and a center punch, and mark the location of the cold water pipe. 7. Uncoil the necessary length of the hole should be installing the shut-off valve. Routing the copper tubing Refer to follow these instructions could enter the drill while you complete the water line hook up. 5.
... Shock Hazard If you are marking copper tubing, do not strike the punch hard enough to the selected water pipe and bleed off valve. Install a l/4* bit in the drill, and carefully drill an access hole through just the front side (not through the access hole you drilled to...and round. Use a hammer and a center punch, and mark the location of the cold water pipe. 7. Uncoil the necessary length of the hole should be installing the shut-off valve. Routing the copper tubing Refer to follow these instructions could enter the drill while you complete the water line hook up. 5.