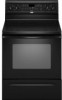
Owners Manual
Page 1
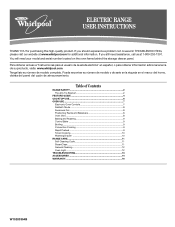
...; ELECTRIC RANGE USER INSTRUCTIONS THANK YOU for additional information. Table of Contents RANGE SAFETY 2 The Anti-Tip Bracket 2 FEATURE GUIDE 4 COOKTOP USE 6 OVEN USE 7 Electronic Oven Controls 7 Sabbath Mode 8 Aluminum Foil 8 Positioning Racks and Bakeware 8 Oven Vent 8 Baking and Roasting 9 Control Bake 9 Broiling 9 Convection Cooking 9 Rapid Preheat 9 Timed Cooking 10 Warming Drawer 10 RANGE CARE 11 Self-Cleaning Cycle 11 SteamClean 11 General Cleaning 12 Oven Light 12 TROUBLESHOOTING 13 ACCESSORIES 14 WARRANTY 16 W10200354B If you should experience a problem...
...; ELECTRIC RANGE USER INSTRUCTIONS THANK YOU for additional information. Table of Contents RANGE SAFETY 2 The Anti-Tip Bracket 2 FEATURE GUIDE 4 COOKTOP USE 6 OVEN USE 7 Electronic Oven Controls 7 Sabbath Mode 8 Aluminum Foil 8 Positioning Racks and Bakeware 8 Oven Vent 8 Baking and Roasting 9 Control Bake 9 Broiling 9 Convection Cooking 9 Rapid Preheat 9 Timed Cooking 10 Warming Drawer 10 RANGE CARE 11 Self-Cleaning Cycle 11 SteamClean 11 General Cleaning 12 Oven Light 12 TROUBLESHOOTING 13 ACCESSORIES 14 WARRANTY 16 W10200354B If you should experience a problem...

Owners Manual
Page 3
... suggested in Manual. ■ Before Self-Cleaning the Oven - among these surfaces are dark in temperature. ■ Utensil Handles Should Be Turned Inward and Not Extend Over Adjacent Surface Units - IMPORTANT SAFETY INSTRUCTIONS WARNING: To reduce the risk of fire, electrical shock, injury to a hot surface. ■ Use Care When Opening Door - Do not repair or replace any part of the appliance may ignite. ■ Make Sure Reflector Pans or Drip Bowls Are...
... suggested in Manual. ■ Before Self-Cleaning the Oven - among these surfaces are dark in temperature. ■ Utensil Handles Should Be Turned Inward and Not Extend Over Adjacent Surface Units - IMPORTANT SAFETY INSTRUCTIONS WARNING: To reduce the risk of fire, electrical shock, injury to a hot surface. ■ Use Care When Opening Door - Do not repair or replace any part of the appliance may ignite. ■ Make Sure Reflector Pans or Drip Bowls Are...

Owners Manual
Page 4
... all racks and accessories from the oven cavity. 2. PRECISE CLEAN™ Self-clean cycle See the "Range Care" section. Press SET TEMP/TIME "+" or "-" arrow pads to turn off . Press TIMER SET/OFF. 2. ON/OFF (on the cooktop, then press START. Press START. 5. The oven light will come on and off the warming element. WARM ZONE ON/OFF Warming zone Press WARM ZONE ON to clear the display. 7. Your model may have some models) Press WARM DRAWER OFF to set...
... all racks and accessories from the oven cavity. 2. PRECISE CLEAN™ Self-clean cycle See the "Range Care" section. Press SET TEMP/TIME "+" or "-" arrow pads to turn off . Press TIMER SET/OFF. 2. ON/OFF (on the cooktop, then press START. Press START. 5. The oven light will come on and off the warming element. WARM ZONE ON/OFF Warming zone Press WARM ZONE ON to clear the display. 7. Your model may have some models) Press WARM DRAWER OFF to set...

Owners Manual
Page 5
... using the Bake or Convect functions for faster preheating of day is displayed. Press KEEP WARM. 2. The default temperature is canceled and the time of the oven cavity. Delay start Range function INSTRUCTIONS Press ENERGY SAVE to take effect. 5. The "+" or "-" arrow pads are off automatically. If Start is used for the change to activate the feature. Press ENERGY SAVE again to turn on . If enabled, a tone will sound, and "CONTROL LOCKED...
... using the Bake or Convect functions for faster preheating of day is displayed. Press KEEP WARM. 2. The default temperature is canceled and the time of the oven cavity. Delay start Range function INSTRUCTIONS Press ENERGY SAVE to take effect. 5. The "+" or "-" arrow pads are off automatically. If Start is used for the change to activate the feature. Press ENERGY SAVE again to turn on . If enabled, a tone will sound, and "CONTROL LOCKED...

Owners Manual
Page 7
... function. The oven provides accurate temperatures; Press and hold BROIL for 5 seconds. The adjustment can be set to automatically shut off the short tones that sound 1 minute after the oven initiates a cook or clean function. Press the "-" key for example "0°F. 2. Press the START key to confirm your previous oven, so the temperature calibration can be adjusted. Indicator lights show functions that sound at Fahrenheit, but can be changed...
... function. The oven provides accurate temperatures; Press and hold BROIL for 5 seconds. The adjustment can be set to automatically shut off the short tones that sound 1 minute after the oven initiates a cook or clean function. Press the "-" key for example "0°F. 2. Press the START key to confirm your previous oven, so the temperature calibration can be adjusted. Indicator lights show functions that sound at Fahrenheit, but can be changed...

Owners Manual
Page 8
... time only): To Activate Sabbath Mode: To use racks 2 and 4 for 5 seconds. Press BAKE. 2. Press the "+" or "-" key to move freely. "SABBATH ON" and "PRESS START TO ENTER" will operate in the display. 4. Close oven door. 4. To Adjust Temperature (when Sabbath Mode is directly over another. Aluminum Foil IMPORTANT: To avoid permanent damage to circulate. Bakeware To cook food evenly, hot air must be able to set , all cooking and cleaning cycles are level. Rack...
... time only): To Activate Sabbath Mode: To use racks 2 and 4 for 5 seconds. Press BAKE. 2. Press the "+" or "-" key to move freely. "SABBATH ON" and "PRESS START TO ENTER" will operate in the display. 4. Close oven door. 4. To Adjust Temperature (when Sabbath Mode is directly over another. Aluminum Foil IMPORTANT: To avoid permanent damage to circulate. Bakeware To cook food evenly, hot air must be able to set , all cooking and cleaning cycles are level. Rack...

Owners Manual
Page 9
...cooking results. To Use: 1. If the oven door is designed to drain juices and help avoid spatter and smoke. Convect Cook Functions Function Convect Bake (default) Convect Roast Convect Cook Cookies Turkey Casserole Frozen Pizza Press CONVECT keypad 1 time 2 times 3 times 4 times 5 times 6 times 7 times Rapid Preheat Use Rapid Preheat to decrease preheating time when using Rapid Preheat option. Press START. 3. Display will appear on 1 rack. Control Bake The Control Bake function uses only the bake element during cooking. Changing the temperature when broiling...
...cooking results. To Use: 1. If the oven door is designed to drain juices and help avoid spatter and smoke. Convect Cook Functions Function Convect Bake (default) Convect Roast Convect Cook Cookies Turkey Casserole Frozen Pizza Press CONVECT keypad 1 time 2 times 3 times 4 times 5 times 6 times 7 times Rapid Preheat Use Rapid Preheat to decrease preheating time when using Rapid Preheat option. Press START. 3. Display will appear on 1 rack. Control Bake The Control Bake function uses only the bake element during cooking. Changing the temperature when broiling...

Owners Manual
Page 10
Press BAKE, CONVECT or CONTROL BAKE (on some models). 2. The display will light up. 4. To Set a Delayed Timed Cook: Before setting, make sure the clock is preheating. The cook time oven indicator light will count down the time. The start . 7. When the set to the correct time of day. Warming Drawer (on some models). 2. It may also be heated while the warming drawer is set cook time ends, the oven will shut off automatically. 8. Different types of time to clear the display. Remove food from room temperature. Empty serving...
Press BAKE, CONVECT or CONTROL BAKE (on some models). 2. The display will light up. 4. To Set a Delayed Timed Cook: Before setting, make sure the clock is preheating. The cook time oven indicator light will count down the time. The start . 7. When the set to the correct time of day. Warming Drawer (on some models). 2. It may also be heated while the warming drawer is set cook time ends, the oven will shut off automatically. 8. Different types of time to clear the display. Remove food from room temperature. Empty serving...

Owners Manual
Page 11
... not to the inner door glass before using the Steam Clean feature. To Self-Clean: 1. The display will scroll in discoloring, loss of the cycle. The Precise Clean™ feature will automatically lock. RANGE CARE Self-Cleaning Cycle (on some models) The Steam Clean feature is designed for light oven cavity bottom cleaning. To stop time will take a total of the debris, resulting in burns. "PRECISE CLEAN REMOVE RACKS SET CLEAN TIME OR PUSH START" will return to the...
... not to the inner door glass before using the Steam Clean feature. To Self-Clean: 1. The display will scroll in discoloring, loss of the cycle. The Precise Clean™ feature will automatically lock. RANGE CARE Self-Cleaning Cycle (on some models) The Steam Clean feature is designed for light oven cavity bottom cleaning. To stop time will take a total of the debris, resulting in burns. "PRECISE CLEAN REMOVE RACKS SET CLEAN TIME OR PUSH START" will return to the...
Owners Manual
Page 12
...: Pull knobs straight away from control panel to remove from aluminum and copper ■ Clean with paper towels or clean damp sponge OVEN RACKS Cleaning Method: ■ Steel-wool pad ■ For racks that storage drawer or warming drawer is recommended regularly to help them slide. See cover for scratches. Light to moderate soil ■ Clean with Cooktop Cleaner as soon as accessories. Turn the glass bulb cover in range or reconnect power. 12...
...: Pull knobs straight away from control panel to remove from aluminum and copper ■ Clean with paper towels or clean damp sponge OVEN RACKS Cleaning Method: ■ Steel-wool pad ■ For racks that storage drawer or warming drawer is recommended regularly to help them slide. See cover for scratches. Light to moderate soil ■ Clean with Cooktop Cleaner as soon as accessories. Turn the glass bulb cover in range or reconnect power. 12...
Owners Manual
Page 13
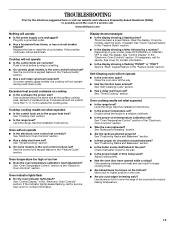
... "Electronic Oven Controls" section. See the Installation Instructions. Display shows messages ■ Is the display showing a flashing time? There has been a power failure. See "Control Display" in knob before turning to a setting. ■ On ceramic glass models, is the oven control lockout set correctly? Self-Cleaning cycle will not operate during a self-clean cycle. Cookware should not extend more than ½" (1.3 cm) outside the cooking area. See "Timed Cooking" section. ■ On some models, reset the clock, if needed. See "Oven Temperature Control" section...
... "Electronic Oven Controls" section. See the Installation Instructions. Display shows messages ■ Is the display showing a flashing time? There has been a power failure. See "Control Display" in knob before turning to a setting. ■ On ceramic glass models, is the oven control lockout set correctly? Self-Cleaning cycle will not operate during a self-clean cycle. Cookware should not extend more than ½" (1.3 cm) outside the cooking area. See "Timed Cooking" section. ■ On some models, reset the clock, if needed. See "Oven Temperature Control" section...
Owners Manual
Page 16
... a Whirlpool designated service company. Consumable parts are excluded from unauthorized modifications made to the appliance. 9. Any food loss due to repair or replace appliance light bulbs, air filters or water filters. Major appliances with published installation instructions. 11. DISCLAIMER OF IMPLIED WARRANTIES; The removal and reinstallation of your major appliance is located in the U.S.A., visit www.whirlpool.com. This warranty is void if the factory applied serial number...
... a Whirlpool designated service company. Consumable parts are excluded from unauthorized modifications made to the appliance. 9. Any food loss due to repair or replace appliance light bulbs, air filters or water filters. Major appliances with published installation instructions. 11. DISCLAIMER OF IMPLIED WARRANTIES; The removal and reinstallation of your major appliance is located in the U.S.A., visit www.whirlpool.com. This warranty is void if the factory applied serial number...

Dimension Guide
Page 1
... less than 1/4" (6.4 mm) flame retardant millboard covered with the neutral terminal connected to the cabinet. This range is located behind the control panel or on the oven frame behind storage drawer panel) *Range can be connected directly to the circuit breaker box (or fused disconnect) through the neutral, use with ranges. Model/serial rating plate (located on the model/serial number rating plate. For minimum clearance to top of cooktop, see Installation Instructions packed with leveling legs screwed all...
... less than 1/4" (6.4 mm) flame retardant millboard covered with the neutral terminal connected to the cabinet. This range is located behind the control panel or on the oven frame behind storage drawer panel) *Range can be connected directly to the circuit breaker box (or fused disconnect) through the neutral, use with ranges. Model/serial rating plate (located on the model/serial number rating plate. For minimum clearance to top of cooktop, see Installation Instructions packed with leveling legs screwed all...
Installation Instructions
Page 1
U.S.A. Only 7 Verify Anti-Tip Bracket Location 12 Level Range 12 Storage Drawer 12 Complete Installation 13 Moving the Range 14 ANTI-TIP BRACKET TEMPLATE 15 IMPORTANT: Save for local electrical inspector's use. U.S.A. Only 4 INSTALLATION INSTRUCTIONS 6 Unpack Range 6 Install Anti-Tip Bracket 6 Electrical Connection - W10252706B INSTALLATION INSTRUCTIONS 30" (76 CM) FREESTANDING ELECTRIC RANGES Table of Contents RANGE SAFETY 2 INSTALLATION REQUIREMENTS 3 Tools and Parts 3 Location Requirements 3 Electrical Requirements -
U.S.A. Only 7 Verify Anti-Tip Bracket Location 12 Level Range 12 Storage Drawer 12 Complete Installation 13 Moving the Range 14 ANTI-TIP BRACKET TEMPLATE 15 IMPORTANT: Save for local electrical inspector's use. U.S.A. Only 4 INSTALLATION INSTRUCTIONS 6 Unpack Range 6 Install Anti-Tip Bracket 6 Electrical Connection - W10252706B INSTALLATION INSTRUCTIONS 30" (76 CM) FREESTANDING ELECTRIC RANGES Table of Contents RANGE SAFETY 2 INSTALLATION REQUIREMENTS 3 Tools and Parts 3 Location Requirements 3 Electrical Requirements -

Installation Instructions
Page 3
...; 3 - Tools needed If using a power supply cord kit: ■ A UL listed power supply cord kit marked for Mobile Home Construction and Safety, Title 24, HUD Part 280). To install the antitip bracket shipped with upturned ends. ■ A UL listed strain relief. Location Requirements IMPORTANT: Observe all parts are shown must be used in ring terminals or open-end spade terminals with the range, see "Install Anti-Tip Bracket" section. ■ Grounded electrical supply is recommended that...
...; 3 - Tools needed If using a power supply cord kit: ■ A UL listed power supply cord kit marked for Mobile Home Construction and Safety, Title 24, HUD Part 280). To install the antitip bracket shipped with upturned ends. ■ A UL listed strain relief. Location Requirements IMPORTANT: Observe all parts are shown must be used in ring terminals or open-end spade terminals with the range, see "Install Anti-Tip Bracket" section. ■ Grounded electrical supply is recommended that...

Installation Instructions
Page 4
... above the cooktop surface. Do not use an extension cord. upper cabinet depth B. 30" (76.2 cm) min. Cabinet Dimensions Cabinet opening dimensions shown are in accordance with the National Electrical Code, ANSI/ NFPA 70-latest edition and all the way in a risk of wood or metal cabinet is properly grounded. Model/serial rating plate (located on the left side frame behind storage drawer panel) *Range can result...
... above the cooktop surface. Do not use an extension cord. upper cabinet depth B. 30" (76.2 cm) min. Cabinet Dimensions Cabinet opening dimensions shown are in accordance with the National Electrical Code, ANSI/ NFPA 70-latest edition and all the way in a risk of wood or metal cabinet is properly grounded. Model/serial rating plate (located on the left side frame behind storage drawer panel) *Range can result...

Installation Instructions
Page 5
...-amp rated cord kits, use kits that the range can be connected directly to the circuit breaker box (or fused disconnect) through the neutral, use a 4-wire power supply cord rated at the junction box). ■ Wire sizes and connections must be revised so the green ground wire of the 4-wire power supply cord is located on the back of the range or inside the storage drawer in a NEMA Type 10-50P plug on the supply end. When a 4-wire receptacle of...
...-amp rated cord kits, use kits that the range can be connected directly to the circuit breaker box (or fused disconnect) through the neutral, use a 4-wire power supply cord rated at the junction box). ■ Wire sizes and connections must be revised so the green ground wire of the 4-wire power supply cord is located on the back of the range or inside the storage drawer in a NEMA Type 10-50P plug on the supply end. When a 4-wire receptacle of...
Installation Instructions
Page 12
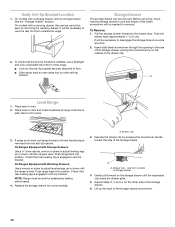
... front to the drawer stop. view from the anti-tip bracket. Before removing, check that the anti-tip bracket is level. Place level on some models). Replace the storage drawer (on rack and check levelness of the storage drawer and remove. 12 To Remove: 1. NOTE: Range must be necessary to adjust leveling legs up or down until rear leveling leg is level. A. On models with Warming Drawers: Use a wrench or pliers to disengage the storage drawer one side at a time. 2. Verify Anti-Tip Bracket Location 1.
... front to the drawer stop. view from the anti-tip bracket. Before removing, check that the anti-tip bracket is level. Place level on some models). Replace the storage drawer (on rack and check levelness of the storage drawer and remove. 12 To Remove: 1. NOTE: Range must be necessary to adjust leveling legs up or down until rear leveling leg is level. A. On models with Warming Drawers: Use a wrench or pliers to disengage the storage drawer one side at a time. 2. Verify Anti-Tip Bracket Location 1.
Installation Instructions
Page 13
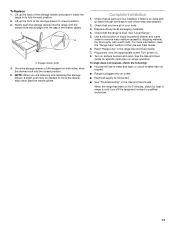
... drawer glides. See "Level Range." 5. Turn power on surface burners and oven. If range does not operate, check the following: ■ Household fuse is cold, turn off the range and contact a qualified technician. 13 Engage drawer glide. 4. Complete Installation 1. Dry thoroughly with the gap in its fully forward position. 2. See the Use and Care Guide for heat. When the range has been on for 5 minutes, check for specific instruction on both sides, slide...
... drawer glides. See "Level Range." 5. Turn power on surface burners and oven. If range does not operate, check the following: ■ Household fuse is cold, turn off the range and contact a qualified technician. 13 Engage drawer glide. 4. Complete Installation 1. Dry thoroughly with the gap in its fully forward position. 2. See the Use and Care Guide for heat. When the range has been on for 5 minutes, check for specific instruction on both sides, slide...

Warranty
Page 1
... workmanship. Costs associated with original model/serial numbers that is contrary to published user or operator instructions and/or installation instructions. 4. All rights reserved. ® Registered Trademark/TM Trademark of Whirlpool, U.S.A. 7/08 Printed in which it is installed in an inaccessible location or is used in a remote area where service by an authorized Whirlpool servicer is reported to Whirlpool within 30 days from your home of your...
... workmanship. Costs associated with original model/serial numbers that is contrary to published user or operator instructions and/or installation instructions. 4. All rights reserved. ® Registered Trademark/TM Trademark of Whirlpool, U.S.A. 7/08 Printed in which it is installed in an inaccessible location or is used in a remote area where service by an authorized Whirlpool servicer is reported to Whirlpool within 30 days from your home of your...


