
Installation Instructions
Page 1
... HOOD COMBINATION SAFETY Your safety and the safety of injury, and tell you don't immediately follow instructions. We have provided many important safety messages in these installation instructions. All safety messages will follow the safety alert symbol and either the word "DANGER" or "...injured if you what the potential hazard is, tell you how to potential hazards that can happen if the instructions are very important. These installation instructions cover different models. This symbol alerts you to reduce the chance of others . These words mean: DANGER You...
... HOOD COMBINATION SAFETY Your safety and the safety of injury, and tell you don't immediately follow instructions. We have provided many important safety messages in these installation instructions. All safety messages will follow the safety alert symbol and either the word "DANGER" or "...injured if you what the potential hazard is, tell you how to potential hazards that can happen if the instructions are very important. These installation instructions cover different models. This symbol alerts you to reduce the chance of others . These words mean: DANGER You...
Installation Instructions
Page 2
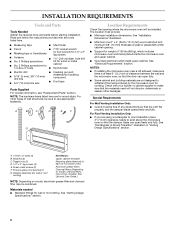
... x 2" lag screws (2) E. NOTE: The hardware items listed here are for wall or roof venting. See "Electrical Requirements" section. For Roof Venting Installation Only: s If you are not designed to make sure there is at least 6" (15.2 cm) of any tools listed here. Washers (2) C. ...Materials needed s Standard fittings for wood studs. Read and follow the instructions provided with your builder or cabinet supplier to withstand the heat produced by the microwave oven for cabinet 1/4-20 x 3" bolts s Keyhole ...
... x 2" lag screws (2) E. NOTE: The hardware items listed here are for wall or roof venting. See "Electrical Requirements" section. For Roof Venting Installation Only: s If you are not designed to make sure there is at least 6" (15.2 cm) of any tools listed here. Washers (2) C. ...Materials needed s Standard fittings for wood studs. Read and follow the instructions provided with your builder or cabinet supplier to withstand the heat produced by the microwave oven for cabinet 1/4-20 x 3" bolts s Keyhole ...
Installation Instructions
Page 3
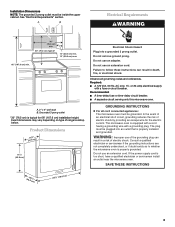
... below. Do not use of the grounding plug can result in a risk of electric shock by providing an escape wire for 66" (167.6 cm) installation height. SAVE THESE INSTRUCTIONS (401.05³c⁄₄m") 29⁷⁄₈" (76.0 cm) 3 Product Dimensions (4116.¹9⁄₂c"m) 17¹⁄₄" (43.8 cm...
... below. Do not use of the grounding plug can result in a risk of electric shock by providing an escape wire for 66" (167.6 cm) installation height. SAVE THESE INSTRUCTIONS (401.05³c⁄₄m") 29⁷⁄₈" (76.0 cm) 3 Product Dimensions (4116.¹9⁄₂c"m) 17¹⁄₄" (43.8 cm...
Installation Instructions
Page 4
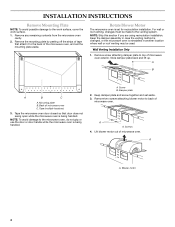
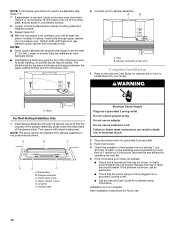
...the microwave oven door closed so that attach it to back of microwave oven exterior. Keep damper plate and screw together and set for recirculation installation. Screws 4. A A. Blower motor 4 Remove any remaining contents from the microwave oven cavity. 2. A B A B C A. Back of...) 3. Lift blower motor out of microwave oven C. A A. Wall Venting Installation Only 1. Rotate Blower Motor The microwave oven is set aside. 3. Slide damper plate back and lift up. INSTALLATION INSTRUCTIONS Remove Mounting Plate NOTE: To avoid possible damage to the microwave oven, do...
...the microwave oven door closed so that attach it to back of microwave oven exterior. Keep damper plate and screw together and set for recirculation installation. Screws 4. A A. Blower motor 4 Remove any remaining contents from the microwave oven cavity. 2. A B A B C A. Back of...) 3. Lift blower motor out of microwave oven C. A A. Wall Venting Installation Only 1. Rotate Blower Motor The microwave oven is set aside. 3. Slide damper plate back and lift up. INSTALLATION INSTRUCTIONS Remove Mounting Plate NOTE: To avoid possible damage to the microwave oven, do...
Installation Instructions
Page 10
...assembly C. Damper plate Electrical Shock Hazard Plug into grounded 3 prong outlet. 3. Do not use . 10 Save Installation Instructions for future use an extension cord. A B A. Bolts For Roof Venting Installation Only 1. Long tab F. Do not use an adapter. Plug microwave oven into a grounded 3 prong outlet. ...metal screw D. s See the Use and Care Guide for instructions on a protected surface. 8. NOTE: If microwave oven does not need to be added. Loosen mounting plate screws. The blocks must be installed if the damper assembly is not positioned as the space between ...
...assembly C. Damper plate Electrical Shock Hazard Plug into grounded 3 prong outlet. 3. Do not use . 10 Save Installation Instructions for future use an extension cord. A B A. Bolts For Roof Venting Installation Only 1. Long tab F. Do not use an adapter. Plug microwave oven into a grounded 3 prong outlet. ...metal screw D. s See the Use and Care Guide for instructions on a protected surface. 8. NOTE: If microwave oven does not need to be added. Loosen mounting plate screws. The blocks must be installed if the damper assembly is not positioned as the space between ...
