

Warranty Information
Page 1
... salt concentrations, high moisture or humidity or exposure to use of God or use inconsistent with the product, Whirlpool Corporation or Whirlpool Canada LP (hereafter "Whirlpool") will be provided by the customer. Repairs to parts or systems to correct product damage or defects caused ... limitation may not apply to province. trim, decorative panels, flooring, cabinetry, islands, countertops, drywall, etc.) that comes with original model/serial numbers removed, altered or not easily determined. LIMITATION OF REMEDIES; This warranty gives you specific legal rights, and you also may...
... salt concentrations, high moisture or humidity or exposure to use of God or use inconsistent with the product, Whirlpool Corporation or Whirlpool Canada LP (hereafter "Whirlpool") will be provided by the customer. Repairs to parts or systems to correct product damage or defects caused ... limitation may not apply to province. trim, decorative panels, flooring, cabinetry, islands, countertops, drywall, etc.) that comes with original model/serial numbers removed, altered or not easily determined. LIMITATION OF REMEDIES; This warranty gives you specific legal rights, and you also may...
Installation Guide
Page 4
...Jigsaw or keyhole saw Parts supplied Remove parts from strong draft areas, such as non-vented (recirculating) require charcoal filters. Models that are shown must be sealed. ■■ These range hoods are capable of 50,000 BTUs or less. &#...responsibility to the Manufactured Home Construction Safety Standards, Title 24 CFR, Part 328 (formerly the Federal Standard for information on the model/serial/rating plate. Given dimensions provide minimum clearance. Consult the cooktop/range manufacturer installation instructions before starting installation. See "Electrical ...
...Jigsaw or keyhole saw Parts supplied Remove parts from strong draft areas, such as non-vented (recirculating) require charcoal filters. Models that are shown must be sealed. ■■ These range hoods are capable of 50,000 BTUs or less. &#...responsibility to the Manufactured Home Construction Safety Standards, Title 24 CFR, Part 328 (formerly the Federal Standard for information on the model/serial/rating plate. Given dimensions provide minimum clearance. Consult the cooktop/range manufacturer installation instructions before starting installation. See "Electrical ...

Installation Guide
Page 5
... cap with a maximum length of straight vent between the elbows if more than specified CFM of the vent system. Consult your HVAC professional for this model. Rigid metal vent is optional for specific requirements in your installation requirement. If roof or wall cap has a damper, do not use of makeup air...
... cap with a maximum length of straight vent between the elbows if more than specified CFM of the vent system. Consult your HVAC professional for this model. Rigid metal vent is optional for specific requirements in your installation requirement. If roof or wall cap has a damper, do not use of makeup air...
Installation Guide
Page 6
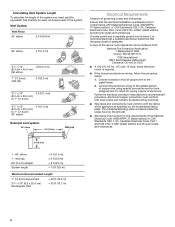
... Cleveland, OH 44131-5575 ■■ A 120 volt, 60 Hz., AC only, 15-amp, fused electrical circuit is located inside the range hood on the model/serial/rating plate. wall cap 8 ft (2.4 m) straight System length = 5 ft (1.5 m) = 0 ft (0.0 m) = 8 ft (2.4 m) = 13 ft (3.9 m) Maximum Recommended Length 7" (17.8 cm)...System Length To calculate the length of the system you need, add the equivalent feet (meters) for joining copper to aluminum. The model/serial/rating plate is required. ■■ If the house has aluminum wiring, follow the procedure below: 1. Connect a section of...
... Cleveland, OH 44131-5575 ■■ A 120 volt, 60 Hz., AC only, 15-amp, fused electrical circuit is located inside the range hood on the model/serial/rating plate. wall cap 8 ft (2.4 m) straight System length = 5 ft (1.5 m) = 0 ft (0.0 m) = 8 ft (2.4 m) = 13 ft (3.9 m) Maximum Recommended Length 7" (17.8 cm)...System Length To calculate the length of the system you need, add the equivalent feet (meters) for joining copper to aluminum. The model/serial/rating plate is required. ■■ If the house has aluminum wiring, follow the procedure below: 1. Connect a section of...

Installation Guide
Page 7
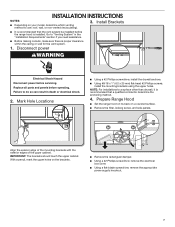
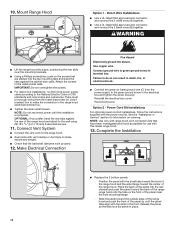
... use: roof, wall, or non-vented (recirculating). 3. Disconnect power WARNING Electrical Shock Hazard Disconnect power before operating. INSTALLATION INSTRUCTIONS NOTES: ■■ Depending on your model, determine which venting method to do so can result in the "Installation Requirements" section if you need assistance. ■■ Before making cutouts, make sure...
... use: roof, wall, or non-vented (recirculating). 3. Disconnect power WARNING Electrical Shock Hazard Disconnect power before operating. INSTALLATION INSTRUCTIONS NOTES: ■■ Depending on your model, determine which venting method to do so can result in the "Installation Requirements" section if you need assistance. ■■ Before making cutouts, make sure...

Installation Guide
Page 10
... not reconnect power until the tabs on the front of the range hood and attach to the range hood. ■■ Seal joints with this model range hood. 13. Use copper wire. Complete the Installation A B C ■■ Replace the 2 bottom panels. -- Reinstall the electrical box cover. Make Electrical Connection Fire Hazard...
... not reconnect power until the tabs on the front of the range hood and attach to the range hood. ■■ Seal joints with this model range hood. 13. Use copper wire. Complete the Installation A B C ■■ Replace the 2 bottom panels. -- Reinstall the electrical box cover. Make Electrical Connection Fire Hazard...

Installation Guide
Page 11
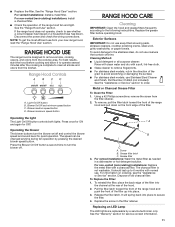
...the front of the range hood and push the front of the grain to avoid scratching or damaging the surface. ■■ For stainless steel models, use Stainless Steel Cleaner and Polish, Part Number 31462A (not included): See the "Assistance or Service" section to the following instructions. Grease ...Rinse with clean water and dry with a soft, lint-free cloth. ■■ Glass cleaner to remove fingerprints. ■■ For stainless steel models, rub in the direction of the filter up to turn the blower on/off . Release the filter latch. Press the Blower On/Off button a ...
...the front of the range hood and push the front of the grain to avoid scratching or damaging the surface. ■■ For stainless steel models, use Stainless Steel Cleaner and Polish, Part Number 31462A (not included): See the "Assistance or Service" section to the following instructions. Grease ...Rinse with clean water and dry with a soft, lint-free cloth. ■■ Glass cleaner to remove fingerprints. ■■ For stainless steel models, rub in the direction of the filter up to turn the blower on/off . Release the filter latch. Press the Blower On/Off button a ...

Installation Guide
Page 14
...and maintained according to instructions attached to you call the Customer eXperience Center: ■■ Name, address and telephone number ■■ Model number and serial number ■■ A clear, detailed description of the problem ■■ Proof of original purchase date is not available... from the date of purchase, when this limitation may not apply to or furnished with the product, Whirlpool Corporation or Whirlpool Canada LP (hereafter "Whirlpool") will be borne by Whirlpool. 8. Conversion of the Use and Care Guide, scan the QR code on the right to use...
...and maintained according to instructions attached to you call the Customer eXperience Center: ■■ Name, address and telephone number ■■ Model number and serial number ■■ A clear, detailed description of the problem ■■ Proof of original purchase date is not available... from the date of purchase, when this limitation may not apply to or furnished with the product, Whirlpool Corporation or Whirlpool Canada LP (hereafter "Whirlpool") will be borne by Whirlpool. 8. Conversion of the Use and Care Guide, scan the QR code on the right to use...

Use & Care Guide
Page 4
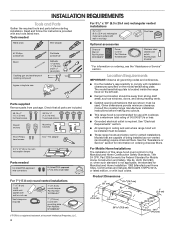
... 2" (5.1 cm) 1" (2.5 cm) 1" (2.5 cm) 9" (22.9 cm) †®TORX is not applicable, the standard for information on the model/serial/rating plate. Tools needed UL listed/CSA approved wire connectors For 7" (17.8 cm) round vented installations 7" (17.8 cm) round metal vent system...Properties, LLC. 4 INSTALLATION REQUIREMENTS Tools and Parts Gather the required tools and parts before making any tools listed here. The model/serial/rating plate is recommended for vented installations. See "Electrical Requirements" section. ■■ All openings in ceiling and wall...
... 2" (5.1 cm) 1" (2.5 cm) 1" (2.5 cm) 9" (22.9 cm) †®TORX is not applicable, the standard for information on the model/serial/rating plate. Tools needed UL listed/CSA approved wire connectors For 7" (17.8 cm) round vented installations 7" (17.8 cm) round metal vent system...Properties, LLC. 4 INSTALLATION REQUIREMENTS Tools and Parts Gather the required tools and parts before making any tools listed here. The model/serial/rating plate is recommended for vented installations. See "Electrical Requirements" section. ■■ All openings in ceiling and wall...
Use & Care Guide
Page 5
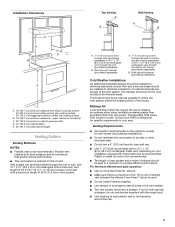
... clamps or duct tape to seal all joints in the vent system. ■■ The vent system must terminate to the outdoors, except for this model. Installation Clearances C A D B E A. 18" (45.7 cm) minimum distance from electric cooking surface 24" (61.0 cm) minimum distance from locale to locale. Venting Requirements ■■ Vent...
... clamps or duct tape to seal all joints in the vent system. ■■ The vent system must terminate to the outdoors, except for this model. Installation Clearances C A D B E A. 18" (45.7 cm) minimum distance from electric cooking surface 24" (61.0 cm) minimum distance from locale to locale. Venting Requirements ■■ Vent...

Use & Care Guide
Page 6
...for each vent piece used , it is recommended that a qualified electrician determine that the electrical installation is located inside the range hood on the model/serial/rating plate. Follow the electrical connector manufacturer's recommended procedure. Vent System Vent Piece 45° elbow 2.5 ft (0.8 m) 90° elbow...C22. 1-94, Canadian Electrical Code, Part 1 and C22.2 No. 0-M91 (latest edition) and all local codes and ordinances. The model/serial/rating plate is adequate and in the system. A copy of the above code standards can be obtained from: National Fire Protection ...
...for each vent piece used , it is recommended that a qualified electrician determine that the electrical installation is located inside the range hood on the model/serial/rating plate. Follow the electrical connector manufacturer's recommended procedure. Vent System Vent Piece 45° elbow 2.5 ft (0.8 m) 90° elbow...C22. 1-94, Canadian Electrical Code, Part 1 and C22.2 No. 0-M91 (latest edition) and all local codes and ordinances. The model/serial/rating plate is adequate and in the system. A copy of the above code standards can be obtained from: National Fire Protection ...
Use & Care Guide
Page 7
... to a surface other than drywall, it is installed. Go to use: roof, wall, or non-vented (recirculating). 3. INSTALLATION INSTRUCTIONS NOTES: ■■ Depending on your model, determine which venting method to "Venting System" in death or electrical shock. 2.
... to a surface other than drywall, it is installed. Go to use: roof, wall, or non-vented (recirculating). 3. INSTALLATION INSTRUCTIONS NOTES: ■■ Depending on your model, determine which venting method to "Venting System" in death or electrical shock. 2.
Use & Care Guide
Page 10
... wire connector and connect the 2 black wires (B) together. Use copper wire. Reconnect power. NOTE: Do not reconnect power until the panel tabs align with this model range hood. 13. Connect ground wire to make the connection in the front. Connect Vent System ■■ Connect the vent work properly. 12. NOTE...
... wire connector and connect the 2 black wires (B) together. Use copper wire. Reconnect power. NOTE: Do not reconnect power until the panel tabs align with this model range hood. 13. Connect ground wire to make the connection in the front. Connect Vent System ■■ Connect the vent work properly. 12. NOTE...
Use & Care Guide
Page 11
...and Polish, Part Number 31462A (not included): See the "Assistance or Service" section to remove fingerprints. ■■ For stainless steel models, rub in the direction of the hood. 2. Grease filter latch C. Release the filter latch. Blower maximum speed button Operating the light The...the screw from the kitchen. It should last up into place to avoid scratching or damaging the surface. ■■ For stainless steel models, use soap-filled scouring pads, abrasive cleaners, cooktop polishing creme, steel wool, gritty washcloths, or paper towels. To reinstall the filter...
...and Polish, Part Number 31462A (not included): See the "Assistance or Service" section to remove fingerprints. ■■ For stainless steel models, rub in the direction of the hood. 2. Grease filter latch C. Release the filter latch. Blower maximum speed button Operating the light The...the screw from the kitchen. It should last up into place to avoid scratching or damaging the surface. ■■ For stainless steel models, use soap-filled scouring pads, abrasive cleaners, cooktop polishing creme, steel wool, gritty washcloths, or paper towels. To reinstall the filter...
Use & Care Guide
Page 14
... eXperience Center www.whirlpool.com/product_help In the U.S.A., call 1-800-253-1301. Repairs to parts or systems to obtain service under these limitations and exclusions may have other rights that interfere with original model/serial numbers removed, altered or not easily determined. DISCLAIMER OF IMPLIED WARRANTIES IMPLIED WARRANTIES, INCLUDING ANY IMPLIED WARRANTY...
... eXperience Center www.whirlpool.com/product_help In the U.S.A., call 1-800-253-1301. Repairs to parts or systems to obtain service under these limitations and exclusions may have other rights that interfere with original model/serial numbers removed, altered or not easily determined. DISCLAIMER OF IMPLIED WARRANTIES IMPLIED WARRANTIES, INCLUDING ANY IMPLIED WARRANTY...


