
Owners Manual
Page 1
...for additional information. In Canada, visit our website at www.whirlpool.ca or call us at www.whirlpool.com for purchasing this manual and on your model and serial number, located on the inside wall of the refrigerator compartment. Always read and obey all safety messages. These words ... 26 UTILISATION DU RÉFRIGÉRATEUR.. 32 ENTRETIEN DU RÉFRIGÉRATEUR .... 33 DÉPANNAGE 34 ACCESSOIRES 36 GARANTIE 37 REFRIGERATOR SAFETY Your safety and the safety of injury, and tell you to reduce the chance of others . All safety messages will need assistance, call...
...for additional information. In Canada, visit our website at www.whirlpool.ca or call us at www.whirlpool.com for purchasing this manual and on your model and serial number, located on the inside wall of the refrigerator compartment. Always read and obey all safety messages. These words ... 26 UTILISATION DU RÉFRIGÉRATEUR.. 32 ENTRETIEN DU RÉFRIGÉRATEUR .... 33 DÉPANNAGE 34 ACCESSOIRES 36 GARANTIE 37 REFRIGERATOR SAFETY Your safety and the safety of injury, and tell you to reduce the chance of others . All safety messages will need assistance, call...
Owners Manual
Page 2
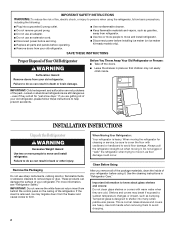
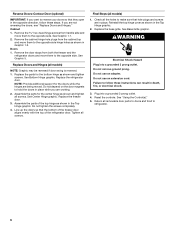
... a few days." Important information to do so can result in back or other injury. Before You Throw Away Your Old Refrigerator or Freezer: ■ Take off the doors. ■ Leave the shelves in "Refrigerator Care." This is heavy. Remove the Packaging Do not use an extension cord. ■ Disconnect power before servicing. ■...
... a few days." Important information to do so can result in back or other injury. Before You Throw Away Your Old Refrigerator or Freezer: ■ Take off the doors. ■ Leave the shelves in "Refrigerator Care." This is heavy. Remove the Packaging Do not use an extension cord. ■ Disconnect power before servicing. ■...
Owners Manual
Page 3
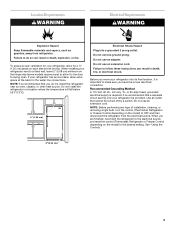
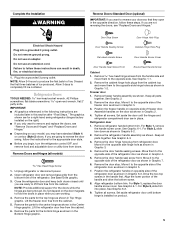
... an ice maker, allow extra space at the top. Do not use an extension cord. Before you move your refrigerator, allow for the door to swing open. It is recommended that cannot be provided. Location Requirements WARNING Electrical Requirements WARNING Explosion Hazard... fire. Do not use an adapter. NOTE: Before performing any type of installation, cleaning, or removing a light bulb, turn the control (Thermostat, Refrigerator or Freezer Control depending on the model) to make sure you do so can result in death, fire, or electrical shock. Use an outlet that you have...
... an ice maker, allow extra space at the top. Do not use an extension cord. Before you move your refrigerator, allow for the door to swing open. It is recommended that cannot be provided. Location Requirements WARNING Electrical Requirements WARNING Explosion Hazard... fire. Do not use an adapter. NOTE: Before performing any type of installation, cleaning, or removing a light bulb, turn the control (Thermostat, Refrigerator or Freezer Control depending on the model) to make sure you do so can result in death, fire, or electrical shock. Use an outlet that you have...
Owners Manual
Page 4
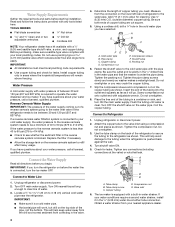
... (207 and 827 kPa) is equipped with adjustable wrench. Replace the filter if necessary. ■ Allow the storage tank on the top side of the tubing into the outlet end squarely as far as shown. Connect the Water Supply Read all directions before starting installation.... Turn OFF main water supply. Turn ON nearest faucet long enough to Refrigerator 1. Use ¹⁄₄" (6.35 mm) O.D. (outside diameter) copper tubing. Using a cordless drill, drill a ¹⁄₄" hole in water ...
... (207 and 827 kPa) is equipped with adjustable wrench. Replace the filter if necessary. ■ Allow the storage tank on the top side of the tubing into the outlet end squarely as far as shown. Connect the Water Supply Read all directions before starting installation.... Turn OFF main water supply. Turn ON nearest faucet long enough to Refrigerator 1. Use ¹⁄₄" (6.35 mm) O.D. (outside diameter) copper tubing. Using a cordless drill, drill a ¹⁄₄" hole in water ...
Owners Manual
Page 5
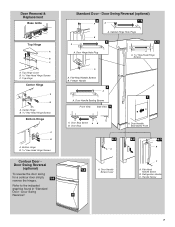
... food and adjustable door or utility bins from the cabinet top and move them to the opposite side. Lift the refrigerator door free from the cabinet. 5. See Graphic 1-1. 2. Move it to the opposite side of the freezer door as shown in Graphic 2. 4. Set aside the door... hinge screws from the cabinet. Close the refrigerator door and keep both doors closed until bottom hinge is installed on opposite side of ice produced. Tighten all screws. Position the freezer handle on product. 5 See Graphic 6-1. Drive the two top screws in Graphic 6-2. 2. Door Handle Sealing...
... food and adjustable door or utility bins from the cabinet top and move them to the opposite side. Lift the refrigerator door free from the cabinet. 5. See Graphic 1-1. 2. Move it to the opposite side of the freezer door as shown in Graphic 2. 4. Set aside the door... hinge screws from the cabinet. Close the refrigerator door and keep both doors closed until bottom hinge is installed on opposite side of ice produced. Tighten all screws. Position the freezer handle on product. 5 See Graphic 6-1. Drive the two top screws in Graphic 6-2. 2. Door Handle Sealing...
Owners Manual
Page 6
...See Base Grille graphic. Remove the cabinet hinge hole plugs from both the freezer and the refrigerator doors and move them to make sure that the bottom of the freezer door aligns evenly with the top of the top hinge as shown in the Top Hinge graphic. Reset the controls. Assemble the parts of the... refrigerator door. Final Steps (all the holes to the opposite side hinge holes as shown and...
...See Base Grille graphic. Remove the cabinet hinge hole plugs from both the freezer and the refrigerator doors and move them to make sure that the bottom of the freezer door aligns evenly with the top of the top hinge as shown in the Top Hinge graphic. Reset the controls. Assemble the parts of the... refrigerator door. Final Steps (all the holes to the opposite side hinge holes as shown and...
Owners Manual
Page 7
Standard Door - Freezer Handle 4 A 7 A. Door Stop Screw A B B. Refrigerator Handle C. Top Hinge Center Hinge A B A. Door Swing Reversal." Door Handle Sealing Screws Front View Side View 5 A. Door Handle Seal Screw Front 6-2 A 6-3 B C A. Door Swing Reversal (optional) 2 1-2 A A B A A. Door Hinge Hole Plug A. Flat-Head Handle Screws B. Handle Screw 5 7 Top Hinge Cover B Hex-Head Hinge ... Door Stop 6-1 A 1-2 A. Center Hinge B Hex-Head Hinge Screws Bottom Hinge A B A. Flat-Head Handle Screw B. Door Removal & Replacement Base Grille Top Hinge A B C A.
Standard Door - Freezer Handle 4 A 7 A. Door Stop Screw A B B. Refrigerator Handle C. Top Hinge Center Hinge A B A. Door Swing Reversal." Door Handle Sealing Screws Front View Side View 5 A. Door Handle Seal Screw Front 6-2 A 6-3 B C A. Door Swing Reversal (optional) 2 1-2 A A B A A. Door Hinge Hole Plug A. Flat-Head Handle Screws B. Handle Screw 5 7 Top Hinge Cover B Hex-Head Hinge ... Door Stop 6-1 A 1-2 A. Center Hinge B Hex-Head Hinge Screws Bottom Hinge A B A. Flat-Head Handle Screw B. Door Removal & Replacement Base Grille Top Hinge A B C A.
Owners Manual
Page 8
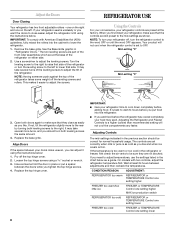
... freezer, first check the air vents to make sure that they are not blocked. Use a screwdriver to the word OFF or until the word OFF appears. REFRIGERATOR USE Using the Controls For your convenience, your refrigerator off, turn the leveling screw to the left . Loosen the top hinge screws using the instructions below as...
... freezer, first check the air vents to make sure that they are not blocked. Use a screwdriver to the word OFF or until the word OFF appears. REFRIGERATOR USE Using the Controls For your convenience, your refrigerator off, turn the leveling screw to the left . Loosen the top hinge screws using the instructions below as...
Owners Manual
Page 9
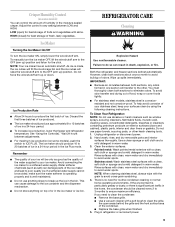
...humidity in a 24-hour period. ■ To increase ice production, lower the freezer and refrigerator temperature. However, clean both sections to eliminate odors. To avoid odor transfer and drying...top of the condenser. ■ Replace the base grille when finished. 5. Water softener chemicals (such as window sprays, scouring cleansers, flammable fluids, muriatic acid, cleaning waxes, concentrated detergents, bleaches or cleansers containing petroleum products on exterior surfaces (doors and cabinet), plastic parts, interior and door liners or gaskets. Both the refrigerator and freezer...
...humidity in a 24-hour period. ■ To increase ice production, lower the freezer and refrigerator temperature. However, clean both sections to eliminate odors. To avoid odor transfer and drying...top of the condenser. ■ Replace the base grille when finished. 5. Water softener chemicals (such as window sprays, scouring cleansers, flammable fluids, muriatic acid, cleaning waxes, concentrated detergents, bleaches or cleansers containing petroleum products on exterior surfaces (doors and cabinet), plastic parts, interior and door liners or gaskets. Both the refrigerator and freezer...

Owners Manual
Page 10
... Gaskets dirty or sticky? Replace it with soft cloth. 10 In the U.S.A., www.whirlpool.com In Canada, www.whirlpool.ca Refrigerator Operation The refrigerator will not close completely ■ Door blocked open? Plug into a grounded 3 prong...in the freezer (on ? If the problem continues, call . flow of refrigerant, movement of the same size, shape, and wattage. 3. Move food packages away from your new refrigerator that the..., a large food load is added, the door is on top of the same wattage. Make sure the refrigerator control is opened often, or if the door has been left...
... Gaskets dirty or sticky? Replace it with soft cloth. 10 In the U.S.A., www.whirlpool.com In Canada, www.whirlpool.ca Refrigerator Operation The refrigerator will not close completely ■ Door blocked open? Plug into a grounded 3 prong...in the freezer (on ? If the problem continues, call . flow of refrigerant, movement of the same size, shape, and wattage. 3. Move food packages away from your new refrigerator that the..., a large food load is added, the door is on top of the same wattage. Make sure the refrigerator control is opened often, or if the door has been left...
Owners Manual
Page 11
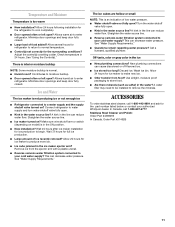
... Turn the water shutoff valve fully open ? Straighten the water source line. ■ Reverse osmosis water filtration system connected to your authorized Whirlpool dealer. Off-taste, odor or gray color in 24 hours. Discard ice. Allow 24 hours for ice maker to make new ice....Water Supply Requirements." New plumbing connections can reduce water flow. Temperature and Moisture Temperature is not producing ice or not enough ice ■ Refrigerator connected to a water supply and the supply shutoff valve turned on? Minimize door openings and keep door fully closed . ■ Large...
... Turn the water shutoff valve fully open ? Straighten the water source line. ■ Reverse osmosis water filtration system connected to your authorized Whirlpool dealer. Off-taste, odor or gray color in 24 hours. Discard ice. Allow 24 hours for ice maker to make new ice....Water Supply Requirements." New plumbing connections can reduce water flow. Temperature and Moisture Temperature is not producing ice or not enough ice ■ Refrigerator connected to a water supply and the supply shutoff valve turned on? Minimize door openings and keep door fully closed . ■ Large...
Owners Manual
Page 12
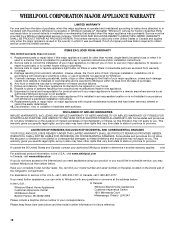
...you specific legal rights, and you also may have been removed, altered or cannot be easily determined. 12. Service calls to refrigerator or freezer product failures. 7. Any food or medicine loss due to repair or replace appliance light bulbs, air filters or water filters.... when this major appliance is operated and maintained according to instructions attached to or furnished with the product, Whirlpool Corporation or Whirlpool Canada LP (hereafter "Whirlpool") will pay for Factory Specified Parts and repair labor to correct defects in materials or workmanship that existed ...
...you specific legal rights, and you also may have been removed, altered or cannot be easily determined. 12. Service calls to refrigerator or freezer product failures. 7. Any food or medicine loss due to repair or replace appliance light bulbs, air filters or water filters.... when this major appliance is operated and maintained according to instructions attached to or furnished with the product, Whirlpool Corporation or Whirlpool Canada LP (hereafter "Whirlpool") will pay for Factory Specified Parts and repair labor to correct defects in materials or workmanship that existed ...
Dimensions
Page 1
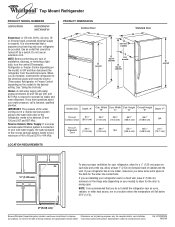
...) Because Whirlpool Corporation policy includes a continuous commitment to OFF and then disconnect the refrigerator from the electrical source. Do not use an extension cord. When you are finished, reconnect the refrigerator to the electrical source and reset the control (Thermostat, Refrigerator or Freezer Control depending... 301⁄8" 651⁄2" (76.5 cm) (166.4 cm) 661⁄2" (168.9 cm) NA 19 cu.ft. ® Top Mount Refrigerator PRODUCT MODEL NUMBERS G9RXXFMW W9RXXMFW W9TXNMFW Electrical: A 115-volt, 60-Hz, AC-only, 15or 20-amp fused, grounded electrical supply is ...
...) Because Whirlpool Corporation policy includes a continuous commitment to OFF and then disconnect the refrigerator from the electrical source. Do not use an extension cord. When you are finished, reconnect the refrigerator to the electrical source and reset the control (Thermostat, Refrigerator or Freezer Control depending... 301⁄8" 651⁄2" (76.5 cm) (166.4 cm) 661⁄2" (168.9 cm) NA 19 cu.ft. ® Top Mount Refrigerator PRODUCT MODEL NUMBERS G9RXXFMW W9RXXMFW W9TXNMFW Electrical: A 115-volt, 60-Hz, AC-only, 15or 20-amp fused, grounded electrical supply is ...

