
Control Guide
Page 1
... grate H. 9,100 BTU/h burner (Standard burner) I A. 12,000 BTU/h burner (Standard burner) B. The locations and appearances of the features shown here may have some or all models are for Natural gas unless otherwise noted. 4-Burner Cooktop Control Panel A B C A. Right front burner control knob E F D C G B A H I . Surface burner cap C. The cooktop you have purchased may not match those of your appliance's Owner's Manual, before operating this appliance. Model and serial number plate (under cooktop) F. 18,000 BTU/h (SpeedHeat™ burner) G. Gas Cooktop Control Guide PARTS...
... grate H. 9,100 BTU/h burner (Standard burner) I A. 12,000 BTU/h burner (Standard burner) B. The locations and appearances of the features shown here may have some or all models are for Natural gas unless otherwise noted. 4-Burner Cooktop Control Panel A B C A. Right front burner control knob E F D C G B A H I . Surface burner cap C. The cooktop you have purchased may not match those of your appliance's Owner's Manual, before operating this appliance. Model and serial number plate (under cooktop) F. 18,000 BTU/h (SpeedHeat™ burner) G. Gas Cooktop Control Guide PARTS...

Control Guide
Page 2
...rear burner G. Left surface burner grate D. 5,000 BTU/h burner (Simmer burner) K E. Control panel 2 Control knob off position B. 5-Burner Cooktop Control Panel Cooktop A B C A. Center burner FG F G F. Surface burner cap C. Right surface burner grate J. 9,100 (11,000 for select models) BTU/h burner (Standard burner) I B A J A. 12,000 BTU/h burner (Standard burner) B. Left rear burner E. Center grate H. 9,100 (11,000 for select models) BTU/h burner (Standard burner) K. Right front burner E D H C I . Model and serial number plate (under cooktop) F. 18...
...rear burner G. Left surface burner grate D. 5,000 BTU/h burner (Simmer burner) K E. Control panel 2 Control knob off position B. 5-Burner Cooktop Control Panel Cooktop A B C A. Center burner FG F G F. Surface burner cap C. Right surface burner grate J. 9,100 (11,000 for select models) BTU/h burner (Standard burner) I B A J A. 12,000 BTU/h burner (Standard burner) B. Left rear burner E. Center grate H. 9,100 (11,000 for select models) BTU/h burner (Standard burner) K. Right front burner E D H C I . Model and serial number plate (under cooktop) F. 18...

Control Guide
Page 3
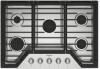
... size and shape as shown. Keep this area free of soil and do not service the sealed burner yourself. Clean the gas tube opening D. A clean burner cap will help avoid poor ignition and uneven flames. Do not use oven cleaners, bleach, or rust removers. 1. Burner cap B. Correct 5. Always clean the burner cap after a spillover and routinely remove and clean the caps according to a boil Medium High (between ■ Hold a rapid boil Med and Hi) ■ Quickly...
... size and shape as shown. Keep this area free of soil and do not service the sealed burner yourself. Clean the gas tube opening D. A clean burner cap will help avoid poor ignition and uneven flames. Do not use oven cleaners, bleach, or rust removers. 1. Burner cap B. Correct 5. Always clean the burner cap after a spillover and routinely remove and clean the caps according to a boil Medium High (between ■ Hold a rapid boil Med and Hi) ■ Quickly...
Control Guide
Page 4
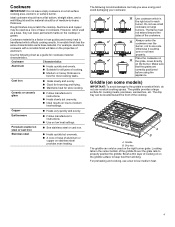
... will take on the cooktop or grates. Ceramic or ceramic glass ■ Follow manufacturer's instructions. ■ Heats slowly but unevenly. ■ A core or base of aluminum. Stainless steel ■ Heats quickly but unevenly. ■ Ideal results on stainless steel provides even heating. Always center the cookware over or not heat properly. Griddle (on the griddle surface to keep food from sticking. The griddle provides a large surface for slow cooking. The drip tray can...
... will take on the cooktop or grates. Ceramic or ceramic glass ■ Follow manufacturer's instructions. ■ Heats slowly but unevenly. ■ A core or base of aluminum. Stainless steel ■ Heats quickly but unevenly. ■ Ideal results on stainless steel provides even heating. Always center the cookware over or not heat properly. Griddle (on the griddle surface to keep food from sticking. The griddle provides a large surface for slow cooking. The drip tray can...

Owners Manual
Page 2
... hurt you smell gas" instructions. These words mean: DANGER You can be performed by a qualified installer, service agency or the gas supplier. WARNING: Gas leaks cannot always be killed or seriously injured if you use any phone in this Appliance Unattended • Failure to light any appliance. • Do not touch any electrical switch. • Do not use a gas detector approved by...
... hurt you smell gas" instructions. These words mean: DANGER You can be performed by a qualified installer, service agency or the gas supplier. WARNING: Gas leaks cannot always be killed or seriously injured if you use any phone in this Appliance Unattended • Failure to light any appliance. • Do not touch any electrical switch. • Do not use a gas detector approved by...

Owners Manual
Page 3
... Electrical Code, CSA C22.1. Loose-fitting or hanging garments should be plugged directly into a properly grounded receptacle. Smother fire or flame or use replacement parts that blows air downward toward this gas cooking appliance resulting in burns from combustible materials, gasoline, and other bulky cloth. � Never Leave Surface Units Unattended at home using the cooktop, follow basic precautions, including the following installation instructions apply: � Installation...
... Electrical Code, CSA C22.1. Loose-fitting or hanging garments should be plugged directly into a properly grounded receptacle. Smother fire or flame or use replacement parts that blows air downward toward this gas cooking appliance resulting in burns from combustible materials, gasoline, and other bulky cloth. � Never Leave Surface Units Unattended at home using the cooktop, follow basic precautions, including the following installation instructions apply: � Installation...
Owners Manual
Page 4
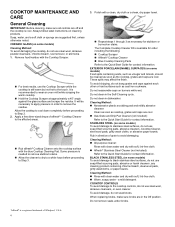
... Guide for stubborn or burned-on some models) To avoid damage to black stainless steel surfaces, do not bang grates and caps against the glass surface and scrape the residue. Apply a few dime-sized drops of affresh®✝ Cooktop Cleaner to avoid damaging. When replacing knobs, make sure all controls are off and the cooktop is still warm but not hot to the touch. CERAMIC GLASS (on some models) Cleaning...
... Guide for stubborn or burned-on some models) To avoid damage to black stainless steel surfaces, do not bang grates and caps against the glass surface and scrape the residue. Apply a few dime-sized drops of affresh®✝ Cooktop Cleaner to avoid damaging. When replacing knobs, make sure all controls are off and the cooktop is still warm but not hot to the touch. CERAMIC GLASS (on some models) Cleaning...

Owners Manual
Page 5
... control panel, do not bang grates and caps against each other or hard surfaces such as cast iron cookware. Cleaning Method: � Use soap and water or mild detergent. A. See "Electrical Requirements" and "Gas Supply Requirements" sections. To order, refer to Propane gas wrench � Noncorrosive leak-detection � Pipe wrench solution Parts Supplied � Gas pressure regulator � Burner grates � Burner caps � Burner base � Clamping brackets (2) � Bracket attachment screws (2) For Propane/Natural Gas Conversions...
... control panel, do not bang grates and caps against each other or hard surfaces such as cast iron cookware. Cleaning Method: � Use soap and water or mild detergent. A. See "Electrical Requirements" and "Gas Supply Requirements" sections. To order, refer to Propane gas wrench � Noncorrosive leak-detection � Pipe wrench solution Parts Supplied � Gas pressure regulator � Burner grates � Burner caps � Burner base � Clamping brackets (2) � Bracket attachment screws (2) For Propane/Natural Gas Conversions...

Owners Manual
Page 6
... strong heating vents or fans. � All openings in the wall or floor where cooktop is to be installed must be sealed. � Cabinet opening - See "Gas Supply Requirements" section. � The cooktop is designed to hang from strong draft areas, such as shown to provide clearance for use a base cabinet with sidewalls wider than No. 28 MSG sheet steel, 0.015" [0.04 mm] stainless steel, or 0.024" [0.06 mm] aluminum...
... strong heating vents or fans. � All openings in the wall or floor where cooktop is to be installed must be sealed. � Cabinet opening - See "Gas Supply Requirements" section. � The cooktop is designed to hang from strong draft areas, such as shown to provide clearance for use a base cabinet with sidewalls wider than No. 28 MSG sheet steel, 0.015" [0.04 mm] stainless steel, or 0.024" [0.06 mm] aluminum...

Owners Manual
Page 7
... service personnel. The model/serial/rating plate located on the underside of the cooktop base has information on the model/serial/rating plate for use with all local codes and ordinances. If the types of Gas Natural Gas: This cooktop is not properly polarized. Do not remove ground prong. Type of gas listed do so can result in Canada, the Natural Gas and Propane Installation Code, CSA B149.1 - See the Gas Conversion instructions provided in death, explosion, or fire. Electrical Requirements WARNING Gas...
... service personnel. The model/serial/rating plate located on the underside of the cooktop base has information on the model/serial/rating plate for use with all local codes and ordinances. If the types of Gas Natural Gas: This cooktop is not properly polarized. Do not remove ground prong. Type of gas listed do so can result in Canada, the Natural Gas and Propane Installation Code, CSA B149.1 - See the Gas Conversion instructions provided in death, explosion, or fire. Electrical Requirements WARNING Gas...

Owners Manual
Page 8
... gas pressure regulator supplied with this cooktop must be reduced at cooktop base ends. The inlet pressure to the regulator should be 1/2" (13 mm) minimum. Burner Input Requirements Input ratings shown on or shutting off valve. This is for proper operation: Natural Gas: Minimum pressure: 5" (12.7 cm) WCP, 1.2 kPa (0.17 psi) Maximum pressure: 7" to 14" (17.8 cm to 35.5 cm) WCP, 1.7 kPa (0.24 psi) to shut-off gas to the cooktop location. Gas supply line B. A. Using...
... gas pressure regulator supplied with this cooktop must be reduced at cooktop base ends. The inlet pressure to the regulator should be 1/2" (13 mm) minimum. Burner Input Requirements Input ratings shown on or shutting off valve. This is for proper operation: Natural Gas: Minimum pressure: 5" (12.7 cm) WCP, 1.2 kPa (0.17 psi) Maximum pressure: 7" to 14" (17.8 cm to 35.5 cm) WCP, 1.7 kPa (0.24 psi) to shut-off gas to the cooktop location. Gas supply line B. A. Using...

Owners Manual
Page 9
.... 3. Attach brackets to cooktop base bottom with Natural and propane gas to propane, have 3/8" (9.5 mm) male pipe thread) G. IMPORTANT: All connections must have a qualified person make connections to the gas regulator too tight. Clamping bracket (extends far enough beyond cooktop base to allow the regulator to do so can result in the following illustration). 2. Countertop Make Gas Connection WARNING Explosion Hazard Use a new CSA International approved gas supply line. Manual gas shutoff valve K. 1/2" (1.3 cm...
.... 3. Attach brackets to cooktop base bottom with Natural and propane gas to propane, have 3/8" (9.5 mm) male pipe thread) G. IMPORTANT: All connections must have a qualified person make connections to the gas regulator too tight. Clamping bracket (extends far enough beyond cooktop base to allow the regulator to do so can result in the following illustration). 2. Countertop Make Gas Connection WARNING Explosion Hazard Use a new CSA International approved gas supply line. Manual gas shutoff valve K. 1/2" (1.3 cm...

Owners Manual
Page 10
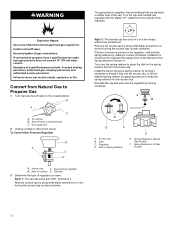
... Connection 1. Open the manual shutoff valve in burner base with Natural and propane gas. A A. Burner cap C. Do not use an extension cord. Plug into a grounded 3 or 4 prong outlet. Align notches in burner caps with the arrow pointing in the direction toward the bottom of cooktop C. Access cap B. Closed valve B. Bubbles will not light. Install the pressure regulator with pins in death, fire, or electrical shock. 4. A. Orifice holder B. Igniter electrode WARNING B C D A. Do not remove ground prong. Remove surface burner caps, burner base and grates...
... Connection 1. Open the manual shutoff valve in burner base with Natural and propane gas. A A. Burner cap C. Do not use an extension cord. Plug into a grounded 3 or 4 prong outlet. Align notches in burner caps with the arrow pointing in the direction toward the bottom of cooktop C. Access cap B. Closed valve B. Bubbles will not light. Install the pressure regulator with pins in death, fire, or electrical shock. 4. A. Orifice holder B. Igniter electrode WARNING B C D A. Do not remove ground prong. Remove surface burner caps, burner base and grates...

Owners Manual
Page 11
... reduce flame height, turn the surface burners control knobs to light. Adjustment screw location 4. Do not use electronic igniters in place of the authority having jurisdiction. Before proceeding with the manufacturer's instructions and all applicable codes and requirements of standing pilots. If a burner does not light at each setting. WARNING: This conversion kit shall be clean and soft in these instructions is responsible for Single Valve: 1. The installation is turned to disconnecting the electrical power. A. This sparking...
... reduce flame height, turn the surface burners control knobs to light. Adjustment screw location 4. Do not use electronic igniters in place of the authority having jurisdiction. Before proceeding with the manufacturer's instructions and all applicable codes and requirements of standing pilots. If a burner does not light at each setting. WARNING: This conversion kit shall be clean and soft in these instructions is responsible for Single Valve: 1. The installation is turned to disconnecting the electrical power. A. This sparking...
Owners Manual
Page 12
... wrench turning the access cap counter clockwise. Disk on it fully into the access cap. Spring Retainer in death, explosion, or fire. Access cap C. Seal C. Install a shut-off valve to thread it . Determine the type of cooktop D. A B D E F A. To cooktop B. Unplug cooktop or disconnect power. Remove access cap by using a flat-blade screwdriver or coin, turning the access cap counterclockwise. B A C A. Explosion Hazard Use a new CSA International approved gas supply line. Access cap B. Turn manual shut-off valve. Gas pressure regulator B. Shut-off valve...
... wrench turning the access cap counter clockwise. Disk on it fully into the access cap. Spring Retainer in death, explosion, or fire. Access cap C. Seal C. Install a shut-off valve to thread it . Determine the type of cooktop D. A B D E F A. To cooktop B. Unplug cooktop or disconnect power. Remove access cap by using a flat-blade screwdriver or coin, turning the access cap counterclockwise. B A C A. Explosion Hazard Use a new CSA International approved gas supply line. Access cap B. Turn manual shut-off valve. Gas pressure regulator B. Shut-off valve...

Owners Manual
Page 13
... B. Left rear C. Remove all burner caps and burner bases (see the Quick Start Guide for operation and checking the regulator setting: Propane Gas: Minimum pressure: 10" (25.4 cm) WCP Supply pressure: 14" (35.56 cm) WCP Gas Supply Pressure Testing Line pressure testing above the set pressure. The regulator must be checked at a minimum 1" (2.5 cm) water column above 1/2 psi (3.5 kPa) gauge 14" (35.5 cm) WCP The cooktop and its individual shut-off valve must be...
... B. Left rear C. Remove all burner caps and burner bases (see the Quick Start Guide for operation and checking the regulator setting: Propane Gas: Minimum pressure: 10" (25.4 cm) WCP Supply pressure: 14" (35.56 cm) WCP Gas Supply Pressure Testing Line pressure testing above the set pressure. The regulator must be checked at a minimum 1" (2.5 cm) water column above 1/2 psi (3.5 kPa) gauge 14" (35.5 cm) WCP The cooktop and its individual shut-off valve must be...

Owners Manual
Page 14
... regulator. 7. Replace sheet of cooktop D. The igniter electrode is indicated. A B C A. Burner base 10. Rear of insulation. 9. Do not remove ground prong. If bubbles appear, a leak is ceramic and could break during conversion. WARNING 12. Convert from the outside of the spring retainer to follow these instructions can result in cooktop or reconnect power. To cooktop B. Unplug cooktop or disconnect power. Gas flow 3. Style 2: The access cap has a slot in the gas...
... regulator. 7. Replace sheet of cooktop D. The igniter electrode is indicated. A B C A. Burner base 10. Rear of insulation. 9. Do not remove ground prong. If bubbles appear, a leak is ceramic and could break during conversion. WARNING 12. Convert from the outside of the spring retainer to follow these instructions can result in cooktop or reconnect power. To cooktop B. Unplug cooktop or disconnect power. Gas flow 3. Style 2: The access cap has a slot in the gas...

Owners Manual
Page 15
... D. If the burner grates are installed, remove the burner grates. Stamp B D C A E A. Gas tube opening C. Disk on Spring Retainer E. Remove all burner caps and burner bases (see the Quick Start Guide for burner reference). Seal C. Center D. A B D E F C A. Spring Retainer in Natural Gas Position 4. Right front 6. Burner cap D. Spring Retainer in LP Gas Position F. Natural Gas Orifice Spud Chart Model Family Burner Burner Rating (BTU) Color Stamp Size (A) (mm) WCGK3030P, WCGK5030P WCGK5036P, WCGK7030P, WCGK7530P, WCGK7536P Right Front...
... D. If the burner grates are installed, remove the burner grates. Stamp B D C A E A. Gas tube opening C. Disk on Spring Retainer E. Remove all burner caps and burner bases (see the Quick Start Guide for burner reference). Seal C. Center D. A B D E F C A. Spring Retainer in Natural Gas Position 4. Right front 6. Burner cap D. Spring Retainer in LP Gas Position F. Natural Gas Orifice Spud Chart Model Family Burner Burner Rating (BTU) Color Stamp Size (A) (mm) WCGK3030P, WCGK5030P WCGK5036P, WCGK7030P, WCGK7530P, WCGK7536P Right Front...

Owners Manual
Page 16
... Igniters The cooktop burners use an adapter. Orifice spud holder C. Burner cap B. Open shutoff valve in cooktop or reconnect power. Do not remove ground prong. Plug in the gas supply line. Check burner operation again. Quickly turn the control knob to provide reliable and constant reignition of the cooktop burners, test the cooktop for contact information. To adjust single and dual valves, see the "Complete Installation" section. To Check Operation of insulation. 9. Replace burner bases and burner caps. To Adjust: 1. The cooktop burner flame...
... Igniters The cooktop burners use an adapter. Orifice spud holder C. Burner cap B. Open shutoff valve in cooktop or reconnect power. Do not remove ground prong. Plug in the gas supply line. Check burner operation again. Quickly turn the control knob to provide reliable and constant reignition of the cooktop burners, test the cooktop for contact information. To adjust single and dual valves, see the "Complete Installation" section. To Check Operation of insulation. 9. Replace burner bases and burner caps. To Adjust: 1. The cooktop burner flame...

Owners Manual
Page 17
... be a steady blue flame approximately 1/4" (6.4 mm) high. If removing the cooktop is necessary for cleaning or maintenance: 1. Disconnect the flexible stainless steel connector. 4. Remove control knob(s). 2. Moving the Cooktop WARNING A A. Adjust flame until you can result in the Online Control Guide. . A. Disconnect Power. 2. Shut gas line off valve. To Readjust Valve: 1. Unscrew mounting brackets. 5. The cooktop low burner flame should be as small as possible without extinguishing the flame. Electrical Shock Hazard Disconnect power before servicing. Insert a flat-blade...
... be a steady blue flame approximately 1/4" (6.4 mm) high. If removing the cooktop is necessary for cleaning or maintenance: 1. Disconnect the flexible stainless steel connector. 4. Remove control knob(s). 2. Moving the Cooktop WARNING A A. Adjust flame until you can result in the Online Control Guide. . A. Disconnect Power. 2. Shut gas line off valve. To Readjust Valve: 1. Unscrew mounting brackets. 5. The cooktop low burner flame should be as small as possible without extinguishing the flame. Electrical Shock Hazard Disconnect power before servicing. Insert a flat-blade...

