User Instructions
Page 1
... Address Phone number Model number Purchase date Accessories Enhance your complete model number and serial number. fits 29" (73.7 cm) Super Capacity, 6.5 cu. Part Number Accessory 20-48KITRC 4 ft (1.2 m) gas line dryer connector installation kit PT220L 4 ft (1.2 m) dryer cord, 3-wire, 30 amp PT400L 4 ft... your correspondence. For more high-quality items or to help is available by calling our Customer eXperience Center at www.whirlpool.com/accessories. Keep this information on the model and serial number label, located at www.whirlpoolparts.ca. white 49572 ...
... Address Phone number Model number Purchase date Accessories Enhance your complete model number and serial number. fits 29" (73.7 cm) Super Capacity, 6.5 cu. Part Number Accessory 20-48KITRC 4 ft (1.2 m) gas line dryer connector installation kit PT220L 4 ft (1.2 m) dryer cord, 3-wire, 30 amp PT400L 4 ft... your correspondence. For more high-quality items or to help is available by calling our Customer eXperience Center at www.whirlpool.com/accessories. Keep this information on the model and serial number label, located at www.whirlpoolparts.ca. white 49572 ...

User Instructions
Page 2
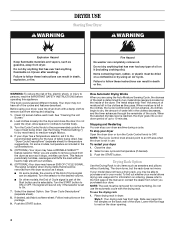
...; Do not dry articles that have been previously cleaned in, washed in, soaked in, or spotted with controls. ■ Do not repair or replace any part of the dryer or attempt any servicing unless specifically recommended in the dryer. All safety messages will follow the safety alert symbol and either the...
...; Do not dry articles that have been previously cleaned in, washed in, soaked in, or spotted with controls. ■ Do not repair or replace any part of the dryer or attempt any servicing unless specifically recommended in the dryer. All safety messages will follow the safety alert symbol and either the...
User Instructions
Page 4
... load. NOTE: The Cycle Control knob should be removed for clothes to the desired volume. ■ On other models, the End of Cycle signal is part of fire, electric shock, or injury to ON or OFF. To restart your dryer 1. Drying Rack Option Use the Drying Rack to dry items such...
... load. NOTE: The Cycle Control knob should be removed for clothes to the desired volume. ■ On other models, the End of Cycle signal is part of fire, electric shock, or injury to ON or OFF. To restart your dryer 1. Drying Rack Option Use the Drying Rack to dry items such...
User Instructions
Page 6
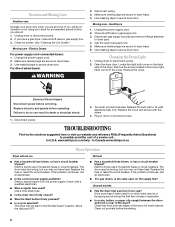
... Was the Start button firmly pressed? ■ Is a cycle selected? Moving care - Electrical Shock Hazard Disconnect power before operating. Replace all parts and panels before servicing. In U.S.A. The drum may be turning, but you may be on the back wall of the cover. The dryer ...the dryer had a period of the drum for small objects. If the dryer hasn't been used ? See "Cleaning the Lint Screen." www.whirlpool.com/help - Replace the fuse or reset the circuit breaker. Unplug the power supply cord. 2. Make sure leveling legs are secure in ...
... Was the Start button firmly pressed? ■ Is a cycle selected? Moving care - Electrical Shock Hazard Disconnect power before operating. Replace all parts and panels before servicing. In U.S.A. The drum may be turning, but you may be on the back wall of the cover. The dryer ...the dryer had a period of the drum for small objects. If the dryer hasn't been used ? See "Cleaning the Lint Screen." www.whirlpool.com/help - Replace the fuse or reset the circuit breaker. Unplug the power supply cord. 2. Make sure leveling legs are secure in ...
User Instructions
Page 8
... fit right and work right because they are excluded from dryer at 1-800-253-1301, or your authorized Whirlpool dealer to order replacement parts, we recommend that can be repaired in remote locations. 10. Service calls to refrigerator or freezer product failures. 6. All rights...plumbing codes, or use of the Use & Care Guide. ITEMS WHIRLPOOL WILL NOT PAY FOR 1. Those consumable parts are made to contact Whirlpool Corporation, please see the "Troubleshooting" section of products not approved by calling Whirlpool. THIS WARRANTY GIVES YOU SPECIFIC LEGAL RIGHTS AND YOU MAY ALSO ...
... fit right and work right because they are excluded from dryer at 1-800-253-1301, or your authorized Whirlpool dealer to order replacement parts, we recommend that can be repaired in remote locations. 10. Service calls to refrigerator or freezer product failures. 6. All rights...plumbing codes, or use of the Use & Care Guide. ITEMS WHIRLPOOL WILL NOT PAY FOR 1. Those consumable parts are made to contact Whirlpool Corporation, please see the "Troubleshooting" section of products not approved by calling Whirlpool. THIS WARRANTY GIVES YOU SPECIFIC LEGAL RIGHTS AND YOU MAY ALSO ...

Installation Instructions
Page 1
... INSTRUCCIONES DE INSTALACIÓN PARA LA SECADORA ELÉCTRICA DE 29" (73,7 CM) Table of Contents / Índice DRYER SAFETY ...1 INSTALLATION INSTRUCTIONS ...2 Tools and Parts ...2 Location Requirements ...2 Electrical Requirements ...4 Electrical Connection ...5 Venting Requirements...10 Plan Vent System ...11 Install Vent System...12 Install Leveling Legs...12 Connect Vent ...12 Level...
... INSTRUCCIONES DE INSTALACIÓN PARA LA SECADORA ELÉCTRICA DE 29" (73,7 CM) Table of Contents / Índice DRYER SAFETY ...1 INSTALLATION INSTRUCTIONS ...2 Tools and Parts ...2 Location Requirements ...2 Electrical Requirements ...4 Electrical Connection ...5 Venting Requirements...10 Plan Vent System ...11 Install Vent System...12 Install Leveling Legs...12 Connect Vent ...12 Level...

Installation Instructions
Page 2
... dryer at the end of 1" (2.5 cm) under entire dryer. (If slope is greater than 1" [2.5 cm], install Extended Dryer Feet Kit, Part Number 279810.) Clothes may not operate correctly if dryer is not level. Check that opens to do not permit, installation of 200 lbs (90.7 kg...). s s Parts needed: Check local codes. Check code requirements. See "Electrical Requirements." The combined weight of a companion appliance should also be exposed to support the...
... dryer at the end of 1" (2.5 cm) under entire dryer. (If slope is greater than 1" [2.5 cm], install Extended Dryer Feet Kit, Part Number 279810.) Clothes may not operate correctly if dryer is not level. Check that opens to do not permit, installation of 200 lbs (90.7 kg...). s s Parts needed: Check local codes. Check code requirements. See "Electrical Requirements." The combined weight of a companion appliance should also be exposed to support the...

Installation Instructions
Page 3
...s *Most installations require a minimum 5½" (14 cm) clearance behind the dryer for Mobile Home Construction and Safety, Title 24, HUD Part 280). Companion appliance spacing should also be large enough to allow the dryer door to open fully. Side view - The installation must conform ...the dryer. s Additional spacing should be made in mobile homes to the Manufactured Home Construction and Safety Standard, Title 24 CFR, Part 3280 (formerly the Federal Standard for the exhaust vent with vents *Additional spacing recommended Mobile Home - For closet installation, with ...
...s *Most installations require a minimum 5½" (14 cm) clearance behind the dryer for Mobile Home Construction and Safety, Title 24, HUD Part 280). Companion appliance spacing should also be large enough to allow the dryer door to open fully. Side view - The installation must conform ...the dryer. s Additional spacing should be made in mobile homes to the Manufactured Home Construction and Safety Standard, Title 24 CFR, Part 3280 (formerly the Federal Standard for the exhaust vent with vents *Additional spacing recommended Mobile Home - For closet installation, with ...

Installation Instructions
Page 10
...) is not plugged with lint. s 2½" (6.4 cm) s s An exhaust hood should cap the vent to keep rodents and insects from your dealer or by calling Whirlpool Parts and Accessories. IMPORTANT: Observe all joints. Do not use a plastic vent. Replace any gas vent, chimney, wall, ceiling or a concealed space of the Dryer User...
...) is not plugged with lint. s 2½" (6.4 cm) s s An exhaust hood should cap the vent to keep rodents and insects from your dealer or by calling Whirlpool Parts and Accessories. IMPORTANT: Observe all joints. Do not use a plastic vent. Replace any gas vent, chimney, wall, ceiling or a concealed space of the Dryer User...

Installation Instructions
Page 11
...B. Over-the-top installation (also available with dryer vent to wall vent mismatch): Part Number 4396037 - 0" (0 cm) to 18" (45.72 cm) mismatch Part Number 4396011 - 18" (45.72 cm) to 29" (73.66 cm) mismatch Part Number 4396014 - 29" (73.66 cm) to 50" (127 cm) mismatch... installations vent the dryer from the rear of the dryer. Exhaust systems longer than those specified will help to connect elbows H. s Over-the-Top Installation: Part Number 4396028 s B C D A E F G B H A. Elbow C. Terminate the exhaust vent outside. s s s Use the Vent system chart below to determine type of the ...
...B. Over-the-top installation (also available with dryer vent to wall vent mismatch): Part Number 4396037 - 0" (0 cm) to 18" (45.72 cm) mismatch Part Number 4396011 - 18" (45.72 cm) to 29" (73.66 cm) mismatch Part Number 4396014 - 29" (73.66 cm) to 50" (127 cm) mismatch... installations vent the dryer from the rear of the dryer. Exhaust systems longer than those specified will help to connect elbows H. s Over-the-Top Installation: Part Number 4396028 s B C D A E F G B H A. Elbow C. Terminate the exhaust vent outside. s s s Use the Vent system chart below to determine type of the ...

Installation Instructions
Page 12
... (do so can change your door swing from the dryer carton. Use clamps to exhaust hood. Reverse Door Swing (Optional) You can result in large part of dryer. Connect vent to seal all joints. Pull door forward off screws. Vent system chart NOTE: Side and bottom exhaust installations have a 90º...
... (do so can change your door swing from the dryer carton. Use clamps to exhaust hood. Reverse Door Swing (Optional) You can result in large part of dryer. Connect vent to seal all joints. Pull door forward off screws. Vent system chart NOTE: Side and bottom exhaust installations have a 90º...

Installation Instructions
Page 13
... so screws are in bottom of hinge slot. Close door and check that door strike aligns with door catch (B). Dispose of/recycle all parts are set in large part of slots. Set the dryer on a full heat cycle (not an air cycle) for the dryer. Remove bottom screws from cabinet. 4. Pull... door. 5. Dryer door is intact and tight, or circuit breaker has not tripped. Position door so large end of door hinge slot is an extra part, go away. 13 Insert and tighten top screws in hinges. 8. Check that both fuses are in a running for 5 minutes, open the dryer door and ...
... so screws are in bottom of hinge slot. Close door and check that door strike aligns with door catch (B). Dispose of/recycle all parts are set in large part of slots. Set the dryer on a full heat cycle (not an air cycle) for the dryer. Remove bottom screws from cabinet. 4. Pull... door. 5. Dryer door is intact and tight, or circuit breaker has not tripped. Position door so large end of door hinge slot is an extra part, go away. 13 Insert and tighten top screws in hinges. 8. Check that both fuses are in a running for 5 minutes, open the dryer door and ...
Parts Diagram
Page 1
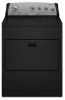
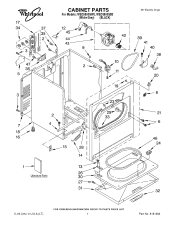
CABINET PARTS For Models: WED5900SW0, WED5900SB0 (White/Grey) (BLACK) 29" Electric Dryer 5−06 Litho in U.S.A.(LT) 1 Part No. 8181284
CABINET PARTS For Models: WED5900SW0, WED5900SB0 (White/Grey) (BLACK) 29" Electric Dryer 5−06 Litho in U.S.A.(LT) 1 Part No. 8181284

Parts Diagram
Page 2
...660658 Clamp, Motor 45 3404162 Clamp, Motor (W/Shield) 46 3390731 Seal, Door 47 3393008 Screw, 10−16 x 1/2 2 8181284 DESCRIPTION 1 Literature Parts 8577188 Installation Instructions W10042910 Sheet, Cycle Feature 8578183 Use & Care Guide W10042930 Tech Sheet W10042920 Sheet, Feature Resource Saver Following May Be Purchased DO−...Felt Pad (3) 24 3389441 Catch, Door Assembly 26 337189 Clip, Hinge (2) 27 694091 Screw, 8−18 x 3/8 28 8066056 Hinge, R.H. 8066057 Hinge, L.H. Part No. CABINET PARTS For Models: WED5900SW0, WED5900SB0 (White/Grey) (BLACK) Illus...
...660658 Clamp, Motor 45 3404162 Clamp, Motor (W/Shield) 46 3390731 Seal, Door 47 3393008 Screw, 10−16 x 1/2 2 8181284 DESCRIPTION 1 Literature Parts 8577188 Installation Instructions W10042910 Sheet, Cycle Feature 8578183 Use & Care Guide W10042930 Tech Sheet W10042920 Sheet, Feature Resource Saver Following May Be Purchased DO−...Felt Pad (3) 24 3389441 Catch, Door Assembly 26 337189 Clip, Hinge (2) 27 694091 Screw, 8−18 x 3/8 28 8066056 Hinge, R.H. 8066057 Hinge, L.H. Part No. CABINET PARTS For Models: WED5900SW0, WED5900SB0 (White/Grey) (BLACK) Illus...
Parts Diagram
Page 3
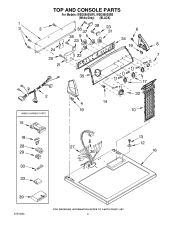
TOP AND CONSOLE PARTS For Models: WED5900SW0, WED5900SB0 (White/Grey) (BLACK) 8181284 3
TOP AND CONSOLE PARTS For Models: WED5900SW0, WED5900SB0 (White/Grey) (BLACK) 8181284 3
Parts Diagram
Page 4
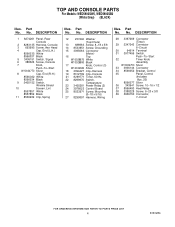
Part No. Part No. Part No. DESCRIPTION 28 3397269 Connector (Timer) 29 3347243 Connector 6−Circuit 30 94614 Terminal 31 3977456 Switch, Push−To−Start 32 Timer Knob ... Switch, Temperature 23 3405281 Power Relay (2) 24 3976623 Control Board 25 8533971 Screw, Mounting (8−18 x 5/16) 27 8299897 Harness, Wiring Illus. TOP AND CONSOLE PARTS For Models: WED5900SW0, WED5900SB0 (White/Grey) (BLACK) Illus. No. No.
Part No. Part No. Part No. DESCRIPTION 28 3397269 Connector (Timer) 29 3347243 Connector 6−Circuit 30 94614 Terminal 31 3977456 Switch, Push−To−Start 32 Timer Knob ... Switch, Temperature 23 3405281 Power Relay (2) 24 3976623 Control Board 25 8533971 Screw, Mounting (8−18 x 5/16) 27 8299897 Harness, Wiring Illus. TOP AND CONSOLE PARTS For Models: WED5900SW0, WED5900SB0 (White/Grey) (BLACK) Illus. No. No.
Parts Diagram
Page 5
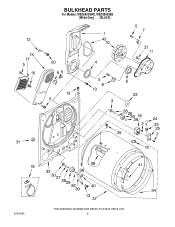
BULKHEAD PARTS For Models: WED5900SW0, WED5900SB0 (White/Grey) (BLACK) 8181284 5
BULKHEAD PARTS For Models: WED5900SW0, WED5900SB0 (White/Grey) (BLACK) 8181284 5
Parts Diagram
Page 6
... Drum 37 695587 Drum Assembly 38 692490 Baffle, Drum (2) 39 3976434 Bracket, Support 40 90296 Clip 41 3403636 Baffle, Drum (1) 42 339956 Seal 6 8181284 BULKHEAD PARTS For Models: WED5900SW0, WED5900SB0 (White/Grey) (BLACK) Illus. No...
... Drum 37 695587 Drum Assembly 38 692490 Baffle, Drum (2) 39 3976434 Bracket, Support 40 90296 Clip 41 3403636 Baffle, Drum (1) 42 339956 Seal 6 8181284 BULKHEAD PARTS For Models: WED5900SW0, WED5900SB0 (White/Grey) (BLACK) Illus. No...
Parts Diagram
Page 7
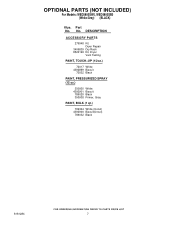
No. Part No. DESCRIPTION ACCESSORY PARTS 279948 Kit, Dryer Repair 3406839 Dry Rack 8522199 Kit, Dryer Vent Testing PAINT, TOUCH−UP (1/2oz.) 72017 White 4392899 Biscuit 72032 Black PAINT, PRESSURIZED SPRAY (12 oz.) 350930 White 4392901 Biscuit 786020 Black 350938 Primer, Gray PAINT, BULK (1 qt.) 799344 White (Uncut) 4392900 Biscuit(Uncut) 786032 Black 8181284 7 OPTIONAL PARTS (NOT INCLUDED) For Models: WED5900SW0, WED5900SB0 (White/Grey) (BLACK) Illus.
No. Part No. DESCRIPTION ACCESSORY PARTS 279948 Kit, Dryer Repair 3406839 Dry Rack 8522199 Kit, Dryer Vent Testing PAINT, TOUCH−UP (1/2oz.) 72017 White 4392899 Biscuit 72032 Black PAINT, PRESSURIZED SPRAY (12 oz.) 350930 White 4392901 Biscuit 786020 Black 350938 Primer, Gray PAINT, BULK (1 qt.) 799344 White (Uncut) 4392900 Biscuit(Uncut) 786032 Black 8181284 7 OPTIONAL PARTS (NOT INCLUDED) For Models: WED5900SW0, WED5900SB0 (White/Grey) (BLACK) Illus.


