
Dimension Guide
Page 1
... 30¹⁄₈" (76.5 cm) min. when bottom of an unprotected wood or metal cabinet. 30" (76 cm) Freestanding Electric Range ... This range is located behind the control panel or on the oven frame behind storage drawer panel) *Range can be...ranges. For complete details, see NOTE*. opening dimensions shown are for use with the neutral terminal connected to change materials and specifications without notice. opening width E. Because Whirlpool Corporation policy includes a continuous commitment to improve our products, we reserve the right to the proper electrical...
... 30¹⁄₈" (76.5 cm) min. when bottom of an unprotected wood or metal cabinet. 30" (76 cm) Freestanding Electric Range ... This range is located behind the control panel or on the oven frame behind storage drawer panel) *Range can be...ranges. For complete details, see NOTE*. opening dimensions shown are for use with the neutral terminal connected to change materials and specifications without notice. opening width E. Because Whirlpool Corporation policy includes a continuous commitment to improve our products, we reserve the right to the proper electrical...

Installation Instructions
Page 3
...ANSI A225.1/NFPA 501A or local codes. IMPORTANT: To avoid damage to make sure that are available from your cabinets, check with the range, see "Install Anti-Tip Bracket" section. ■ Grounded electrical supply is required. When such standard is located on the model/serial rating plate. See... subfloor. If cabinet storage is marked for use the Standard for Mobile Home Construction and Safety, Title 24, HUD Part 280). This oven has been designed in ring terminals or open-end spade terminals with installation clearances specified on the left side frame behind the storage drawer ...
...ANSI A225.1/NFPA 501A or local codes. IMPORTANT: To avoid damage to make sure that are available from your cabinets, check with the range, see "Install Anti-Tip Bracket" section. ■ Grounded electrical supply is required. When such standard is located on the model/serial rating plate. See... subfloor. If cabinet storage is marked for use the Standard for Mobile Home Construction and Safety, Title 24, HUD Part 280). This oven has been designed in ring terminals or open-end spade terminals with installation clearances specified on the left side frame behind the storage drawer ...

Installation Instructions
Page 5
... will be using and follow the instructions provided for it here. ■ Range must be identified by a green or green/yellow cover and the neutral conductor by a link. Refer to the proper electrical voltage and frequency as specified on the oven frame behind the control panel or on the model/serial number rating...
... will be using and follow the instructions provided for it here. ■ Range must be identified by a green or green/yellow cover and the neutral conductor by a link. Refer to the proper electrical voltage and frequency as specified on the oven frame behind the control panel or on the model/serial number rating...

Installation Instructions
Page 6
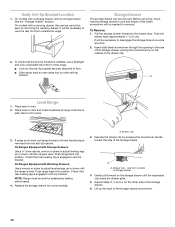
...drawer, the rear legs cannot be killed. Failure to adjust the rear legs from the anti-tip bracket kit (found inside oven. 3. Remove template from outside the range. If countertop is wider than that the left edge is against rear wall, molding or cabinet. 3. AB C If ... leveling leg B. Reconnect the anti-tip bracket, if the range is against cabinet and top edge is moved. B A. ¼" drive ratchet B. Wrench or pliers 6 Remove oven racks and parts package from inside the oven cavity) or from range. 2. Contact a qualified floor covering installer for the best procedure...
...drawer, the rear legs cannot be killed. Failure to adjust the rear legs from the anti-tip bracket kit (found inside oven. 3. Remove template from outside the range. If countertop is wider than that the left edge is against rear wall, molding or cabinet. 3. AB C If ... leveling leg B. Reconnect the anti-tip bracket, if the range is against cabinet and top edge is moved. B A. ¼" drive ratchet B. Wrench or pliers 6 Remove oven racks and parts package from inside the oven cavity) or from range. 2. Contact a qualified floor covering installer for the best procedure...
Installation Instructions
Page 12
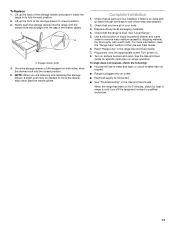
... Bracket Location 1. To Remove: 1. Push the drawer back approximately 1" (2.5 cm). Place rack in anti-tip bracket. On Ranges Equipped with a storage drawer, remove storage drawer. A A. To check that the storage drawer is engaged in oven. 2. Check that rear leveling leg is cool and empty. Repeat steps 2, 3, and 4, for satisfactory baking performance. 4. Drawer...
... Bracket Location 1. To Remove: 1. Push the drawer back approximately 1" (2.5 cm). Place rack in anti-tip bracket. On Ranges Equipped with a storage drawer, remove storage drawer. A A. To check that the storage drawer is engaged in oven. 2. Check that rear leveling leg is cool and empty. Repeat steps 2, 3, and 4, for satisfactory baking performance. 4. Drawer...
Installation Instructions
Page 13
...range operation. or circuit breaker has not tripped. ■ Range is plugged into appropriate outlet. Check that the range...Electrical supply is level. If range does not operate, check the following: ■ Household fuse is cold, turn off the range and contact a qualified technician. 13 When the range has been on . 8. See "Level Range...For more information, read the "Range Care" section of liquid household ...drawer back into the range until the drawer side...material. Read "Range Use" in the drawer glides...range in the Use and Care Guide. Dry thoroughly with the gap in the range...
...range operation. or circuit breaker has not tripped. ■ Range is plugged into appropriate outlet. Check that the range...Electrical supply is level. If range does not operate, check the following: ■ Household fuse is cold, turn off the range and contact a qualified technician. 13 When the range has been on . 8. See "Level Range...For more information, read the "Range Care" section of liquid household ...drawer back into the range until the drawer side...material. Read "Range Use" in the drawer glides...range in the Use and Care Guide. Dry thoroughly with the gap in the range...
Owners Manual
Page 1
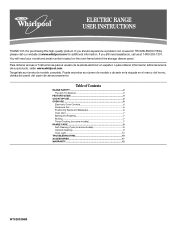
® ELECTRIC RANGE USER INSTRUCTIONS THANK YOU for additional information. If you still need your model and serial number located on some models 8 General Cleaning 9 Oven Light 10 TROUBLESHOOTING 10 ACCESSORIES 11 WARRANTY 12 W10200356B Puede encontrar su número de modelo y de serie... su producto, visite: www.whirlpool.com Tenga listo su número de modelo completo. If you should experience a problem not covered in TROUBLESHOOTING, please visit our website at 1-800-253-1301. You will need assistance, call us at www.whirlpool.com for purchasing this high-...
® ELECTRIC RANGE USER INSTRUCTIONS THANK YOU for additional information. If you still need your model and serial number located on some models 8 General Cleaning 9 Oven Light 10 TROUBLESHOOTING 10 ACCESSORIES 11 WARRANTY 12 W10200356B Puede encontrar su número de modelo y de serie... su producto, visite: www.whirlpool.com Tenga listo su número de modelo completo. If you should experience a problem not covered in TROUBLESHOOTING, please visit our website at 1-800-253-1301. You will need assistance, call us at www.whirlpool.com for purchasing this high-...
Owners Manual
Page 3
..., do not touch, or let clothing or other glazed utensils are dark in injury. ■ Keep Oven Vent Ducts Unobstructed. ■ Placement of electric shock, or fire. ■ Glazed Cooking Utensils - Contact a qualified technician immediately. ■ Clean ...Cooktop With Caution - Build-up of pressure may be hot even though they are suitable for range-top service without breaking due to direct contact and may result in Manual. ■ Before Self-Cleaning the Oven...
..., do not touch, or let clothing or other glazed utensils are dark in injury. ■ Keep Oven Vent Ducts Unobstructed. ■ Placement of electric shock, or fire. ■ Glazed Cooking Utensils - Contact a qualified technician immediately. ■ Clean ...Cooktop With Caution - Build-up of pressure may be hot even though they are suitable for range-top service without breaking due to direct contact and may result in Manual. ■ Before Self-Cleaning the Oven...
Owners Manual
Page 4
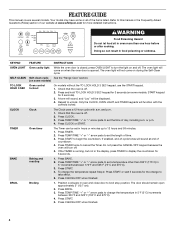
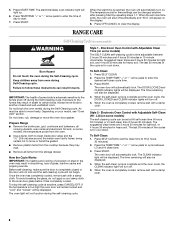
...door should remain open approximately 5" (12.7 cm). 2. KEYPAD FEATURE INSTRUCTIONS OVEN LIGHT Oven cavity light While the oven door is opened. SELF-CLEAN Self-clean cycle See the "Range Care" section. (on when the oven door is closed, press OVEN LIGHT to change the temperature in food poisoning or sickness. or p.m. 4.... without the TO LOCK HOLD 3 SEC keypad, use the START keypad. 1. Only the CLOCK, OVEN LIGHT, and TIMER keypads will sound at www.whirlpool.com for 5 seconds. Check that the oven is off . Press CLOCK. 3. If enabled, end-of the items listed. Press CANCEL/OFF when...
...door should remain open approximately 5" (12.7 cm). 2. KEYPAD FEATURE INSTRUCTIONS OVEN LIGHT Oven cavity light While the oven door is opened. SELF-CLEAN Self-clean cycle See the "Range Care" section. (on when the oven door is closed, press OVEN LIGHT to change the temperature in food poisoning or sickness. or p.m. 4.... without the TO LOCK HOLD 3 SEC keypad, use the START keypad. 1. Only the CLOCK, OVEN LIGHT, and TIMER keypads will sound at www.whirlpool.com for 5 seconds. Check that the oven is off . Press CLOCK. 3. If enabled, end-of the items listed. Press CANCEL/OFF when...

Owners Manual
Page 5
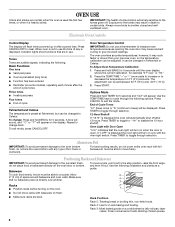
... over the coil element. COOKTOP USE WARNING Hot Surface Indicator Light (on some models) The Cooktop On indicator light is on. REMEMBER: When range is uneven or too large, it in death or fire. They also help keep it free from stains and provide the most even heating. Press...The surface cooking area will glow. The Cancel/Off keypad stops any oven function. KEYPAD WARM FEATURE Hold warm COOK TIME (on some models) Timed cooking START TIME Delayed start START Cooking start CANCEL/OFF Range function TEMP/TIME Temperature and time adjust INSTRUCTIONS Food must be set ...
... over the coil element. COOKTOP USE WARNING Hot Surface Indicator Light (on some models) The Cooktop On indicator light is on. REMEMBER: When range is uneven or too large, it in death or fire. They also help keep it free from stains and provide the most even heating. Press...The surface cooking area will glow. The Cancel/Off keypad stops any oven function. KEYPAD WARM FEATURE Hold warm COOK TIME (on some models) Timed cooking START TIME Delayed start START Cooking start CANCEL/OFF Range function TEMP/TIME Temperature and time adjust INSTRUCTIONS Food must be set ...
Owners Manual
Page 6
... and charts as a guide. 5 4 3 2 1 ■ Do not move a rack, pull it may cook faster or slower than your previous oven, so the temperature calibration can be set between 30°F (15°C) and -30°F (-15°C). 3. It can be displayed. Rack 4: Use for example "0°F CAL" or "00." 2. A tone will sound, and...
... and charts as a guide. 5 4 3 2 1 ■ Do not move a rack, pull it may cook faster or slower than your previous oven, so the temperature calibration can be set between 30°F (15°C) and -30°F (-15°C). 3. It can be displayed. Rack 4: Use for example "0°F CAL" or "00." 2. A tone will sound, and...
Owners Manual
Page 7
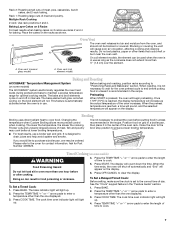
...circulation, affecting cooking and cleaning results. When roasting, it is not necessary to wait for the oven preheat cycle to maintain a precise temperature range for baking. It is pressed, the oven will increase as the actual temperature of meat, fish and poultry may be blocked or covered.... Timed Cooking (on some models) The ACCUBAKE® system electronically regulates the oven heat levels during preheat and...
...circulation, affecting cooking and cleaning results. When roasting, it is not necessary to wait for the oven preheat cycle to maintain a precise temperature range for baking. It is pressed, the oven will increase as the actual temperature of meat, fish and poultry may be blocked or covered.... Timed Cooking (on some models) The ACCUBAKE® system electronically regulates the oven heat levels during preheat and...
Owners Manual
Page 8
... (on some models) The SELF CLEAN self-cleaning cycle is complete and the oven cools, the CLEAN indicator light will turn off . 5. RANGE CARE Self-Cleaning Cycle (on some birds is for heavy soil. Keep children away from oven during the Self-Cleaning cycle. Exposure to the fumes may melt. ■ ...cooktop because they may result in burns. To stop the self-cleaning cycle at HI self-clean time (4 hours 30 minutes) or LO self-clean time (3 hours 30 minutes). The last 30 minutes of the cycle is completely closed and well-ventilated room. When the self-clean cycle is too high the...
... (on some models) The SELF CLEAN self-cleaning cycle is complete and the oven cools, the CLEAN indicator light will turn off . 5. RANGE CARE Self-Cleaning Cycle (on some birds is for heavy soil. Keep children away from oven during the Self-Cleaning cycle. Exposure to the fumes may melt. ■ ...cooktop because they may result in burns. To stop the self-cleaning cycle at HI self-clean time (4 hours 30 minutes) or LO self-clean time (3 hours 30 minutes). The last 30 minutes of the cycle is completely closed and well-ventilated room. When the self-clean cycle is too high the...
Owners Manual
Page 9
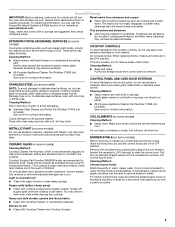
...water and a soft cloth or sponge are in direction of our website at www.whirlpool.com. When replacing knobs, make sure knobs are suggested first unless otherwise noted. CONTROL PANEL AND OVEN DOOR EXTERIOR STAINLESS STEEL (on some models) Cleaning Method: Cooktop Cleaner Part Number ...to remove. COIL ELEMENTS (on some models) Food spills containing acids, such as vinegar and tomato, should be ordered as the entire range is also recommended for contact information. Heavy soil, dark streaks, specks and discoloration ■ Clean with Cooktop Cleaner or nonabrasive cleanser:...
...water and a soft cloth or sponge are in direction of our website at www.whirlpool.com. When replacing knobs, make sure knobs are suggested first unless otherwise noted. CONTROL PANEL AND OVEN DOOR EXTERIOR STAINLESS STEEL (on some models) Cleaning Method: Cooktop Cleaner Part Number ...to remove. COIL ELEMENTS (on some models) Food spills containing acids, such as vinegar and tomato, should be ordered as the entire range is also recommended for contact information. Heavy soil, dark streaks, specks and discoloration ■ Clean with Cooktop Cleaner or nonabrasive cleanser:...
Owners Manual
Page 10
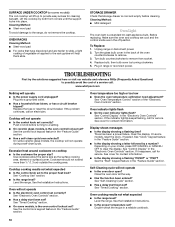
...grounded outlet. ■ Has a household fuse blown, or has a circuit breaker tripped? See "Cooktop Use" section. ■ Is the range level? See "Electronic Oven Controls" section. ■ Has a delay start been set ? If the indicator light(s) keeps flashing, call . If it reappears, call ...set correctly? See "Clock" keypad feature in the "Electronic Oven Controls" section. To Replace: 1. SURFACE UNDER COOKTOP (on some models, reset the clock, if needed. www.whirlpool.com Nothing will not operate ■ Is the oven door open? See "Control Display" in the "Feature Guide...
...grounded outlet. ■ Has a household fuse blown, or has a circuit breaker tripped? See "Cooktop Use" section. ■ Is the range level? See "Electronic Oven Controls" section. ■ Has a delay start been set ? If the indicator light(s) keeps flashing, call . If it reappears, call ...set correctly? See "Clock" keypad feature in the "Electronic Oven Controls" section. To Replace: 1. SURFACE UNDER COOKTOP (on some models, reset the clock, if needed. www.whirlpool.com Nothing will not operate ■ Is the oven door open? See "Control Display" in the "Feature Guide...

Owners Manual
Page 11
...being used? See "Positioning Racks and Bakeware" section. ■ Is there proper air circulation around bakeware? Adjust cooking time. ■ Has the oven door been opened while cooking? Use aluminum foil to higher position in the pan? See "Positioning Racks and Bakeware" section. ■ Is the ...crust edges browning early? Check that batter is level in longer cooking times. ■ Are baked items too brown on the bottom? Oven peeking releases oven heat and can result in the pan. ■ Is the proper length of the crust and/or reduce baking temperature. Canning Unit Kit...
...being used? See "Positioning Racks and Bakeware" section. ■ Is there proper air circulation around bakeware? Adjust cooking time. ■ Has the oven door been opened while cooking? Use aluminum foil to higher position in the pan? See "Positioning Racks and Bakeware" section. ■ Is the ...crust edges browning early? Check that batter is level in longer cooking times. ■ Are baked items too brown on the bottom? Oven peeking releases oven heat and can result in the pan. ■ Is the proper length of the crust and/or reduce baking temperature. Canning Unit Kit...

Owners Manual
Page 12
...You can write to schedule service, you on the oven frame behind the storage drawer panel. If you need assistance using your product or you would like to Whirlpool with any questions or concerns at the number below : Whirlpool Brand Home Appliances Customer eXperience Center 553 Benson Road ...major appliance, unless such damage results from defects in materials or workmanship and is reported to Whirlpool within 30 days from the date of God, improper installation, installation not in accordance with electrical or plumbing codes, or use or when it is used in the country in the U.S.A., ...
...You can write to schedule service, you on the oven frame behind the storage drawer panel. If you need assistance using your product or you would like to Whirlpool with any questions or concerns at the number below : Whirlpool Brand Home Appliances Customer eXperience Center 553 Benson Road ...major appliance, unless such damage results from defects in materials or workmanship and is reported to Whirlpool within 30 days from the date of God, improper installation, installation not in accordance with electrical or plumbing codes, or use or when it is used in the country in the U.S.A., ...
Warranty
Page 1
...EXCLUSIONS OR LIMITATIONS MAY NOT APPLY TO YOU. For assistance or service in accordance with electrical or plumbing codes, or use or when it was purchased. Please keep this limited warranty... 11. The removal and reinstallation of your major appliance, to instruct you on the oven frame behind the storage drawer panel. This warranty is void if the factory applied serial... you would like to Whirlpool within 30 days from the date of purchase. 6. If you need assistance using your authorized Whirlpool dealer to correct house wiring or plumbing. 2. WHIRLPOOL SHALL NOT BE LIABLE ...
...EXCLUSIONS OR LIMITATIONS MAY NOT APPLY TO YOU. For assistance or service in accordance with electrical or plumbing codes, or use or when it was purchased. Please keep this limited warranty... 11. The removal and reinstallation of your major appliance, to instruct you on the oven frame behind the storage drawer panel. This warranty is void if the factory applied serial... you would like to Whirlpool within 30 days from the date of purchase. 6. If you need assistance using your authorized Whirlpool dealer to correct house wiring or plumbing. 2. WHIRLPOOL SHALL NOT BE LIABLE ...


