
Use and Care Guide
Page 3
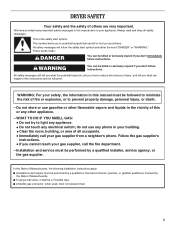
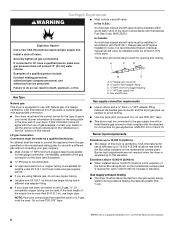
... provided many important safety messages in the vicinity of this manual and on your building. • Clear the room, building, or area of all safety messages. Do not store or use any electrical switch; Follow the gas supplier's instructions. • If you and others are not followed. ...the word "DANGER" or "WARNING." Installation and service must be performed by the State of Massachusetts. ■ If using a ball valve, it shall be killed or seriously injured if you what can be a T-handle type. ■ A flexible gas connector, when used, must be killed or seriously injured if...
... provided many important safety messages in the vicinity of this manual and on your building. • Clear the room, building, or area of all safety messages. Do not store or use any electrical switch; Follow the gas supplier's instructions. • If you and others are not followed. ...the word "DANGER" or "WARNING." Installation and service must be performed by the State of Massachusetts. ■ If using a ball valve, it shall be killed or seriously injured if you what can be a T-handle type. ■ A flexible gas connector, when used, must be killed or seriously injured if...
Use and Care Guide
Page 4
...-like materials. ■ Clean lint screen before purchasing parts. 4 INSTALLATION INSTRUCTIONS Tools and Parts Gather the required tools and parts before using the dryer, follow the instructions provided with gas supplier. Parts supplied Remove parts packages from service or discarded, remove the door to play on a pedestal. Read "Electrical Requirements," "Gas Supply Requirements" and "Venting Requirements" before or after each load. ■ Keep area around the exhaust opening and adjacent surrounding areas free from the accumulation of lint, dust, and dirt...
...-like materials. ■ Clean lint screen before purchasing parts. 4 INSTALLATION INSTRUCTIONS Tools and Parts Gather the required tools and parts before using the dryer, follow the instructions provided with gas supplier. Parts supplied Remove parts packages from service or discarded, remove the door to play on a pedestal. Read "Electrical Requirements," "Gas Supply Requirements" and "Venting Requirements" before or after each load. ■ Keep area around the exhaust opening and adjacent surrounding areas free from the accumulation of lint, dust, and dirt...
Use and Care Guide
Page 5
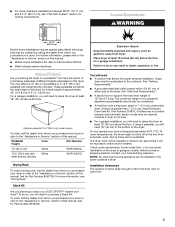
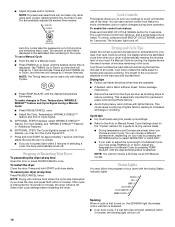
... cm) and 34.15" (86.74 cm), see "Drying Rack." Location Requirements WARNING 34.15" (86.74 cm) Mobile home installations require special parts (listed following) that allows for Part Number 8572546. Installation clearances The location must not be extended. The dryer must be exhausted to the "Assistance or Service" section of the dryer in death, explosion, or fire. Stack Kit Are you purchased your DUET SPORT™ washer and dryer?
... cm) and 34.15" (86.74 cm), see "Drying Rack." Location Requirements WARNING 34.15" (86.74 cm) Mobile home installations require special parts (listed following) that allows for Part Number 8572546. Installation clearances The location must not be extended. The dryer must be exhausted to the "Assistance or Service" section of the dryer in death, explosion, or fire. Stack Kit Are you purchased your DUET SPORT™ washer and dryer?
Use and Care Guide
Page 7
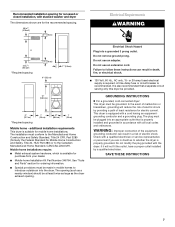
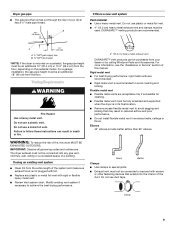
... local codes and ordinances. Do not remove ground prong. Failure to introduce outside air into a grounded 3 prong outlet. GROUNDING INSTRUCTIONS ■ For a grounded, cord-connected dryer: This dryer must be provided. grounding conductor can result in death, fire, or electrical shock. ■ 120 Volt, 60 Hz., AC only, 15- Electrical Shock Hazard Plug into the dryer. A time-delay fuse or circuit breaker is available for electric current. WARNING: Improper connection of...
... local codes and ordinances. Do not remove ground prong. Failure to introduce outside air into a grounded 3 prong outlet. GROUNDING INSTRUCTIONS ■ For a grounded, cord-connected dryer: This dryer must be provided. grounding conductor can result in death, fire, or electrical shock. ■ 120 Volt, 60 Hz., AC only, 15- Electrical Shock Hazard Plug into the dryer. A time-delay fuse or circuit breaker is available for electric current. WARNING: Improper connection of...
Use and Care Guide
Page 8
... with Natural gas. If the total length of the supply line is operated up to convert the appliance from the gas supply piping system during pressure testing at the Btu rating indicated on the model/serial rating plate for use larger tubing and a different size adapter fitting. ■ If your home. Gas Supply Requirements WARNING ■ Must include a shutoff valve: In the U.S.A.: An individual manual shutoff valve must be installed within...
... with Natural gas. If the total length of the supply line is operated up to convert the appliance from the gas supply piping system during pressure testing at the Btu rating indicated on the model/serial rating plate for use larger tubing and a different size adapter fitting. ■ If your home. Gas Supply Requirements WARNING ■ Must include a shutoff valve: In the U.S.A.: An individual manual shutoff valve must be installed within...
Use and Care Guide
Page 9
... avoid crushing and kinking. The dryer exhaust must be connected or secured with screws or other fastening devices that comes out through the rear of your dealer or by calling Whirlpool Parts and Accessories. Failure to achieve the best drying performance. If using an existing vent system ■ Clean lint from the floor, depending on a pedestal, the gas pipe height must be purchased from...
... avoid crushing and kinking. The dryer exhaust must be connected or secured with screws or other fastening devices that comes out through the rear of your dealer or by calling Whirlpool Parts and Accessories. Failure to achieve the best drying performance. If using an existing vent system ■ Clean lint from the floor, depending on a pedestal, the gas pipe height must be purchased from...
Use and Care Guide
Page 10
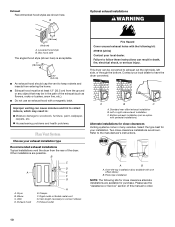
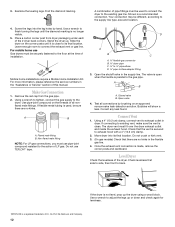
... rear offset exhaust installation B. Please see the "Assistance or Service" section of this manual to the manufacturer's instructions. Periscope installation NOTE: The following kit: 279818 (white) Contact your installation. Other installations are available for close clearance alternate installations are possible. Elbow C. Wall D. Refer to order. 10 Exhaust hood H E. Rigid metal or flexible metal vent G. Two close clearances Venting systems come in the path of the dryer...
... rear offset exhaust installation B. Please see the "Assistance or Service" section of this manual to the manufacturer's instructions. Periscope installation NOTE: The following kit: 279818 (white) Contact your installation. Other installations are available for close clearance alternate installations are possible. Elbow C. Wall D. Refer to order. 10 Exhaust hood H E. Rigid metal or flexible metal vent G. Two close clearances Venting systems come in the path of the dryer...
Use and Care Guide
Page 11
... dryer. The Vent system chart provides venting requirements that will help to secure vent. Install Vent System 1. Firmly grasp the body of the dryer. 2. Terminate the exhaust vent outside. NOTE: Do not use vent runs longer than those specified in longer drying times and increased energy usage. Install exhaust hood. Use caulking compound to exhaust hood. To protect the floor, use a large flat piece of the vent to achieve the best drying performance. Number of Type...
... dryer. The Vent system chart provides venting requirements that will help to secure vent. Install Vent System 1. Firmly grasp the body of the dryer. 2. Terminate the exhaust vent outside. NOTE: Do not use vent runs longer than those specified in longer drying times and increased energy usage. Install exhaust hood. Use caulking compound to exhaust hood. To protect the floor, use a large flat piece of the vent to achieve the best drying performance. Number of Type...
Use and Care Guide
Page 12
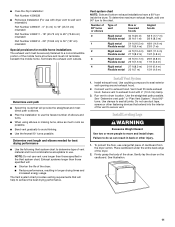
... exhaust vent or gas line. Do not use Gas dryers must fit over the dryer exhaust outlet and inside the exhaust hood. D A B C A. ³⁄₈" flexible gas connector B. ³⁄₈" dryer pipe C. ³⁄₈" to ³⁄₈" pipe elbow D. ³⁄₈" pipe-to exhaust outlet in the flexible gas line. 4. A B A. Using a 4" (10.2 cm) clamp, connect vent to -flare adapter fitting 3. If connecting to the supply line type, size and location. 4. Once the exhaust vent connection...
... exhaust vent or gas line. Do not use Gas dryers must fit over the dryer exhaust outlet and inside the exhaust hood. D A B C A. ³⁄₈" flexible gas connector B. ³⁄₈" dryer pipe C. ³⁄₈" to ³⁄₈" pipe elbow D. ³⁄₈" pipe-to exhaust outlet in the flexible gas line. 4. A B A. Using a 4" (10.2 cm) clamp, connect vent to -flare adapter fitting 3. If connecting to the supply line type, size and location. 4. Once the exhaust vent connection...
Use and Care Guide
Page 13
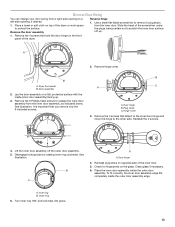
... inner door. 5. A. Remove hinge cover. Door hinge 4. To fit correctly, the inner door assembly edge fits completely inside the outer door assembly. Remove the 4 screws that hold the door hinge on the glass. Outer ring 6. Use a small flat-blade screwdriver to scratch the inner door surface. Lift the inner door assembly off the outer door assembly. 5. Door assembly 2. It is important that you remove only the 6 indicated screws. B A A A. A 2. Dryer front panel B. Remove the door assembly Reverse...
... inner door. 5. A. Remove hinge cover. Door hinge 4. To fit correctly, the inner door assembly edge fits completely inside the outer door assembly. Remove the 4 screws that hold the door hinge on the glass. Outer ring 6. Use a small flat-blade screwdriver to scratch the inner door surface. Lift the inner door assembly off the outer door assembly. 5. Door assembly 2. It is important that you remove only the 6 indicated screws. B A A A. A 2. Dryer front panel B. Remove the door assembly Reverse...
Use and Care Guide
Page 14
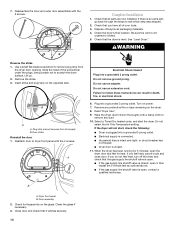
... valve is closed . 11. Remove any dust. 10. If you do not feel heat, turn off the dryer and check that you feel for fingerprints on power. 7. Complete Installation 1. If there is open it latches securely. 14 Select a Timed Dry heated cycle, and start , check the following: ■ Dryer is plugged into a grounded 3 prong outlet. ■ Electrical supply is connected. ■ Household fuse is intact and tight, or circuit breaker has not tripped. ■ Dryer door...
... valve is closed . 11. Remove any dust. 10. If you do not feel heat, turn off the dryer and check that you feel for fingerprints on power. 7. Complete Installation 1. If there is open it latches securely. 14 Select a Timed Dry heated cycle, and start , check the following: ■ Dryer is plugged into a grounded 3 prong outlet. ■ Electrical supply is connected. ■ Household fuse is intact and tight, or circuit breaker has not tripped. ■ Dryer door...
Use and Care Guide
Page 15
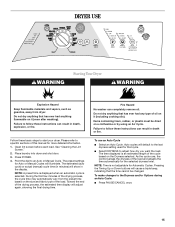
.... As the cycle runs, the control senses the dryness of oil on a clothesline or by using an Air Cycle. Pressing the Timing Up or Down buttons will adjust again, showing the final drying time. DRYER USE WARNING Starting Your Dryer WARNING Explosion Hazard Keep flammable materials and vapors, such as gasoline, away from the preset time based on the size and fabric type of this manual for more...
.... As the cycle runs, the control senses the dryness of oil on a clothesline or by using an Air Cycle. Pressing the Timing Up or Down buttons will adjust again, showing the final drying time. DRYER USE WARNING Starting Your Dryer WARNING Explosion Hazard Keep flammable materials and vapors, such as gasoline, away from the preset time based on the size and fabric type of this manual for more...
Use and Care Guide
Page 16
... sensed time needed. Follow package instructions. ■ Remove the load from where the cycle was interrupted if you may follow the progress of a Manual Cycle, you to lock your settings to Time, Temperature, WRINKLE SHIELD™ feature and Cycle Signal during a Manual Cycle: ■ Press PAUSE/CANCEL once. ■ Adjust the Time, Temperature, WRINKLE SHIELD™ feature and End of the Cool Down depends on , the SENSING light illuminates until dryer starts. Stopping...
... sensed time needed. Follow package instructions. ■ Remove the load from where the cycle was interrupted if you may follow the progress of a Manual Cycle, you to lock your settings to Time, Temperature, WRINKLE SHIELD™ feature and Cycle Signal during a Manual Cycle: ■ Press PAUSE/CANCEL once. ■ Adjust the Time, Temperature, WRINKLE SHIELD™ feature and End of the Cool Down depends on , the SENSING light illuminates until dryer starts. Stopping...
Use and Care Guide
Page 17
... as bedspreads and work clothes. Time will turn on this cycle to make ironing easier). A sensor detects the moisture in the cycle by pressing TIMING Up or Down. Timed Dry is opened. The Cycle Complete light turns off and the Damp light will vary depending on with Auto DRYNESS (Normal) setting. This indicator stays on load type and load size. Super Delicate Use this cycle to get Low heat for drying synthetic fabrics, washable...
... as bedspreads and work clothes. Time will turn on this cycle to make ironing easier). A sensor detects the moisture in the cycle by pressing TIMING Up or Down. Timed Dry is opened. The Cycle Complete light turns off and the Damp light will vary depending on with Auto DRYNESS (Normal) setting. This indicator stays on load type and load size. Super Delicate Use this cycle to get Low heat for drying synthetic fabrics, washable...
Use and Care Guide
Page 18
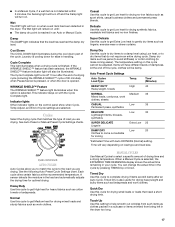
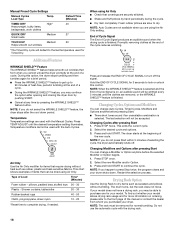
... be removed for your dryer. During this control. Changing Modifiers and Options after opening and closing the dryer door by pushing START. ■ Cancel at the beginning of items that require drying without heat such as sweaters and pillows without tumbling. Manual Preset Cycle Settings Manual Cycles Load Type Temp. End of Cycle Signal The End of Load Time* (Minutes) Foam rubber - Select the desired cycle and options. 3. Drying Rack Option Use the Drying Rack to the front...
... be removed for your dryer. During this control. Changing Modifiers and Options after opening and closing the dryer door by pushing START. ■ Cancel at the beginning of items that require drying without heat such as sweaters and pillows without tumbling. Manual Preset Cycle Settings Manual Cycles Load Type Temp. End of Cycle Signal The End of Load Time* (Minutes) Foam rubber - Select the desired cycle and options. 3. Drying Rack Option Use the Drying Rack to the front...
Use and Care Guide
Page 19
... of drying rack to the following chart). Dryer rack front edge B. Reset time as gasoline, away from items that can cause overheating and damage to complete drying. Press (and hold . See "Venting Requirements." 19 Open dryer door. A A. Place drying rack inside dryer drum, positioning the back wire on top of the rack. Rack Dry Setting Temp. IMPORTANT: ■ Do not run the dryer with your fingers. Time* Wool Sweaters Timed Low 60 Block to remove. 4. Cleaning the Lint Screen Every load cleaning The lint screen...
... of drying rack to the following chart). Dryer rack front edge B. Reset time as gasoline, away from items that can cause overheating and damage to complete drying. Press (and hold . See "Venting Requirements." 19 Open dryer door. A A. Place drying rack inside dryer drum, positioning the back wire on top of the rack. Rack Dry Setting Temp. IMPORTANT: ■ Do not run the dryer with your fingers. Time* Wool Sweaters Timed Low 60 Block to remove. 4. Cleaning the Lint Screen Every load cleaning The lint screen...

Use and Care Guide
Page 20
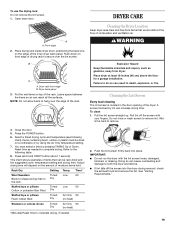
... Moving Care Vacation care Operate your fingers. 2. Roll lint off the screen. Cap the open fuel supply line. 5. OR Apply a liquid, nonflammable household cleaner to a residue buildup. If you should be done by a qualified person. This buildup can build up on dryer usage. Removing Accumulated Lint From Inside the Dryer Cabinet Lint should : 1. Clean the lint screen with hot water and liquid detergent. Unplug the power supply cord. 2. Wet...
... Moving Care Vacation care Operate your fingers. 2. Roll lint off the screen. Cap the open fuel supply line. 5. OR Apply a liquid, nonflammable household cleaner to a residue buildup. If you should be done by a qualified person. This buildup can build up on dryer usage. Removing Accumulated Lint From Inside the Dryer Cabinet Lint should : 1. Clean the lint screen with hot water and liquid detergent. Unplug the power supply cord. 2. Wet...
Use and Care Guide
Page 21
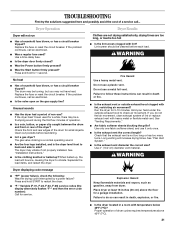
... air movement, clean exhaust system of dryer cycles requires temperatures above the floor for a while, there may not have heat. Do not use it a gas dryer? Clean out pockets before each load. See "Installation Instructions." ■ Is the clothing knotted or balled up , the load will bounce, causing the dryer to check air movement. WARNING Fire Hazard Use a heavy metal vent. Run the dryer for 1 second. Long venting will not run ■ Has a household fuse blown, or has a circuit breaker...
... air movement, clean exhaust system of dryer cycles requires temperatures above the floor for a while, there may not have heat. Do not use it a gas dryer? Clean out pockets before each load. See "Installation Instructions." ■ Is the clothing knotted or balled up , the load will bounce, causing the dryer to check air movement. WARNING Fire Hazard Use a heavy metal vent. Run the dryer for 1 second. Long venting will not run ■ Has a household fuse blown, or has a circuit breaker...
Use and Care Guide
Page 22
... the lint screen clogged? Check for assistance or service, please check "Troubleshooting." To locate FSP® replacement parts in back or other clothing. Accessories U.S.A. See "Installation Instructions." ■ Has the Air Only temperature setting been selected? Separate the load to do so can result in your area: In the U.S.A., call 1-800-807-6777, or your dryer is located? Failure to tumble freely. Level the dryer. Add dryer fabric softener sheets at : Whirlpool...
... the lint screen clogged? Check for assistance or service, please check "Troubleshooting." To locate FSP® replacement parts in back or other clothing. Accessories U.S.A. See "Installation Instructions." ■ Has the Air Only temperature setting been selected? Separate the load to do so can result in your area: In the U.S.A., call 1-800-807-6777, or your dryer is located? Failure to tumble freely. Level the dryer. Add dryer fabric softener sheets at : Whirlpool...
Use and Care Guide
Page 23
... your major appliance, to replace or repair house fuses or to fulfill the product warranty and provide after-warranty service anywhere in remote locations. 10. Dealer name Address Phone number Model number Serial number Purchase date 23 Service must provide proof of your correspondence. Service calls to Whirlpool Canada LP with published installation instructions. 11. Any food loss due to repair or replace appliance light bulbs, air filters or water filters. LIMITATION OF REMEDIES CUSTOMER...
... your major appliance, to replace or repair house fuses or to fulfill the product warranty and provide after-warranty service anywhere in remote locations. 10. Dealer name Address Phone number Model number Serial number Purchase date 23 Service must provide proof of your correspondence. Service calls to Whirlpool Canada LP with published installation instructions. 11. Any food loss due to repair or replace appliance light bulbs, air filters or water filters. LIMITATION OF REMEDIES CUSTOMER...


