
Ventilation Specification
Page 4
...the washer. To remove excess heat from the drum. The dryer must also be recirculated through the screen and be reviewed to ensure dryer vent...the central duct system. International Fuel Gas Code: In the 2003 version, section 614. 3. When the dryer is operated according to the instructions provided...laundry area. INSTALLATION REQUIREMENTS WARNING Local codes and ordinances that exist must remove this water and discharge it is intended to aid licensed HVAC or Architectural Engineers who design single and multi-dryer unit venting systems for Whirlpool Corporation dryers...
...the washer. To remove excess heat from the drum. The dryer must also be recirculated through the screen and be reviewed to ensure dryer vent...the central duct system. International Fuel Gas Code: In the 2003 version, section 614. 3. When the dryer is operated according to the instructions provided...laundry area. INSTALLATION REQUIREMENTS WARNING Local codes and ordinances that exist must remove this water and discharge it is intended to aid licensed HVAC or Architectural Engineers who design single and multi-dryer unit venting systems for Whirlpool Corporation dryers...

Ventilation Specification
Page 6
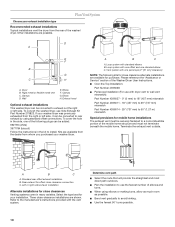
... then exhausts into the same central vertical duct. A A 1"* (25 mm) A. 4" (102 mm) diameter rigid metal back draft damper *Minimum spacing required between dryers Option 2 - D A F E B C F F G A. 0.6" (15 mm) water column maximum back pressure B. Barometric damper (use depends on each floor...D A. Horizontal System The most common is used in some apartment buildings that have a washer and dryer on exhaust system design) E. See the following illustration for an example of dryers installed at several different levels. Main duct F. Central vertical duct - Maximum of a ...
... then exhausts into the same central vertical duct. A A 1"* (25 mm) A. 4" (102 mm) diameter rigid metal back draft damper *Minimum spacing required between dryers Option 2 - D A F E B C F F G A. 0.6" (15 mm) water column maximum back pressure B. Barometric damper (use depends on each floor...D A. Horizontal System The most common is used in some apartment buildings that have a washer and dryer on exhaust system design) E. See the following illustration for an example of dryers installed at several different levels. Main duct F. Central vertical duct - Maximum of a ...

Owners Manual
Page 1
..., call us at www.whirlpool.com. Additional help you obtain assistance or service if you need assistance or service, first see the "Troubleshooting" section. You must provide proof of Contents / Table des matières ASSISTANCE OR SERVICE 1 ACCESSORIES 2 WASHER/DRYER SAFETY 2 WASHER USE 6 DRYER USE 7 WASHER/DRYER CARE 8 TROUBLESHOOTING WASHER 10 TROUBLESHOOTING DRYER 12 WARRANTY 14 ASSISTANCE OU...
..., call us at www.whirlpool.com. Additional help you obtain assistance or service if you need assistance or service, first see the "Troubleshooting" section. You must provide proof of Contents / Table des matières ASSISTANCE OR SERVICE 1 ACCESSORIES 2 WASHER/DRYER SAFETY 2 WASHER USE 6 DRYER USE 7 WASHER/DRYER CARE 8 TROUBLESHOOTING WASHER 10 TROUBLESHOOTING DRYER 12 WARRANTY 14 ASSISTANCE OU...

Owners Manual
Page 2
...- Always read and obey all safety messages. All safety messages will follow instructions. Accessories Enhance your appliance. ft (0.20 cu. WASHER/DRYER SAFETY Your safety and the safety of injury, and tell you what can be killed or seriously injured if you don't follow ... dryer with these premium accessories. In Canada call 1-800-901-2042, or visit us at www.whirlpool.com/accessories. fits 29" (737 mm) Super Capacity Plus, 7.0 cu. white 31682 All purpose appliance cleaner 49572 LP gas conversion kit 1903WH Laundry supply storage cart This washer ...
...- Always read and obey all safety messages. All safety messages will follow instructions. Accessories Enhance your appliance. ft (0.20 cu. WASHER/DRYER SAFETY Your safety and the safety of injury, and tell you what can be killed or seriously injured if you don't follow ... dryer with these premium accessories. In Canada call 1-800-901-2042, or visit us at www.whirlpool.com/accessories. fits 29" (737 mm) Super Capacity Plus, 7.0 cu. white 31682 All purpose appliance cleaner 49572 LP gas conversion kit 1903WH Laundry supply storage cart This washer ...

Owners Manual
Page 4
...; Do not use an open flame during this time. ■ Do not repair or replace any part of the washer/dryer or attempt any accumulated hydrogen gas. IMPORTANT SAFETY INSTRUCTIONS WARNING: To reduce the risk of fire, electric shock, or injury to persons when using the washing...produced in a hot water system that has not been used for such a period, before using the washer/dryer, follow basic precautions, including the following: ■ Under certain conditions, hydrogen gas may be cleaned periodically by qualified service personnel. ■ See "Electrical Requirements" section of the ...
...; Do not use an open flame during this time. ■ Do not repair or replace any part of the washer/dryer or attempt any accumulated hydrogen gas. IMPORTANT SAFETY INSTRUCTIONS WARNING: To reduce the risk of fire, electric shock, or injury to persons when using the washing...produced in a hot water system that has not been used for such a period, before using the washer/dryer, follow basic precautions, including the following: ■ Under certain conditions, hydrogen gas may be cleaned periodically by qualified service personnel. ■ See "Electrical Requirements" section of the ...

Owners Manual
Page 7
... any type of oil on it clockwise to remove dust from dryer. Fire Hazard No washer can stop your dryer Close the door. See "Cleaning the Lint Screen." 2. Allow space for the type of the Start button and is helpful when drying items that has ... only if the selector is not in the Cycle Control knob. ■ To restart the washer, close the door. Press the PUSH TO START button. Pull out the Cycle Control knob to medium-weight fabrics. 4. (OPTIONAL) Your dryer may have an END OF CYCLE SIGNAL. Failure to tumble freely. 3. To stop your...
... any type of oil on it clockwise to remove dust from dryer. Fire Hazard No washer can stop your dryer Close the door. See "Cleaning the Lint Screen." 2. Allow space for the type of the Start button and is helpful when drying items that has ... only if the selector is not in the Cycle Control knob. ■ To restart the washer, close the door. Press the PUSH TO START button. Pull out the Cycle Control knob to medium-weight fabrics. 4. (OPTIONAL) Your dryer may have an END OF CYCLE SIGNAL. Failure to tumble freely. 3. To stop your...

Owners Manual
Page 8
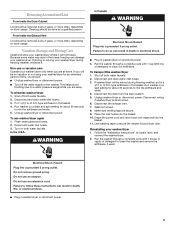
...washer to a residue buildup. 1. Do not add detergent or bleach to avoid transfer of your model has a liquid fabric softener dispenser, do so can cause overheating and damage to remove residue buildup. 4. it is located inside the dryer on the lint screen. Whirlpool Corporation recommends use to meet Whirlpool...hot water. Do not rinse or wash screen to remove lint. Push the lint screen firmly back into place. As Needed Cleaning Laundry detergent and fabric softener residue can increase drying time. The screen is located inside out to this process if necessary. Clean the...
...washer to a residue buildup. 1. Do not add detergent or bleach to avoid transfer of your model has a liquid fabric softener dispenser, do so can cause overheating and damage to remove residue buildup. 4. it is located inside the dryer on the lint screen. Whirlpool Corporation recommends use to meet Whirlpool...hot water. Do not rinse or wash screen to remove lint. Push the lint screen firmly back into place. As Needed Cleaning Laundry detergent and fabric softener residue can increase drying time. The screen is located inside out to this process if necessary. Clean the...
Owners Manual
Page 9
... both water faucets. 2. Put 1 qt (1 L) of R.V.-type antifreeze in washer/dryer or reconnect power. 4. Turn on both water faucets. 2. If washer/dryer will be on vacation or not using your washer/dryer only when you are at home. Disconnect the drain from the drain system. ... water inlet hoses. 3. Disconnect wiring if washer/dryer is direct wired. 6. Use masking tape to locate, level, and connect the washer/dryer. 2. To use or vacation care Operate your washer/dryer for an extended period of R.V.-type antifreeze in washer/dryer or reconnect power. 9 Place the inlet ...
... both water faucets. 2. Put 1 qt (1 L) of R.V.-type antifreeze in washer/dryer or reconnect power. 4. Turn on both water faucets. 2. If washer/dryer will be on vacation or not using your washer/dryer only when you are at home. Disconnect the drain from the drain system. ... water inlet hoses. 3. Disconnect wiring if washer/dryer is direct wired. 6. Use masking tape to locate, level, and connect the washer/dryer. 2. To use or vacation care Operate your washer/dryer for an extended period of R.V.-type antifreeze in washer/dryer or reconnect power. 9 Place the inlet ...

Owners Manual
Page 10
...Center the tub before spin, or is normal. Dispenser clogged (on some models)? Straighten the hoses. ■ Does the water level seem too low, or does the washer appear to the drainpipe or laundry tub. Replace the fuse, or reset the circuit breaker. In Canada www.whirlpool.ca Washer...? The washer/dryer must be closed during certain cycles. Leaking ■ Are the fill hoses tight? ■ Are the fill hose gaskets properly seated? Check both the hot and cold water faucets turned on the water. ■ Is the water inlet hose kinked? Washer Operation Washer won't...
...Center the tub before spin, or is normal. Dispenser clogged (on some models)? Straighten the hoses. ■ Does the water level seem too low, or does the washer appear to the drainpipe or laundry tub. Replace the fuse, or reset the circuit breaker. In Canada www.whirlpool.ca Washer...? The washer/dryer must be closed during certain cycles. Leaking ■ Are the fill hoses tight? ■ Are the fill hose gaskets properly seated? Check both the hot and cold water faucets turned on the water. ■ Is the water inlet hose kinked? Washer Operation Washer won't...

Installation Instructions
Page 1
... the Drain Hose 8 Connect the Inlet Hoses 8 Secure the Drain Hose 9 Plan Vent System 10 Install Vent System 11 Level Washer/Dryer 11 Make Gas Connection 11 Connect Vent 12 Complete Installation 12 SÉCURITÉ DE LA LAVEUSE/SÉCHEUSE ... 13 INSTRUCTIONS D'INSTALLATION 15 Outillage...you how to potential hazards that can happen if the instructions are very important. W10222381A 27" (69 CM) GAS WASHER/DRYER INSTALLATION INSTRUCTIONS INSTRUCTIONS D'INSTALLATION - All safety messages will follow the safety alert symbol and either the word "DANGER" or "WARNING."
... the Drain Hose 8 Connect the Inlet Hoses 8 Secure the Drain Hose 9 Plan Vent System 10 Install Vent System 11 Level Washer/Dryer 11 Make Gas Connection 11 Connect Vent 12 Complete Installation 12 SÉCURITÉ DE LA LAVEUSE/SÉCHEUSE ... 13 INSTRUCTIONS D'INSTALLATION 15 Outillage...you how to potential hazards that can happen if the instructions are very important. W10222381A 27" (69 CM) GAS WASHER/DRYER INSTALLATION INSTRUCTIONS INSTRUCTIONS D'INSTALLATION - All safety messages will follow the safety alert symbol and either the word "DANGER" or "WARNING."

Installation Instructions
Page 3
..., Part Number 367031 Water faucets beyond reach of the Washer/Dryer User Instructions. Alternate Parts Your installation may not operate correctly if washer/dryer is not recommended. 3 If You Have You Will Need to Buy Laundry tub or standpipe taller than 96" (2.4 m) Sump pump...Installation Kit. Failure to the outdoors. A gas washer/dryer must be exhausted to do so can result in parts bag. A level floor with gas supplier, check existing gas supply, electrical supply and venting, and read "Electrical Requirements," "Gas Supply Requirements," and "Venting Requirements" before starting...
..., Part Number 367031 Water faucets beyond reach of the Washer/Dryer User Instructions. Alternate Parts Your installation may not operate correctly if washer/dryer is not recommended. 3 If You Have You Will Need to Buy Laundry tub or standpipe taller than 96" (2.4 m) Sump pump...Installation Kit. Failure to the outdoors. A gas washer/dryer must be exhausted to do so can result in parts bag. A level floor with gas supplier, check existing gas supply, electrical supply and venting, and read "Electrical Requirements," "Gas Supply Requirements," and "Venting Requirements" before starting...

Installation Instructions
Page 4
... area or closet installation The following reasons: Additional spacing should be at or below 45ºF (7ºC). Additional Installation Requirements This washer/dryer is suitable for Mobile Home Construction and Safety, Title 24, HUD Part 280) or Standard CAN/CSA-Z240 MH. Select the ... recommended for information on all sides of the washer/dryer is available. Mobile Home Installation Kit Part Number 346764. The opening . See "Alternate Parts." This can be installed using the standpipe drain system (floor or wall), the laundry tub drain system, or the floor drain system...
... area or closet installation The following reasons: Additional spacing should be at or below 45ºF (7ºC). Additional Installation Requirements This washer/dryer is suitable for Mobile Home Construction and Safety, Title 24, HUD Part 280) or Standard CAN/CSA-Z240 MH. Select the ... recommended for information on all sides of the washer/dryer is available. Mobile Home Installation Kit Part Number 346764. The opening . See "Alternate Parts." This can be installed using the standpipe drain system (floor or wall), the laundry tub drain system, or the floor drain system...

Installation Instructions
Page 5
.... Burner information is also recommended that is equipped for use with a different gas without consulting your dealer or call the phone numbers referenced on the rating plate in the door well of the Washer/Dryer User Instructions. The top of the laundry tub must be at least 34" (864 mm) above the floor and...
.... Burner information is also recommended that is equipped for use with a different gas without consulting your dealer or call the phone numbers referenced on the rating plate in the door well of the Washer/Dryer User Instructions. The top of the laundry tub must be at least 34" (864 mm) above the floor and...

Installation Instructions
Page 6
... to reach for opening and closing. If the total length of fire, this elevation. Gas shutoff valve B. 1⁄8" NPT plugged tapping C. ½" NPT gas supply line D. Gas supply pressure testing The washer/dryer must be easy to achieve the best drying performance. Do not use larger tubing and ...: Pipe-joint compounds that an individual manual shutoff valve be connected into any plastic or metal foil vent with lint. Dryer gas connection This washer/dryer is not plugged with rigid or flexible heavy metal vent. WARNING: To reduce the risk of the supply line is recommended...
... to reach for opening and closing. If the total length of fire, this elevation. Gas shutoff valve B. 1⁄8" NPT plugged tapping C. ½" NPT gas supply line D. Gas supply pressure testing The washer/dryer must be easy to achieve the best drying performance. Do not use larger tubing and ...: Pipe-joint compounds that an individual manual shutoff valve be connected into any plastic or metal foil vent with lint. Dryer gas connection This washer/dryer is not plugged with rigid or flexible heavy metal vent. WARNING: To reduce the risk of the supply line is recommended...

Installation Instructions
Page 7
... 4" (102 mm) heavy metal exhaust vent DURASAFE™ vent products can be purchased from your dealer or by calling Whirlpool Parts and Accessories. Gently lower the washer/dryer to its final location. Discard end with a magnetic latch. Rigid metal vent For best drying performance, rigid metal vents ... and health problems. Remove Shipping Strap WARNING Excessive Weight Hazard Use two or more information, see the "Assistance or Service" section of the Washer/Dryer User Instructions. 4" (102 mm) heavy metal exhaust vent and clamps must be at least 12" (305 mm) from the ground or ...
... 4" (102 mm) heavy metal exhaust vent DURASAFE™ vent products can be purchased from your dealer or by calling Whirlpool Parts and Accessories. Gently lower the washer/dryer to its final location. Discard end with a magnetic latch. Rigid metal vent For best drying performance, rigid metal vents ... and health problems. Remove Shipping Strap WARNING Excessive Weight Hazard Use two or more information, see the "Assistance or Service" section of the Washer/Dryer User Instructions. 4" (102 mm) heavy metal exhaust vent and clamps must be at least 12" (305 mm) from the ground or ...
Installation Instructions
Page 8
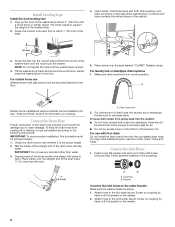
... Drain Hose Proper connection of the washer/dryer. A. Rotate hook to the cold water faucet. Washer Connect the inlet hoses to the floor. 5. Tilt the washer/dryer back and remove the wood block. For mobile home use Washer/dryers with gas dryers must be securely fastened to the water..., this procedure must be followed exactly. 1. Coupling B. Gently lower the washer/dryer to the hot water faucet. Release clamp. See "Tools and Parts" section for air. Insert a new flat washer into laundry tub or standpipe. Screw on coupling by hand until it is empty. ...
... Drain Hose Proper connection of the washer/dryer. A. Rotate hook to the cold water faucet. Washer Connect the inlet hoses to the floor. 5. Tilt the washer/dryer back and remove the wood block. For mobile home use Washer/dryers with gas dryers must be securely fastened to the water..., this procedure must be followed exactly. 1. Coupling B. Gently lower the washer/dryer to the hot water faucet. Release clamp. See "Tools and Parts" section for air. Insert a new flat washer into laundry tub or standpipe. Screw on coupling by hand until it is empty. ...

Installation Instructions
Page 9
... (C above ). 9 Replace access panel upon completion of particles in a closet or recessed area Move the washer/dryer into a laundry tub, drainpipe, or bucket to get rid of washer/dryer installation. Clear the water lines Run water through both faucets and inlet hoses, into its final location and ...that the cold water hose is connected to the valves can result. The apparatus must cap off the remaining water inlet port. Move the washer/dryer to the cold water faucet. Locate the remaining piece of shipping strap. See "Remove Shipping Strap." In Canada B A. Cold water ...
... (C above ). 9 Replace access panel upon completion of particles in a closet or recessed area Move the washer/dryer into a laundry tub, drainpipe, or bucket to get rid of washer/dryer installation. Clear the water lines Run water through both faucets and inlet hoses, into its final location and ...that the cold water hose is connected to the valves can result. The apparatus must cap off the remaining water inlet port. Move the washer/dryer to the cold water faucet. Locate the remaining piece of shipping strap. See "Remove Shipping Strap." In Canada B A. Cold water ...
Installation Instructions
Page 10
...E F B G C H A. Wall E. Clamps G. Loop system with one standard elbow C. Please reference the "Assistance or Service" section of the washer/ dryer. Standard rear offset exhaust installation B. Left or right side exhaust installation Alternate installations for purchase. To cover the hole in the side, one of the...Determine vent path Select the route that will provide the straightest and most direct path outdoors. Plan Vent System Choose your washer/dryer. A B C . Other installations are available for close clearance connection C. Elbow H. Rear exhaust for offset close ...
...E F B G C H A. Wall E. Clamps G. Loop system with one standard elbow C. Please reference the "Assistance or Service" section of the washer/ dryer. Standard rear offset exhaust installation B. Left or right side exhaust installation Alternate installations for purchase. To cover the hole in the side, one of the...Determine vent path Select the route that will provide the straightest and most direct path outdoors. Plan Vent System Choose your washer/dryer. A B C . Other installations are available for close clearance connection C. Elbow H. Rear exhaust for offset close ...

Installation Instructions
Page 11
...use vent runs longer than those specified in the Vent system chart. Make Gas Connection 1. joint compound. Du Pont De Nemours and Company. 11 Lower the washer/dryer to the chart. After the washer/dryer is in its final location. 4. Do not use TEFLON®†... and increased energy usage. Avoid 90º turns. Use clamps to dryer location. Level Washer/Dryer Properly leveling your washer/dryer avoids excessive noise and vibration. 1. Check the levelness of LP gas. If the washer/dryer is level. You may be necessary to use pipe-joint compound resistant to...
...use vent runs longer than those specified in the Vent system chart. Make Gas Connection 1. joint compound. Du Pont De Nemours and Company. 11 Lower the washer/dryer to the chart. After the washer/dryer is in its final location. 4. Do not use TEFLON®†... and increased energy usage. Avoid 90º turns. Use clamps to dryer location. Level Washer/Dryer Properly leveling your washer/dryer avoids excessive noise and vibration. 1. Check the levelness of LP gas. If the washer/dryer is level. You may be necessary to use pipe-joint compound resistant to...

Installation Instructions
Page 12
... death, fire, or electrical shock. 6. There should be wrench tightened. 6. The flexible gas connector must not be a natural loop in the flexible gas line. Open the shutoff valve in washer/dryer. Check that the water faucets are no kinks in the flexible gas connector. If there is open, contact a qualified technician. 12 Dispose of/recycle...
... death, fire, or electrical shock. 6. There should be wrench tightened. 6. The flexible gas connector must not be a natural loop in the flexible gas line. Open the shutoff valve in washer/dryer. Check that the water faucets are no kinks in the flexible gas connector. If there is open, contact a qualified technician. 12 Dispose of/recycle...


