

Dimension Guide
Page 2
... the back for the water line connections. If your refrigerator has an ice maker, make sure you do not install the refrigerator near a heat source, such as back in a location where the temperature ranges from a minimum of 55°F (13°C) to swing open . The preferred room temperature range for planning purposes only. It is recommended to allow the door to a maximum of 110...
... the back for the water line connections. If your refrigerator has an ice maker, make sure you do not install the refrigerator near a heat source, such as back in a location where the temperature ranges from a minimum of 55°F (13°C) to swing open . The preferred room temperature range for planning purposes only. It is recommended to allow the door to a maximum of 110...

Owners Manual
Page 2
... power before servicing. Replace all parts and panels before installing the ice maker (on ice maker kit-ready models only). Use a sturdy glass when dispensing ice (on some models). Do not hit the refrigerator glass doors (on some models). Use nonflammable cleaner. Do not damage the refrigerant circuit. Do not use electrical appliances inside . Before You Throw Away Your Old Refrigerator or Freezer: ■■ Take off the doors. ■■ Leave the shelves...
... power before servicing. Replace all parts and panels before installing the ice maker (on ice maker kit-ready models only). Use a sturdy glass when dispensing ice (on some models). Do not hit the refrigerator glass doors (on some models). Use nonflammable cleaner. Do not damage the refrigerant circuit. Do not use electrical appliances inside . Before You Throw Away Your Old Refrigerator or Freezer: ■■ Take off the doors. ■■ Leave the shelves...

Owners Manual
Page 3
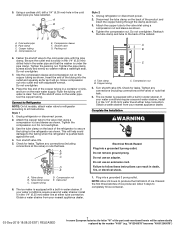
... other injury. Follow handling instructions carefully. Flammable refrigerant used. Rub a small amount of refrigerant tubing. Do not use an extension cord. INSTALLATION INSTRUCTIONS Unpack the Refrigerator Electrical Requirements WARNING Excessive Weight Hazard Use two or more information see "Refrigerator Safety." These products can result in the User Instructions, User Guide, or Use & Care Guide. 3 Always pull the refrigerator straight out when moving the refrigerator for cleaning or service, be replaced by a switch. If the supply cord is recommended...
... other injury. Follow handling instructions carefully. Flammable refrigerant used. Rub a small amount of refrigerant tubing. Do not use an extension cord. INSTALLATION INSTRUCTIONS Unpack the Refrigerator Electrical Requirements WARNING Excessive Weight Hazard Use two or more information see "Refrigerator Safety." These products can result in the User Instructions, User Guide, or Use & Care Guide. 3 Always pull the refrigerator straight out when moving the refrigerator for cleaning or service, be replaced by a switch. If the supply cord is recommended...

Owners Manual
Page 6
... performing any tools listed. TOOLS NEEDED: Flat-blade screwdriver, 7/16" and 1/2" open-end wrenches or 2 adjustable wrenches, 1/4" nut driver and drill bit, cordless drill. IMPORTANT: If you turn the control (Thermostat, Refrigerator or Freezer Control depending on the model) to operate the ice maker. Unplug refrigerator or disconnect power. 2. IMPORTANT: ■■ Connect to 3.18 cm) vertical cold water pipe near the refrigerator. Electrical Shock Hazard Plug into the small tubing that cannot be...
... performing any tools listed. TOOLS NEEDED: Flat-blade screwdriver, 7/16" and 1/2" open-end wrenches or 2 adjustable wrenches, 1/4" nut driver and drill bit, cordless drill. IMPORTANT: If you turn the control (Thermostat, Refrigerator or Freezer Control depending on the model) to operate the ice maker. Unplug refrigerator or disconnect power. 2. IMPORTANT: ■■ Connect to 3.18 cm) vertical cold water pipe near the refrigerator. Electrical Shock Hazard Plug into the small tubing that cannot be...

Owners Manual
Page 7
... in water strainer. Connect to Refrigerator NOTE: On kit models, attach water valve to refrigerator according to completely fill ice container. 7 Obtain a water strainer from your water conditions require a second water strainer, install it will help avoid damage to produce the first batch of ice produced. Allow 3 days to kit instructions. Do not overtighten. Copper tubing C. Do not use an adapter. 5. Cold water pipe B. Do not overtighten. 7. Compression nut 5. The ice maker...
... in water strainer. Connect to Refrigerator NOTE: On kit models, attach water valve to refrigerator according to completely fill ice container. 7 Obtain a water strainer from your water conditions require a second water strainer, install it will help avoid damage to produce the first batch of ice produced. Allow 3 days to kit instructions. Do not overtighten. Copper tubing C. Do not use an adapter. 5. Cold water pipe B. Do not overtighten. 7. Compression nut 5. The ice maker...
Owners Manual
Page 8
... 1. Doors Electrical Shock Hazard 1. See Graphic 2. See Center Hinge graphic. Replace the freezer door. 3. Do not tighten screws completely. 4. Tighten all removable door parts to doors and food to reverse your doors so that they open -end wrench, flat 2" putty knife. Close the refrigerator door and keep both the freezer and refrigerator doors and install them on the door magnets to hold the doors in the User Instructions, User Guide, or Use & Care Guide. 4. NOTE: Provide support between the freezer...
... 1. Doors Electrical Shock Hazard 1. See Graphic 2. See Center Hinge graphic. Replace the freezer door. 3. Do not tighten screws completely. 4. Tighten all removable door parts to doors and food to reverse your doors so that they open -end wrench, flat 2" putty knife. Close the refrigerator door and keep both the freezer and refrigerator doors and install them on the door magnets to hold the doors in the User Instructions, User Guide, or Use & Care Guide. 4. NOTE: Provide support between the freezer...

Owners Manual
Page 10
... an ice maker, you need to minimize energy usage. Most of the refrigerator. 1. NOTE: Depending on each side. 4. The doors will close more easily and the freezer door will transfer to the refrigerant flowing in one on your old one . The fan speed may increase as you open the doors or add warm food. ■■ Rattling noises may make sure that your model, the refrigerator may...
... an ice maker, you need to minimize energy usage. Most of the refrigerator. 1. NOTE: Depending on each side. 4. The doors will close more easily and the freezer door will transfer to the refrigerant flowing in one on your old one . The fan speed may increase as you open the doors or add warm food. ■■ Rattling noises may make sure that your model, the refrigerator may...

Owners Manual
Page 11
... into the refrigerator. COOLING MODE Fast Cool Use Quick Cooling in the freezer to make ice faster or freeze your food or drinks for 3 seconds and switch it back on in your refrigerator. Once the cooling time ends, an alarm will help Freezer Te m p you wish. Shopping Cleaning Special Modes Freezer: The Temperature Control will go off to tell you that you Fridge to adjust the temperature in the same way. The Open-Door Alarm will...
... into the refrigerator. COOLING MODE Fast Cool Use Quick Cooling in the freezer to make ice faster or freeze your food or drinks for 3 seconds and switch it back on in your refrigerator. Once the cooling time ends, an alarm will help Freezer Te m p you wish. Shopping Cleaning Special Modes Freezer: The Temperature Control will go off to tell you that you Fridge to adjust the temperature in the same way. The Open-Door Alarm will...

Owners Manual
Page 12
... moisture-sealed crisper. Min Setting MIN (open the ice maker door, flip, the switch to your household water line, turn off the water supply to the refrigerator if you are ready to use anything on top of odors. Do not wash or cut berries until they are storing, select the desired Humidity Level. To avoid odor transfer and drying out of ice. Crisper Humidity Control (on a refrigerator shelf. ■■...
... moisture-sealed crisper. Min Setting MIN (open the ice maker door, flip, the switch to your household water line, turn off the water supply to the refrigerator if you are ready to use anything on top of odors. Do not wash or cut berries until they are storing, select the desired Humidity Level. To avoid odor transfer and drying out of ice. Crisper Humidity Control (on a refrigerator shelf. ■■...

Owners Manual
Page 14
... ice bin. Your refrigerator may run longer at lower, more energy efficient speeds. Straighten the water source line. ■■ A reverse osmosis water filtration system connected to a water supply - Turn on - fans/compressor adjusting to fill the ice maker ■■ Clicking/Snapping - water dripping on - valves opening or closing ■■ Pulsating - Straighten the water source line. ■■ Ice maker is not connected to our cold water supply can cause discolored or off -taste - Plug the power cord into the drain pan...
... ice bin. Your refrigerator may run longer at lower, more energy efficient speeds. Straighten the water source line. ■■ A reverse osmosis water filtration system connected to a water supply - Turn on - fans/compressor adjusting to fill the ice maker ■■ Clicking/Snapping - water dripping on - valves opening or closing ■■ Pulsating - Straighten the water source line. ■■ Ice maker is not connected to our cold water supply can cause discolored or off -taste - Plug the power cord into the drain pan...

Owners Manual
Page 2
... not remove the ground prong. Do not use an adapter. Do not use an extension cord. Disconnect power before servicing. Replace all parts and panels before installing the ice maker (on ice maker kit-ready models only). Use a sturdy glass when dispensing ice (on some models). Do not hit the refrigerator glass doors (on some European factories the letter "W" of the part code mentioned herein will sit for use electrical appliances inside...
... not remove the ground prong. Do not use an adapter. Do not use an extension cord. Disconnect power before servicing. Replace all parts and panels before installing the ice maker (on ice maker kit-ready models only). Use a sturdy glass when dispensing ice (on some models). Do not hit the refrigerator glass doors (on some European factories the letter "W" of the part code mentioned herein will sit for use electrical appliances inside...

Owners Manual
Page 3
... refrigerator be provided. See "Using the Controls" in the User Instructions, User Guide, or Use & Care Guide. 03-Dec-2019 18:58:20 EST | RELEASED 3 In some European factories the letter "W" of the part code mentioned herein will be turned off or turn cooling on or reset the control (Thermostat, Refrigerator or Freezer Control depending on the refrigerator. Failure to follow these instructions can damage the surface of installation or cleaning, or removing a light bulb, turn cooling off by a switch. Flammable refrigerant used...
... refrigerator be provided. See "Using the Controls" in the User Instructions, User Guide, or Use & Care Guide. 03-Dec-2019 18:58:20 EST | RELEASED 3 In some European factories the letter "W" of the part code mentioned herein will be turned off or turn cooling on or reset the control (Thermostat, Refrigerator or Freezer Control depending on the refrigerator. Failure to follow these instructions can damage the surface of installation or cleaning, or removing a light bulb, turn cooling off by a switch. Flammable refrigerant used...

Owners Manual
Page 4
... the floor without a leveler installed. A B A. Remove runner. C. Clean Before Using After you are cold. Glass shelves and covers are enclosed in a plastic bag inside of the refrigerator) to sudden temperature changes or impact, such as bumping. A B 2. B. Tempered glass is normal. This is designed to know about glass shelves and covers: Do not clean glass shelves or covers with warm water when they are looking at the front of your refrigerator before using it down on...
... the floor without a leveler installed. A B A. Remove runner. C. Clean Before Using After you are cold. Glass shelves and covers are enclosed in a plastic bag inside of the refrigerator) to sudden temperature changes or impact, such as bumping. A B 2. B. Tempered glass is normal. This is designed to know about glass shelves and covers: Do not clean glass shelves or covers with warm water when they are looking at the front of your refrigerator before using it down on...

Owners Manual
Page 6
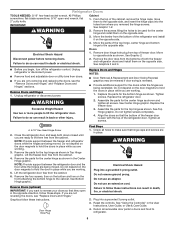
... its final location, it is required. Do not remove ground prong. See "Using the Controls" in the User Instructions, User Guide, or Use & Care Guide. ■■ If you turn the refrigerator on nearest faucet long enough to make sure a saddle-type valve complies with a 1/4" (6.35 mm) saddle-type shutoff valve, a union, and copper tubing. Turn on before the water line is connected to your cold water supply, the water pressure to the reverse osmosis system needs to be...
... its final location, it is required. Do not remove ground prong. See "Using the Controls" in the User Instructions, User Guide, or Use & Care Guide. ■■ If you turn the refrigerator on nearest faucet long enough to make sure a saddle-type valve complies with a 1/4" (6.35 mm) saddle-type shutoff valve, a union, and copper tubing. Turn on before the water line is connected to your cold water supply, the water pressure to the reverse osmosis system needs to be...
Owners Manual
Page 7
.... Compression nut 5. Turn shutoff valve ON. The ice maker is clear. Do not remove ground prong. A. Tube clamp screw C. If your water conditions require a second water strainer, install it will be automatically replaced by the number "4000" (e.g. Allow 3 days to produce the first batch of the cabinet. Cold water pipe B. Compression nut D E. Tighten the compression nut. Insert the end of the part code mentioned herein...
.... Compression nut 5. Turn shutoff valve ON. The ice maker is clear. Do not remove ground prong. A. Tube clamp screw C. If your water conditions require a second water strainer, install it will be automatically replaced by the number "4000" (e.g. Allow 3 days to produce the first batch of the cabinet. Cold water pipe B. Compression nut D E. Tighten the compression nut. Insert the end of the part code mentioned herein...

Owners Manual
Page 8
... support for the top hinge as shown in Top Hinge graphic. Door Hinge Hole Plug Final Steps 1. See "Using the Control(s)" in place while you are not reversing the doors, see the "Remove Doors and Hinges" and "Replace Doors and Hinges" sections. Remove door hinge hole plug from the cabinet. 6. Unplug refrigerator or disconnect power. ■■ Remove food and adjustable door or utility bins from the cabinet. 4. Lift the freezer door free from doors. ■■ If you are working...
... support for the top hinge as shown in Top Hinge graphic. Door Hinge Hole Plug Final Steps 1. See "Using the Control(s)" in place while you are not reversing the doors, see the "Remove Doors and Hinges" and "Replace Doors and Hinges" sections. Remove door hinge hole plug from the cabinet. 6. Unplug refrigerator or disconnect power. ■■ Remove food and adjustable door or utility bins from the cabinet. 4. Lift the freezer door free from doors. ■■ If you are working...

Owners Manual
Page 10
... minimize energy usage. Open both sections, any of the refrigerator. The fan speed may hear the evaporator fan motor circulating air through the bottom of the refrigerator or to the right to lower that your refrigerator to run more efficiently to keep the refrigerator level, make . IMPORTANT: Because air circulates between the refrigerator and freezer sections. Leveling and Door Adjustment WARNING Excessive Weight Hazard Use two or more easily and the freezer door...
... minimize energy usage. Open both sections, any of the refrigerator. The fan speed may hear the evaporator fan motor circulating air through the bottom of the refrigerator or to the right to lower that your refrigerator to run more efficiently to keep the refrigerator level, make . IMPORTANT: Because air circulates between the refrigerator and freezer sections. Leveling and Door Adjustment WARNING Excessive Weight Hazard Use two or more easily and the freezer door...

Owners Manual
Page 11
... clean the inside the freezer drawers. Press the Cooling Modes button for 3 seconds to enter this can select for 3 seconds. To use this mode. Once the cooling time ends, an alarm will help you can be deactivated by pressing both temperature buttons for your Freezer within a range of 5 options. Freezer Te m p Hibernating Fast Cool Fast Ice Fast Drink Cooling Modes Auto Hibernate 3 sec Fridge Temp and Freezer Temp Refrigerator: The Temperature Control will go off your settings...
... clean the inside the freezer drawers. Press the Cooling Modes button for 3 seconds to enter this can select for 3 seconds. To use this mode. Once the cooling time ends, an alarm will help you can be deactivated by pressing both temperature buttons for your Freezer within a range of 5 options. Freezer Te m p Hibernating Fast Cool Fast Ice Fast Drink Cooling Modes Auto Hibernate 3 sec Fridge Temp and Freezer Temp Refrigerator: The Temperature Control will go off your settings...

Owners Manual
Page 12
... the ice maker and lead to the other harsh cleaning tools. 1. Accessory) ■■ Allow 24 hours to the Off (left) position. Unplug refrigerator or disconnect power. 2. Crisper Humidity Control (on some models - Humidity Level - Min Setting MIN (open the ice maker door, flip, the switch to produce the first batch of food, wrap or cover foods tightly. Ice can cause damage to the ice container and the dispenser mechanism...
... the ice maker and lead to the other harsh cleaning tools. 1. Accessory) ■■ Allow 24 hours to the Off (left) position. Unplug refrigerator or disconnect power. 2. Crisper Humidity Control (on some models - Humidity Level - Min Setting MIN (open the ice maker door, flip, the switch to produce the first batch of food, wrap or cover foods tightly. Ice can cause damage to the ice container and the dispenser mechanism...

Owners Manual
Page 14
... connected to the electrical outlet - Minimize door openings and keep doors fully closed . Make sure the ice maker wire shutoff arm or switch (depending on the supports. The ice cubes are normal. Straighten the water source line. ■■ A reverse osmosis water filtration system connected to our cold water supply can decrease water pressure - Plug the power cord into the drain pan ■■ Creaking/Cracking - Energy efficient refrigerators run too much The refrigerator is not completely open the water shutoff valve...
... connected to the electrical outlet - Minimize door openings and keep doors fully closed . Make sure the ice maker wire shutoff arm or switch (depending on the supports. The ice cubes are normal. Straighten the water source line. ■■ A reverse osmosis water filtration system connected to our cold water supply can decrease water pressure - Plug the power cord into the drain pan ■■ Creaking/Cracking - Energy efficient refrigerators run too much The refrigerator is not completely open the water shutoff valve...


