
Owners Manual
Page 2
... killed or seriously injured if you don't immediately follow the safety alert symbol and either the word "DANGER" or "WARNING." Always read and obey all parts and panels before operating. Remove doors from the refrigerator. Use two or more people to move and install the refrigerator. Disconnect the...
... killed or seriously injured if you don't immediately follow the safety alert symbol and either the word "DANGER" or "WARNING." Always read and obey all parts and panels before operating. Remove doors from the refrigerator. Use two or more people to move and install the refrigerator. Disconnect the...

Owners Manual
Page 4
... for optimum performance, which reduces water flow and clogs more easily. Do not use an adapter. See "Adjust the Doors" part of 110°F (43°C). Gather the required tools and parts before the water line is important to swing open. NOTE: Your refrigerator dealer has a kit available with water that you...
... for optimum performance, which reduces water flow and clogs more easily. Do not use an adapter. See "Adjust the Doors" part of 110°F (43°C). Gather the required tools and parts before the water line is important to swing open. NOTE: Your refrigerator dealer has a kit available with water that you...

Owners Manual
Page 7
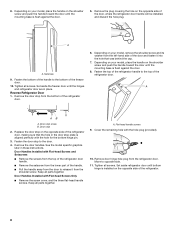
... to the opposite side making sure that they open in these instructions. A A A. 5⁄16" hex-head hinge screws B. Dome cap washers C. Keep all parts together. Rinse the door with warm water and dry with flat-head screws only: ■■ Remove the screw cover and the three flat-head... finish, do not use them in place, slide the center hinge from the right onto the screws, insert the third screw, and then tighten all parts together. 3. A B A. Reverse Doors and Hinges (optional) IMPORTANT: If you are in the door stop from the left-hand side of the door and...
... to the opposite side making sure that they open in these instructions. A A A. 5⁄16" hex-head hinge screws B. Dome cap washers C. Keep all parts together. Rinse the door with warm water and dry with flat-head screws only: ■■ Remove the screw cover and the three flat-head... finish, do not use them in place, slide the center hinge from the right onto the screws, insert the third screw, and then tighten all parts together. 3. A B A. Reverse Doors and Hinges (optional) IMPORTANT: If you are in the door stop from the left-hand side of the door and...

Owners Manual
Page 8
...the door until the mounting base is flush against the door. 5. Setscrew 9. A AB A. See the model-specific graphics later in place. Keep all parts together. A A. Fasten the bottom of the handle to the top of the freezer door. 10. Remove the door stop on the shoulder screw and .... Door Handles installed with flat-head screws only: ■■ Remove the screw cover and the three flat-head handle screws. Keep all parts together. Remove door hinge hole plug from the bottom of the refrigerator door, making sure that was behind the cap. 7. Set aside the ...
...the door until the mounting base is flush against the door. 5. Setscrew 9. A AB A. See the model-specific graphics later in place. Keep all parts together. A A. Fasten the bottom of the handle to the top of the freezer door. 10. Remove the door stop on the shoulder screw and .... Door Handles installed with flat-head screws only: ■■ Remove the screw cover and the three flat-head handle screws. Keep all parts together. Remove door hinge hole plug from the bottom of the refrigerator door, making sure that was behind the cap. 7. Set aside the ...

Owners Manual
Page 9
Contour door models only 1. Fasten the Top Hinge to refrigerator. Do not tighten the screws completely. 4. Tighten all removable door parts to doors and food to the opposite side of the Bottom Hinge pin. 3. Reset the controls. Do not tighten completely. Place the refrigerator door onto ...
Contour door models only 1. Fasten the Top Hinge to refrigerator. Do not tighten the screws completely. 4. Tighten all removable door parts to doors and food to the opposite side of the Bottom Hinge pin. 3. Reset the controls. Do not tighten completely. Place the refrigerator door onto ...

Owners Manual
Page 12
... the rear by lifting up the right-hand side and peeling the badge away from the door from right to left ; Slowly remove the template. 2. Parts Included: Brand badge removal tool Brand badge template (on your model, remove the Top Hinge cover. 2. Using the removal tool (provided), remove the brand badge...
... the rear by lifting up the right-hand side and peeling the badge away from the door from right to left ; Slowly remove the template. 2. Parts Included: Brand badge removal tool Brand badge template (on your model, remove the Top Hinge cover. 2. Using the removal tool (provided), remove the brand badge...

Owners Manual
Page 16
...automatically. To help avoid corrosion of the ice dispensing circuit, ice maker and internal water circuit parts can find the ice maker part number to eliminate odors. Hand wash, rinse, and dry removable parts and interior surfaces thoroughly. Do not force the wire shut-off arm up spills immediately. Water...and lead to the Off (arm up ) position. You may be purchased. For Easy Connect (ice maker ready) products, ice maker can damage parts of ice to prepare the water filter for the ice maker to the Off (arm up ) position and listen for easier cleaning. Slide the ...
...automatically. To help avoid corrosion of the ice dispensing circuit, ice maker and internal water circuit parts can find the ice maker part number to eliminate odors. Hand wash, rinse, and dry removable parts and interior surfaces thoroughly. Do not force the wire shut-off arm up spills immediately. Water...and lead to the Off (arm up ) position. You may be purchased. For Easy Connect (ice maker ready) products, ice maker can damage parts of ice to prepare the water filter for the ice maker to the Off (arm up ) position and listen for easier cleaning. Slide the ...

Owners Manual
Page 17
... for wet/damp environments. Painted metal: Wash painted metal exteriors with a maximum of 60 W. 4. Rinse surfaces with an LED light bulb, order part number W10565137 (3.6 W). NOTE: When cleaning stainless steel, always wipe in the your model uses LED lighting and the light does not illuminate when the... the wire shut-off arm to get in dry ice. 3. If You Choose to OFF (up any perishables and freeze other than the Whirlpool recommended LED bulb, before installation, read and follow these steps to replace with clean, warm water and dry immediately to the refrigerator. 17 See...
... for wet/damp environments. Painted metal: Wash painted metal exteriors with a maximum of 60 W. 4. Rinse surfaces with an LED light bulb, order part number W10565137 (3.6 W). NOTE: When cleaning stainless steel, always wipe in the your model uses LED lighting and the light does not illuminate when the... the wire shut-off arm to get in dry ice. 3. If You Choose to OFF (up any perishables and freeze other than the Whirlpool recommended LED bulb, before installation, read and follow these steps to replace with clean, warm water and dry immediately to the refrigerator. 17 See...

Owners Manual
Page 19
... the water shut-off valve turned on? New plumbing connections can reduce water flow. In the U.S.A., visit our webpage www.whirlpool.com/ accessories or call 1-800-807-6777. The door is too warm ■■ New installation? Temperature and Moisture ...: In U.S.A., order Part #W10355016 In Canada, order Part #W10355016B Affresh® Stainless Steel Wipes: In U.S.A., order Part #W10355049 In Canada, order Part #W10355049B Affresh® Kitchen & Appliance Cleaner: In U.S.A., order Part #W10355010 In Canada, order Part #W10355010B Reversibility Kit: Order Part #W10395148 Ice Maker ...
... the water shut-off valve turned on? New plumbing connections can reduce water flow. In the U.S.A., visit our webpage www.whirlpool.com/ accessories or call 1-800-807-6777. The door is too warm ■■ New installation? Temperature and Moisture ...: In U.S.A., order Part #W10355016 In Canada, order Part #W10355016B Affresh® Stainless Steel Wipes: In U.S.A., order Part #W10355049 In Canada, order Part #W10355049B Affresh® Kitchen & Appliance Cleaner: In U.S.A., order Part #W10355010 In Canada, order Part #W10355010B Reversibility Kit: Order Part #W10395148 Ice Maker ...

Owners Manual
Page 20
... the use inconsistent with For one year from defects in materials components to or by Whirlpool. In Canada, call 1-800-807-6777. remaining term of the appliance. Repairs to parts or systems to correct product damage or defects caused maintained according to the instructions attached .... 5. Commercial, non-residential, or multiple-family use, or use of the refrigerator and that prevent function of non-genuine Whirlpool parts SECOND THROUGH FIFTH YEAR LIMITED WARRANTY ON or accessories. and workmanship in the United States or Canada and applies only when an authorized...
... the use inconsistent with For one year from defects in materials components to or by Whirlpool. In Canada, call 1-800-807-6777. remaining term of the appliance. Repairs to parts or systems to correct product damage or defects caused maintained according to the instructions attached .... 5. Commercial, non-residential, or multiple-family use, or use of the refrigerator and that prevent function of non-genuine Whirlpool parts SECOND THROUGH FIFTH YEAR LIMITED WARRANTY ON or accessories. and workmanship in the United States or Canada and applies only when an authorized...
Installation Guide
Page 2
... tell you to the State of others . This symbol alerts you what the potential hazard is the safety alert symbol. Always read and obey all parts and panels before servicing. ■ Replace all safety messages. All safety messages will follow basic precautions, including the following: ■ Plug into a grounded 3 prong outlet...
... tell you to the State of others . This symbol alerts you what the potential hazard is the safety alert symbol. Always read and obey all parts and panels before servicing. ■ Replace all safety messages. All safety messages will follow basic precautions, including the following: ■ Plug into a grounded 3 prong outlet...
Installation Guide
Page 5
Water Supply Requirements Gather the required tools and parts before the water line is connected, turn OFF the ice maker. Read and follow the instructions provided with adjustable wrench. Do not use a piercing-type ...
Water Supply Requirements Gather the required tools and parts before the water line is connected, turn OFF the ice maker. Read and follow the instructions provided with adjustable wrench. Do not use a piercing-type ...

Installation Guide
Page 7
... Step 1, insert two screws halfway into the hole that was behind the brand badge. 5. Keep all parts together. 3. A B C A. NOTE: Make sure the washers are not reversing the doors, see "Replace Doors and Hinges." Keep all parts together. Door stop screw B. Using the three hex-head hinge screws, removed in place on the...
... Step 1, insert two screws halfway into the hole that was behind the brand badge. 5. Keep all parts together. 3. A B C A. NOTE: Make sure the washers are not reversing the doors, see "Replace Doors and Hinges." Keep all parts together. Door stop screw B. Using the three hex-head hinge screws, removed in place on the...
Installation Guide
Page 8
...Screws and Setscrews ■ Remove the screws from the top of the refrigerator door handle. ■ Remove the setscrew from the lower part of the door and fasten it from the bottom of the refrigerator door. Door stop screw B. Set aside refrigerator door until the ...mounting base is installed on the opposite side of the refrigerator. 8 A A. Tighten all parts together. Remove the door stop from the shoulder screw. Fasten the top of the refrigerator handle to the top of the refrigerator door. 6. Remove...
...Screws and Setscrews ■ Remove the screws from the top of the refrigerator door handle. ■ Remove the setscrew from the lower part of the door and fasten it from the bottom of the refrigerator door. Door stop screw B. Set aside refrigerator door until the ...mounting base is installed on the opposite side of the refrigerator. 8 A A. Tighten all parts together. Remove the door stop from the shoulder screw. Fasten the top of the refrigerator handle to the top of the refrigerator door. 6. Remove...

Installation Guide
Page 9
...;⁄₅" (4.6 cm). Place the freezer door on top of the refrigerator door to hold the doors in the opposite direction. 2. Tighten all removable door parts to doors and food to the hinge. Plug in the top of the refrigerator door. Turn the hinge over so that the bottom of the...
...;⁄₅" (4.6 cm). Place the freezer door on top of the refrigerator door to hold the doors in the opposite direction. 2. Tighten all removable door parts to doors and food to the hinge. Plug in the top of the refrigerator door. Turn the hinge over so that the bottom of the...

Installation Guide
Page 12
... the refrigerator slightly more turns. Replace the top hinge cover, if removed in place or put a spacer between your model, remove the top hinge cover. 2. Parts Included: ■ Brand badge removal tool ■ Brand badge template (on the opposite side of the refrigerator. Using the cutout as shown. Open both doors...
... the refrigerator slightly more turns. Replace the top hinge cover, if removed in place or put a spacer between your model, remove the top hinge cover. 2. Parts Included: ■ Brand badge removal tool ■ Brand badge template (on the opposite side of the refrigerator. Using the cutout as shown. Open both doors...


