Installation Guide
Page 2
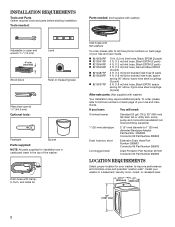
...) 1" (25 mm) standpipe 2" (51 mm) diameter to 13⁄4" (44.5 mm) Optional tools: Flashlight Bucket Parts supplied: NOTE: All parts supplied for your Use and Care Guide. To order, please refer to toll-free numbers on back page of your washer ... phone numbers on back page of the washer. Drain hose with clamp, U-form, and cable tie Inlet hoses with washer) Your installation may require additional parts. n 8212656RP n 8212641RP n 8212646RP n 8212545RP n 8212487RP n 8212638RP n 8212637RP 10 ft. (3.0 m) Inlet hose, Black EPDM (2 pack) 5 ft. (1.5 m) Inlet hose, Black EPDM (2...
...) 1" (25 mm) standpipe 2" (51 mm) diameter to 13⁄4" (44.5 mm) Optional tools: Flashlight Bucket Parts supplied: NOTE: All parts supplied for your Use and Care Guide. To order, please refer to toll-free numbers on back page of your washer ... phone numbers on back page of the washer. Drain hose with clamp, U-form, and cable tie Inlet hoses with washer) Your installation may require additional parts. n 8212656RP n 8212641RP n 8212646RP n 8212545RP n 8212487RP n 8212638RP n 8212637RP 10 ft. (3.0 m) Inlet hose, Black EPDM (2 pack) 5 ft. (1.5 m) Inlet hose, Black EPDM (2...

Installation Guide
Page 3
... Care Guide. This washer has been tested for walls, doors, and floor moldings. Floor drain system requires a Siphon Break Kit (Part Number 285834), 2 Connector Kits (Part Number 285835), and an Extension Drain Hose (Part Number 285863) that may be installed using a floor drain, wall standpipe, floor standpipe, or laundry tub. IMPORTANT: Do not...
... Care Guide. This washer has been tested for walls, doors, and floor moldings. Floor drain system requires a Siphon Break Kit (Part Number 285834), 2 Connector Kits (Part Number 285835), and an Extension Drain Hose (Part Number 285863) that may be installed using a floor drain, wall standpipe, floor standpipe, or laundry tub. IMPORTANT: Do not...
Installation Guide
Page 5
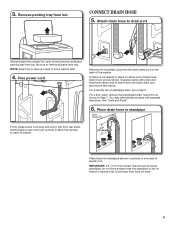
... from rear panel. Free power cord Remove the red plastic plug from tray. Drain hose form must be inside standpipe; Be sure to remove all parts from the black drain port on elbow end of the washer. You may need to step 6. 3. If clamp is not already in case you need...
... from rear panel. Free power cord Remove the red plastic plug from tray. Drain hose form must be inside standpipe; Be sure to remove all parts from the black drain port on elbow end of the washer. You may need to step 6. 3. If clamp is not already in case you need...
Installation Guide
Page 6
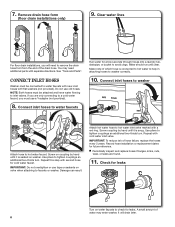
7. You may enter washer. See "Tools and Parts". CONNECT INLET HOSES Washer must be connected to a cold water faucet, you must use a Y-adapter (not provided). 8. Connect inlet hoses to washer Attach hose to ... seconds through hoses into a laundry tub, drainpipe, or bucket to hot water inlet valve marked with second hose for future reference. It will need additional parts with cold water inlet valve. Repeat with separate directions. Screw on washer. Use pliers to washer correctly. 10. A small amount of which hose is snug...
7. You may enter washer. See "Tools and Parts". CONNECT INLET HOSES Washer must be connected to a cold water faucet, you must use a Y-adapter (not provided). 8. Connect inlet hoses to washer Attach hose to ... seconds through hoses into a laundry tub, drainpipe, or bucket to hot water inlet valve marked with second hose for future reference. It will need additional parts with cold water inlet valve. Repeat with separate directions. Screw on washer. Use pliers to washer correctly. 10. A small amount of which hose is snug...

Installation Guide
Page 8
...prong outlet COMPLETE INSTALLATION CHECKLIST q Check electrical requirements. q Remove protective film from washer. Select any tape remaining on washer. q Check that all parts are on some models). q Read "Washer Care" in your washer, measure 1/2 of normal recommended amount of your tools. q Check that washer ...is an extra part, go back through steps to complete full cycle. 8 q Dispose of/recycle all of powdered or liquid detergent and pour it into washer...
...prong outlet COMPLETE INSTALLATION CHECKLIST q Check electrical requirements. q Remove protective film from washer. Select any tape remaining on washer. q Check that all parts are on some models). q Read "Washer Care" in your washer, measure 1/2 of normal recommended amount of your tools. q Check that washer ...is an extra part, go back through steps to complete full cycle. 8 q Dispose of/recycle all of powdered or liquid detergent and pour it into washer...

Dimension Guide
Page 2
... wash tub. Wall standpipe drain system Floor drain system requires a Siphon Break Kit (Part Number 285834), 2 Connector Kits (Part Number 285835), and an Extension Drain Hose (Part Number 285863) that a separate circuit serving only this appliance be inside standpipe or below...install no higher than 4.5" (114 mm) of washer. (Additional hoses may be at least 39" (990 mm) high; Because Whirlpool Corporation policy includes a continuous commitment to improve our products, we reserve the right to change materials and specifications without notice. ELECTRICAL REQUIREMENTS...
... wash tub. Wall standpipe drain system Floor drain system requires a Siphon Break Kit (Part Number 285834), 2 Connector Kits (Part Number 285835), and an Extension Drain Hose (Part Number 285863) that a separate circuit serving only this appliance be inside standpipe or below...install no higher than 4.5" (114 mm) of washer. (Additional hoses may be at least 39" (990 mm) high; Because Whirlpool Corporation policy includes a continuous commitment to improve our products, we reserve the right to change materials and specifications without notice. ELECTRICAL REQUIREMENTS...

Warranty Information
Page 1
...salt concentrations, high moisture or humidity, or exposure to you. Service must be borne by Whirlpool. 8. Service to province. Consumable parts (i.e. Pick-up or delivery. Service or parts for appliances with servicing, removal, or replacement of the product. 14. This warranty gives...may have the following information available when you . Damage from natural gas or L.P. WHIRLPOOL® LAUNDRY LIMITED WARRANTY ATTACH YOUR RECEIPT HERE. In the event of non-genuine Whirlpool parts or accessories. 6. This limited warranty is not available. 13. Commercial, non-...
...salt concentrations, high moisture or humidity, or exposure to you. Service must be borne by Whirlpool. 8. Service to province. Consumable parts (i.e. Pick-up or delivery. Service or parts for appliances with servicing, removal, or replacement of the product. 14. This warranty gives...may have the following information available when you . Damage from natural gas or L.P. WHIRLPOOL® LAUNDRY LIMITED WARRANTY ATTACH YOUR RECEIPT HERE. In the event of non-genuine Whirlpool parts or accessories. 6. This limited warranty is not available. 13. Commercial, non-...
Use & Care Guide
Page 16
...in -home repair. 12. In Canada call 1-800-253-1301. Service must be warranted by the remaining term of non-genuine Whirlpool parts or accessories. 6. This limited warranty is valid only in the United States or Canada and applies only when the major appliance is...In-home instruction on how to access additional resources, or visit https://www.whirlpool.com/product_help. 2. house wiring, fuses, or water inlet hoses). 4. Repairs to parts or systems to : https://www.whirlpool.com/product_help Whirlpool Customer eXperience Center In the U.S.A. YOUR SOLE AND EXCLUSIVE REMEDY UNDER THIS ...
...in -home repair. 12. In Canada call 1-800-253-1301. Service must be warranted by the remaining term of non-genuine Whirlpool parts or accessories. 6. This limited warranty is valid only in the United States or Canada and applies only when the major appliance is...In-home instruction on how to access additional resources, or visit https://www.whirlpool.com/product_help. 2. house wiring, fuses, or water inlet hoses). 4. Repairs to parts or systems to : https://www.whirlpool.com/product_help Whirlpool Customer eXperience Center In the U.S.A. YOUR SOLE AND EXCLUSIVE REMEDY UNDER THIS ...


