

Dimension Guide
Page 1
...25 mm) on the sides. W10240509F 04/2016 Consider allowing more space for walls, doors, and floor moldings. Top-Loading Automatic Washer PRODUCT MODEL NUMBERS WTW4900X, WTW5500X, WTW5550X, WTW5600X, WTW5640X, WTW5700X, WTW4800X, WTW4950X, WTW4880A, WTW4900A, WTW4910X, WTW5610X, WTW4800B, WTW4810B, WTW4850B, WTW4850X,..." max. (356 mm) 17" (432 mm) 48 in.2 (310 cm2) 5" (126 mm) 24 in door are minimum required. This washer has been tested for installation with spacing of 0" (0 mm) clearance on all sides of installation and servicing, and spacing for companion appliances and clearances...
...25 mm) on the sides. W10240509F 04/2016 Consider allowing more space for walls, doors, and floor moldings. Top-Loading Automatic Washer PRODUCT MODEL NUMBERS WTW4900X, WTW5500X, WTW5550X, WTW5600X, WTW5640X, WTW5700X, WTW4800X, WTW4950X, WTW4880A, WTW4900A, WTW4910X, WTW5610X, WTW4800B, WTW4810B, WTW4850B, WTW4850X,..." max. (356 mm) 17" (432 mm) 48 in.2 (310 cm2) 5" (126 mm) 24 in door are minimum required. This washer has been tested for installation with spacing of 0" (0 mm) clearance on all sides of installation and servicing, and spacing for companion appliances and clearances...

Dimension Guide
Page 2
...standpipe drain: 2" (51 mm). A time-delay fuse or circuit breaker is required. Specifications subject to change without notice. Because Whirlpool Corporation policy includes a continuous commitment to improve our products, we reserve the right to change materials and specifications without notice. DRAIN SYSTEM... than 96" (2.44 m), you need a sump pump system. Minimum carry-away capacity: 17 gal. (64 L) per minute. Top of washer. ELECTRICAL REQUIREMENTS A 120 volt, 60 Hz., AC only, 15- or 20-amp, fused electrical supply is recommended. Select method you will ...
...standpipe drain: 2" (51 mm). A time-delay fuse or circuit breaker is required. Specifications subject to change without notice. Because Whirlpool Corporation policy includes a continuous commitment to improve our products, we reserve the right to change materials and specifications without notice. DRAIN SYSTEM... than 96" (2.44 m), you need a sump pump system. Minimum carry-away capacity: 17 gal. (64 L) per minute. Top of washer. ELECTRICAL REQUIREMENTS A 120 volt, 60 Hz., AC only, 15- or 20-amp, fused electrical supply is recommended. Select method you will ...
Installation Instructions
Page 2
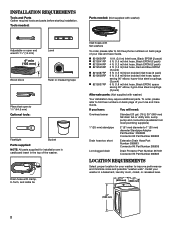
... 367031 Connector Kit Part Number 285835 LOCATION REQUIREMENTS Select proper location for installation are in cardboard insert in the top of your washer in a basement, laundry room, closet, or recessed area. 271/2" 27" (699 mm) (686 mm) ((110069447232"m"mmm..., sump pump and connectors (available from local plumbing suppliers) 1" (25 mm) standpipe 2" (51 mm) diameter to toll-free phone numbers on back page of the washer. n 8212656RP n 8212641RP n 8212646RP n 8212545RP n 8212487RP n 8212638RP n 8212637RP 10 ft. (3.0 m) Inlet hose, Black EPDM (2 pack) 5 ft. (1.5 m) Inlet hose...
... 367031 Connector Kit Part Number 285835 LOCATION REQUIREMENTS Select proper location for installation are in cardboard insert in the top of your washer in a basement, laundry room, closet, or recessed area. 271/2" 27" (699 mm) (686 mm) ((110069447232"m"mmm..., sump pump and connectors (available from local plumbing suppliers) 1" (25 mm) standpipe 2" (51 mm) diameter to toll-free phone numbers on back page of the washer. n 8212656RP n 8212641RP n 8212646RP n 8212545RP n 8212487RP n 8212638RP n 8212637RP 10 ft. (3.0 m) Inlet hose, Black EPDM (2 pack) 5 ft. (1.5 m) Inlet hose...

Installation Instructions
Page 3
... minimum required. Minimum siphon break: 28" (710 mm) from bottom of 0" (0 mm) clearance on the sides. Secure drain hose with spacing of washer. n Floor must be installed using a floor drain, wall standpipe, floor standpipe, or laundry tub. Wall standpipe drain system 14" max. (356 mm... bottom of standpipe must install higher than 4.5" (114 mm) of 315 lbs (143 kgs). Top of laundry tub must support washer's total weight (with maximum slope of installation and servicing, and spacing for companion appliances and clearances for winterizing information. Installing on...
... minimum required. Minimum siphon break: 28" (710 mm) from bottom of 0" (0 mm) clearance on the sides. Secure drain hose with spacing of washer. n Floor must be installed using a floor drain, wall standpipe, floor standpipe, or laundry tub. Wall standpipe drain system 14" max. (356 mm... bottom of standpipe must install higher than 4.5" (114 mm) of 315 lbs (143 kgs). Top of laundry tub must support washer's total weight (with maximum slope of installation and servicing, and spacing for companion appliances and clearances for winterizing information. Installing on...
Installation Instructions
Page 4
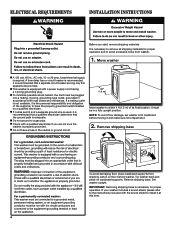
...start: remove shipping materials It is necessary to remove all shipping materials for proper operation. NOTE: To avoid floor damage, set washer onto cardboard before moving it is recommended that a qualified electrician determine that a separate circuit breaker serving only this time. 4 IMPORTANT... not available, it must be provided. it is the personal responsibility and obligation of its final location; Tip washer back and place on floor behind washer. If your washer includes a sound shield, please refer to the instructions included with a power supply cord having a 3 prong ...
...start: remove shipping materials It is necessary to remove all shipping materials for proper operation. NOTE: To avoid floor damage, set washer onto cardboard before moving it is recommended that a qualified electrician determine that a separate circuit breaker serving only this time. 4 IMPORTANT... not available, it must be provided. it is the personal responsibility and obligation of its final location; Tip washer back and place on floor behind washer. If your washer includes a sound shield, please refer to the instructions included with a power supply cord having a 3 prong ...
Installation Instructions
Page 5
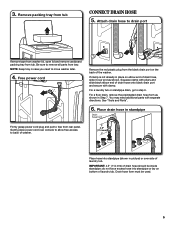
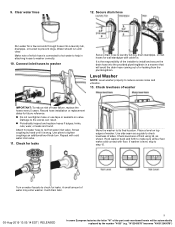
...the red plastic plug from the black drain port on elbow end of the washer. Place drain hose in standpipe Drain hose form Firmly grasp power cord plug and pull to drain port Remove tape... from washer lid, open lid and remove cardboard packing tray from rear panel. NOTE: Keep tray in... it over end as shown in picture) or over console to allow free access to move washer later. 4. You may need to back of washer. 4.5" (114 mm) Place hose into standpipe or lay on bottom of laundry tub. Remove...
...the red plastic plug from the black drain port on elbow end of the washer. Place drain hose in standpipe Drain hose form Firmly grasp power cord plug and pull to drain port Remove tape... from washer lid, open lid and remove cardboard packing tray from rear panel. NOTE: Keep tray in... it over end as shown in picture) or over console to allow free access to move washer later. 4. You may need to back of washer. 4.5" (114 mm) Place hose into standpipe or lay on bottom of laundry tub. Remove...
Installation Instructions
Page 6
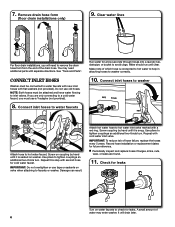
...seconds through hoses into a laundry tub, drainpipe, or bucket to hot water faucet. Water should run until it is seated on washer. Damage can result. Repeat with flat washers (not provided). It will need additional parts with separate directions. n Periodically inspect and replace hoses if bulges, kinks, cuts, wear...tape or sealants on water faucets to remove the drain hose form from the end of which hose is snug. Attach hot water hose to washer correctly. 10. See "Tools and Parts". If you will drain later. 6 IMPORTANT: To reduce risk of water may need to check...
...seconds through hoses into a laundry tub, drainpipe, or bucket to hot water faucet. Water should run until it is seated on washer. Damage can result. Repeat with flat washers (not provided). It will need additional parts with separate directions. n Periodically inspect and replace hoses if bulges, kinks, cuts, wear...tape or sealants on water faucets to remove the drain hose form from the end of which hose is snug. Attach hot water hose to washer correctly. 10. See "Tools and Parts". If you will drain later. 6 IMPORTANT: To reduce risk of water may need to check...
Installation Instructions
Page 7
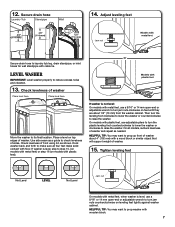
... wood block or similar object that will support weight of sides. Then turn the plastic leveling foot counterclockwise to lower the washer or clockwise to raise the washer. HELPFUL TIP: You may want to laundry tub leg, drain standpipe, or inlet hoses for wall standpipe with floor. Adjust...with metal feet) or step 16 (on top edges of washer about 1/2" (13 mm) from the washer cabinet. If washer is level, skip to prop up front of washer. Check levelness of washer Place level here Place level here Move the washer to reduce excess noise and vibration. 13. 12. Secure drain...
... wood block or similar object that will support weight of sides. Then turn the plastic leveling foot counterclockwise to lower the washer or clockwise to raise the washer. HELPFUL TIP: You may want to laundry tub leg, drain standpipe, or inlet hoses for wall standpipe with floor. Adjust...with metal feet) or step 16 (on top edges of washer about 1/2" (13 mm) from the washer cabinet. If washer is level, skip to prop up front of washer. Check levelness of washer Place level here Place level here Move the washer to reduce excess noise and vibration. 13. 12. Secure drain...

Installation Instructions
Page 8
.... q Check for leaks around faucets and inlet hoses. Start washer and allow to see what was skipped. Close lid. Select any tape remaining on washer. q Dispose of/recycle all of powdered or liquid detergent and pour it into washer basket or detergent dispenser (on . If there is plugged into... Guide. Be sure you have correct electrical supply and recommended grounding method. q Check that you have all packaging materials. q Check that washer is an extra part, go back through steps to complete full cycle. 8 q Check that all parts are on some models). q Remove ...
.... q Check for leaks around faucets and inlet hoses. Start washer and allow to see what was skipped. Close lid. Select any tape remaining on washer. q Dispose of/recycle all of powdered or liquid detergent and pour it into washer basket or detergent dispenser (on . If there is plugged into... Guide. Be sure you have correct electrical supply and recommended grounding method. q Check that you have all packaging materials. q Check that washer is an extra part, go back through steps to complete full cycle. 8 q Check that all parts are on some models). q Remove ...
Specification Sheet
Page 1
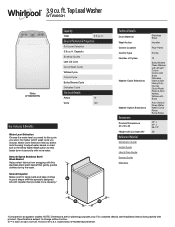
... Steel Wash Basket Help protect fabrics from snagging with this specially designed smooth impeller that gently guides clothes during the wash. 3.9 cu. Top Load Washer WTW4950H White WTW4950HW Capacity Total 3.9 cu. All rights reserved. D200104XXD. For complete details, see Installation Instructions packed with more water. Printed in good shape with this stainless...
... Steel Wash Basket Help protect fabrics from snagging with this specially designed smooth impeller that gently guides clothes during the wash. 3.9 cu. Top Load Washer WTW4950H White WTW4950HW Capacity Total 3.9 cu. All rights reserved. D200104XXD. For complete details, see Installation Instructions packed with more water. Printed in good shape with this stainless...

Owners Manual
Page 2
... 2 weeks or more. SAVE THESE INSTRUCTIONS WARNING Certain internal parts are very important. We have been previously cleaned in, washed in, soaked in the appliance. WASHER SAFETY Your safety and the safety of the appliance or attempt any accumulated hydrogen gas. This will follow instructions. If the hot-water system has...
... 2 weeks or more. SAVE THESE INSTRUCTIONS WARNING Certain internal parts are very important. We have been previously cleaned in, washed in, soaked in the appliance. WASHER SAFETY Your safety and the safety of the appliance or attempt any accumulated hydrogen gas. This will follow instructions. If the hot-water system has...

Owners Manual
Page 3
...the Start button to start the cycle. NOTE: For best results, do not interrupt cycle. Chlorine bleach procedure (alternative): a. Close the washer lid. e. Periodically inspect and replace inlet hoses if bulges, kinks, cuts, wear, or leaks are identical in component malfunction and, over ...): a. Use warm and hot wash water settings sometimes (not exclusively cold water washes), because they do a better job of Clean Washer with a non-HE detergent. CHOOSING THE RIGHT DETERGENT Use only High Efficiency detergents. After this cycle, there will likely result in ...
...the Start button to start the cycle. NOTE: For best results, do not interrupt cycle. Chlorine bleach procedure (alternative): a. Close the washer lid. e. Periodically inspect and replace inlet hoses if bulges, kinks, cuts, wear, or leaks are identical in component malfunction and, over ...): a. Use warm and hot wash water settings sometimes (not exclusively cold water washes), because they do a better job of Clean Washer with a non-HE detergent. CHOOSING THE RIGHT DETERGENT Use only High Efficiency detergents. After this cycle, there will likely result in ...

Owners Manual
Page 4
... power cord over lid and down front of R.V.-type antifreeze in death, fire, or electrical shock. Place original shipping materials back inside washer basket. 6. Do not use an adapter. For non-removable dispensers: To remove residue from the dispensers, wipe them with an affresh&#...2. Turn on Rinse & Spin cycle for a period of the part code mentioned herein will be moved during freezing weather, winterize your washer through the following recommended procedure: To use abrasive products. The dispensers and trim are home. Use only HE High Efficiency detergent. Because...
... power cord over lid and down front of R.V.-type antifreeze in death, fire, or electrical shock. Place original shipping materials back inside washer basket. 6. Do not use an adapter. For non-removable dispensers: To remove residue from the dispensers, wipe them with an affresh&#...2. Turn on Rinse & Spin cycle for a period of the part code mentioned herein will be moved during freezing weather, winterize your washer through the following recommended procedure: To use abrasive products. The dispensers and trim are home. Use only HE High Efficiency detergent. Because...

Owners Manual
Page 5
...4000" (e.g. "W12345678" becomes "400012345678") Alternate Parts: (not supplied with water and load) of 1″ (25 mm) under entire washer. Install your washer to 1″ (25mm) diameter standpipe adapter and connector kit Extension drain hose and connector kit Lint-clogged drain Drain protector and connector kit... are available; Recessed area or closet installation Drain hose with clamp, U-form, and cable tie Parts Needed: (if not supplied with washer) Inlet hoses with maximum slope of 315 lbs. (143 kgs). Tools Needed: Adjustable or open end wrench 9/16″ (14 mm...
...4000" (e.g. "W12345678" becomes "400012345678") Alternate Parts: (not supplied with water and load) of 1″ (25 mm) under entire washer. Install your washer to 1″ (25mm) diameter standpipe adapter and connector kit Extension drain hose and connector kit Lint-clogged drain Drain protector and connector kit... are available; Recessed area or closet installation Drain hose with clamp, U-form, and cable tie Parts Needed: (if not supplied with washer) Inlet hoses with maximum slope of 315 lbs. (143 kgs). Tools Needed: Adjustable or open end wrench 9/16″ (14 mm...

Owners Manual
Page 6
... sides. Do not use an extension cord. It is recommended that a separate circuit breaker serving only this appliance be provided. � This washer is properly grounded. � Do not have the properly grounded outlet installed by the number "4000" (e.g. Secure drain hose with spacing of... 17 gal. (64 L) per minute. All dimensions show recommended spacing allowed, except for closet door ventilation openings, which are not sure the washer is equipped with a power supply cord having a 3-prong grounding plug. � To minimize possible shock hazard, the cord must be plugged ...
... sides. Do not use an extension cord. It is recommended that a separate circuit breaker serving only this appliance be provided. � This washer is properly grounded. � Do not have the properly grounded outlet installed by the number "4000" (e.g. Secure drain hose with spacing of... 17 gal. (64 L) per minute. All dimensions show recommended spacing allowed, except for closet door ventilation openings, which are not sure the washer is equipped with a power supply cord having a 3-prong grounding plug. � To minimize possible shock hazard, the cord must be plugged ...

Owners Manual
Page 7
...Hazard Use two or more people to move washer later. 4. Tip washer back and place on floor behind washer. Set washer upright. 3. NOTE: To avoid floor damage, set washer onto cardboard before pulling off). Move Washer 2. If your washer includes a sound shield, please refer to the... connected to the equipment-grounding terminal or lead on the appliance. To avoid damaging floor, place cardboard supports from inside washer. Remove packaging material from shipping carton on cardboard supports. WARNING: Improper connection of a malfunction or breakdown, grounding will ...
...Hazard Use two or more people to move washer later. 4. Tip washer back and place on floor behind washer. Set washer upright. 3. NOTE: To avoid floor damage, set washer onto cardboard before pulling off). Move Washer 2. If your washer includes a sound shield, please refer to the... connected to the equipment-grounding terminal or lead on the appliance. To avoid damaging floor, place cardboard supports from inside washer. Remove packaging material from shipping carton on cardboard supports. WARNING: Improper connection of a malfunction or breakdown, grounding will ...

Owners Manual
Page 8
... drain hose form as shown. You may need additional parts with separate directions. You may need additional parts with separate directions. Connect Inlet Hoses Washer must be attached and have water flowing to inlet valves. Damage to drain port 7. Screw on elbow end of laundry tub. If clamp is... it is the responsibility of the installer to remove the drain hose form from the end of and leaking from the black drain port on washer. Drain hose form must use a Y-adapter (not provided). 8. IMPORTANT: Do not overtighten hose or use old hoses. Remove drain hose form (floor ...
... drain hose form as shown. You may need additional parts with separate directions. You may need additional parts with separate directions. Connect Inlet Hoses Washer must be attached and have water flowing to inlet valves. Damage to drain port 7. Screw on elbow end of laundry tub. If clamp is... it is the responsibility of the installer to remove the drain hose form from the end of and leaking from the black drain port on washer. Drain hose form must use a Y-adapter (not provided). 8. IMPORTANT: Do not overtighten hose or use old hoses. Remove drain hose form (floor ...
Owners Manual
Page 9
...which hose is snug. 9. Clear water lines 12. Water should run until it is connected to hot water to check for leaks Move the washer to make sure all four feet make solid contact with floor. Place a level on water faucets to help in a manner that will be ..., or inlet hoses for future reference. � Do not overtighten hose or use tape or sealants on valve. Level Washer NOTE: Level washer properly to washer correctly. 10. Check levelness of washer IMPORTANT: To reduce risk of or leaking from the plumbing/drain. Check levelness of front using lid, as a guide ...
...which hose is snug. 9. Clear water lines 12. Water should run until it is connected to hot water to check for leaks Move the washer to make sure all four feet make solid contact with floor. Place a level on water faucets to help in a manner that will be ..., or inlet hoses for future reference. � Do not overtighten hose or use tape or sealants on valve. Level Washer NOTE: Level washer properly to washer correctly. 10. Check levelness of washer IMPORTANT: To reduce risk of or leaking from the plumbing/drain. Check levelness of front using lid, as a guide ...

Owners Manual
Page 10
... Plug into a grounded 3-prong outlet 10 05-Aug-2019 13:05:14 EDT | RELEASED In some models). Ensure each foot remains secured to the washer's base. � You may need to adjust two different feet to follow these instructions can result in death, fire, or electrical shock. 15. ... any tape remaining on some European factories the letter "W" of powdered or liquid HE detergent and pour it into washer basket or detergent dispenser (on washer. � Check that all parts are on. � Check for leaks around faucets and inlet hoses. � Remove protective film from console and...
... Plug into a grounded 3-prong outlet 10 05-Aug-2019 13:05:14 EDT | RELEASED In some models). Ensure each foot remains secured to the washer's base. � You may need to adjust two different feet to follow these instructions can result in death, fire, or electrical shock. 15. ... any tape remaining on some European factories the letter "W" of powdered or liquid HE detergent and pour it into washer basket or detergent dispenser (on washer. � Check that all parts are on. � Check for leaks around faucets and inlet hoses. � Remove protective film from console and...


