Owners Manual
Page 1
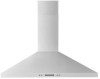
.../W11549256A IMPORTANT: LIRE ET CONSERVER CES INSTRUCTIONS. 30" AND 36" (76.2 AND 91.4 CM) WALL‑MOUNT CANOPY RANGE HOOD Installation Instructions and Use & Care Guide For questions about features, operation/performance, parts, accessories or service, call: 1-800-253-1301 or visit our website at www.whirlpool.com In Canada, call 1-800-807-6777 or visit our website at www.whirlpool.ca HOTTE DE CUISINIÈRE À MONTAGE...
.../W11549256A IMPORTANT: LIRE ET CONSERVER CES INSTRUCTIONS. 30" AND 36" (76.2 AND 91.4 CM) WALL‑MOUNT CANOPY RANGE HOOD Installation Instructions and Use & Care Guide For questions about features, operation/performance, parts, accessories or service, call: 1-800-253-1301 or visit our website at www.whirlpool.com In Canada, call 1-800-807-6777 or visit our website at www.whirlpool.ca HOTTE DE CUISINIÈRE À MONTAGE...
Owners Manual
Page 2
...DES MATIÈRES RANGE HOOD SAFETY 2 INSTALLATION REQUIREMENTS 4 Tools and Parts 4 Location Requirements 4 Venting Requirements 5 Electrical Requirements 6 INSTALLATION INSTRUCTIONS 7 Prepare Location 7 Connect Vent System 8 Install Range Hood 8 Make Electrical Connection 9 Install Vent Covers 9 Complete Installation 9 RANGE HOOD USE 10 Range Hood Controls 10 RANGE HOOD CARE 11 Cleaning 11 WIRING DIAGRAM 12 ASSISTANCE OR SERVICE 13 In the U.S.A 13 In Canada 13 Accessories 13 SÉCURITÉ DE LA HOTTE DE CUISINIÈRE 16 EXIGENCES D'INSTALLATION 18 Outils et pi...
...DES MATIÈRES RANGE HOOD SAFETY 2 INSTALLATION REQUIREMENTS 4 Tools and Parts 4 Location Requirements 4 Venting Requirements 5 Electrical Requirements 6 INSTALLATION INSTRUCTIONS 7 Prepare Location 7 Connect Vent System 8 Install Range Hood 8 Make Electrical Connection 9 Install Vent Covers 9 Complete Installation 9 RANGE HOOD USE 10 Range Hood Controls 10 RANGE HOOD CARE 11 Cleaning 11 WIRING DIAGRAM 12 ASSISTANCE OR SERVICE 13 In the U.S.A 13 In Canada 13 Accessories 13 SÉCURITÉ DE LA HOTTE DE CUISINIÈRE 16 EXIGENCES D'INSTALLATION 18 Outils et pi...
Owners Manual
Page 3
IMPORTANT SAFETY INSTRUCTIONS READ AND SAVE THESE INSTRUCTIONS 3
IMPORTANT SAFETY INSTRUCTIONS READ AND SAVE THESE INSTRUCTIONS 3
Owners Manual
Page 4
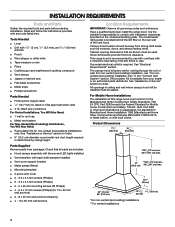
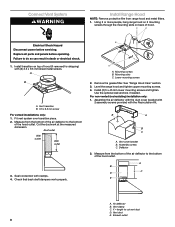
... the rear wall of the vent hood. Read and follow the instructions provided with local codes. Parts Supplied Remove parts from strong draft areas, such as windows, doors, and strong heating vents. The model/serial/ rating plate is available from your dealer or an authorized parts distributor. Recirculation Kit is located behind the left filter on the model/serial/rating plate. It is required. Check that are included. ■ Hood canopy assembly with blower and LED lights installed ■ Vent transition with...
... the rear wall of the vent hood. Read and follow the instructions provided with local codes. Parts Supplied Remove parts from strong draft areas, such as windows, doors, and strong heating vents. The model/serial/ rating plate is available from your dealer or an authorized parts distributor. Recirculation Kit is located behind the left filter on the model/serial/rating plate. It is required. Check that are included. ■ Hood canopy assembly with blower and LED lights installed ■ Vent transition with...
Owners Manual
Page 5
... ceilings, a Stainless Steel Chimney Extension Kit is available from locale to seal exterior wall or roof opening is a minimum of 24" (61 cm) of straight vent between the bottom of makeup air systems when using ventilation systems greater than three 90° elbows. ■ Make sure there is 6" (15.2 cm) round. The chimney extension replaces the upper chimney shipped with the range hood. ■ Use caulking to locale. If the roof or wall cap has a damper, do not use...
... ceilings, a Stainless Steel Chimney Extension Kit is available from locale to seal exterior wall or roof opening is a minimum of 24" (61 cm) of straight vent between the bottom of makeup air systems when using ventilation systems greater than three 90° elbows. ■ Make sure there is 6" (15.2 cm) round. The chimney extension replaces the upper chimney shipped with the range hood. ■ Use caulking to locale. If the roof or wall cap has a damper, do not use...
Owners Manual
Page 6
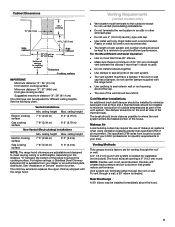
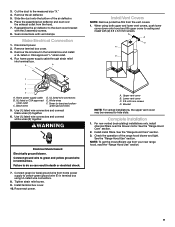
... (latest edition), and all local codes and ordinances. For Non-Vented (Recirculating) Installations If it is recommended that a qualified electrician determine that the electrical installation is adequate. Roof Venting A Wall Venting Non-Vented (Recirculating) A B B B A A. Fumes and vapors are recycled through the top grille. The model/serial/rating plate is 35 ft (10.7 m). See the "Assistance or Service" section for each vent piece used in the non-vented (recirculating) version, fitting a charcoal filter and the deflector.
... (latest edition), and all local codes and ordinances. For Non-Vented (Recirculating) Installations If it is recommended that a qualified electrician determine that the electrical installation is adequate. Roof Venting A Wall Venting Non-Vented (Recirculating) A B B B A A. Fumes and vapors are recycled through the top grille. The model/serial/rating plate is 35 ft (10.7 m). See the "Assistance or Service" section for each vent piece used in the non-vented (recirculating) version, fitting a charcoal filter and the deflector.
Owners Manual
Page 7
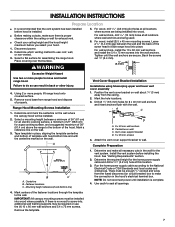
... C. Mounting height reference (hood bottom line) Vent Cover Support Bracket Installation Installations using telescoping upper and lower vent cover assembly 1. Attach the vent cover support bracket to the National Electrical Code or CSA Standards and local codes and ordinances. Run the home power supply cable according to wall. If there is no wood to screw into, additional wall framing supports may be installed. 2. WARNING 5. Remove wood base from the ceiling. 2. Position the vent cover bracket on the wall where the canopy hood will be required or use : roof, wall...
... C. Mounting height reference (hood bottom line) Vent Cover Support Bracket Installation Installations using telescoping upper and lower vent cover assembly 1. Attach the vent cover support bracket to the National Electrical Code or CSA Standards and local codes and ordinances. Run the home power supply cable according to wall. If there is no wood to screw into, additional wall framing supports may be installed. 2. WARNING 5. Remove wood base from the ceiling. 2. Position the vent cover bracket on the wall where the canopy hood will be required or use : roof, wall...
Owners Manual
Page 8
... lower mounting screws and tighten. Vent cover bracket B. A B D X C E A. Roof outlet Wall outlet Wall outlet 3. Mounting slots C. Vent transition B. 3.5 x 9.5 mm screw For vented installations only: 1. Measure from range hood and metal filters. 1. For non-vented (recirculating) installation only: 1. A B A. Use the optional wall anchors if needed. Seal connection with the Recirculation Kit. Check that back draft dampers work properly. Replace all parts and panels before servicing. Assemble the air deflector with the duct cover bracket with 2 assembly screws...
... lower mounting screws and tighten. Vent cover bracket B. A B D X C E A. Roof outlet Wall outlet Wall outlet 3. Mounting slots C. Vent transition B. 3.5 x 9.5 mm screw For vented installations only: 1. Measure from range hood and metal filters. 1. For non-vented (recirculating) installation only: 1. A B A. Use the optional wall anchors if needed. Seal connection with the Recirculation Kit. Check that back draft dampers work properly. Replace all parts and panels before servicing. Assemble the air deflector with the duct cover bracket with 2 assembly screws...
Owners Manual
Page 9
...-vented (recirculating) installations only, install charcoal filters over the exhaust outlet from home power supply to the measured size "X." 4. See the "Range Hood Use" section. Remove the air deflector. 5. Check the operation of the air deflector. 6. Place the assembled air deflector and duct over the blower motor. Make Electrical Connection 1. Remove terminal box cover. 3. UL listed wire connectors E. A. Green (or bare) and yellowgreen ground wires 5. See the "Range Hood Care" section. 2. Slide the duct onto the bottom of the range hood blower and light...
...-vented (recirculating) installations only, install charcoal filters over the exhaust outlet from home power supply to the measured size "X." 4. See the "Range Hood Use" section. Remove the air deflector. 5. Check the operation of the air deflector. 6. Place the assembled air deflector and duct over the blower motor. Make Electrical Connection 1. Remove terminal box cover. 3. UL listed wire connectors E. A. Green (or bare) and yellowgreen ground wires 5. See the "Range Hood Care" section. 2. Slide the duct onto the bottom of the range hood blower and light...
Owners Manual
Page 10
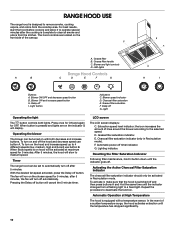
... charcoal filter saturation indicator should only be activated at the same time until the indicator changes from the cooktop area. To activate it to 4 different speeds (low, medium, high and boost) use button A. LED lights Range Hood Controls C D E F G H I . F. Press once for ON and again for 5 minutes. A B A. RANGE HOOD USE The range hood is pressed and lights are located on the front side of the canopy. When button is designed to remove smoke, cooking...
... charcoal filter saturation indicator should only be activated at the same time until the indicator changes from the cooktop area. To activate it to 4 different speeds (low, medium, high and boost) use button A. LED lights Range Hood Controls C D E F G H I . F. Press once for ON and again for 5 minutes. A B A. RANGE HOOD USE The range hood is pressed and lights are located on the front side of the canopy. When button is designed to remove smoke, cooking...
Owners Manual
Page 11
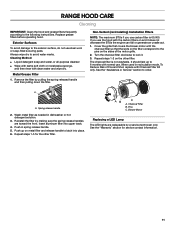
... service contact information. 11 AB C A. Always wipe dry to order. Push in dishwasher or hot detergent solution. 3. Pins C. Metal Grease Filter 1. Turn the charcoal filter clockwise to the pins on and it . 3. Insert aluminum filter into place. 6. Blower Motor Replacing a LED Lamp The LED lights are toward the front. See the "Warranty" section for the other filter. Non-Vented (recirculating) Installation Filters NOTE: The maximum BTUs if you use . Cover the grille...
... service contact information. 11 AB C A. Always wipe dry to order. Push in dishwasher or hot detergent solution. 3. Pins C. Metal Grease Filter 1. Turn the charcoal filter clockwise to the pins on and it . 3. Insert aluminum filter into place. 6. Blower Motor Replacing a LED Lamp The LED lights are toward the front. See the "Warranty" section for the other filter. Non-Vented (recirculating) Installation Filters NOTE: The maximum BTUs if you use . Cover the grille...
Owners Manual
Page 12
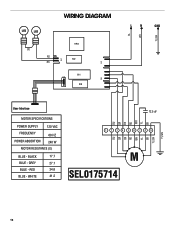
RED 34.6 BLUE - BLACK 17.7 BLUE - GREY 27.1 BLUE - WHITE 41.2 B U BU 12.5 uF 1 234 56 789 M SEL0175714 GR GR BK B K RD RD WH WH YL YL BR BR YL/GN YL/GN 12 LED LED BU RD BK CN3 WIRING DIAGRAM TR1 K2 K1 CN5 K3 CN2 CN1 B L W H YL/GN L N GND User Interface MOTOR SPECIFICATIONS POWER SUPPLY 120 VAC FREQUENCY 60 HZ POWER ABSORTION 240 W MOTOR RESISTANCE (Ω) BLUE -
RED 34.6 BLUE - BLACK 17.7 BLUE - GREY 27.1 BLUE - WHITE 41.2 B U BU 12.5 uF 1 234 56 789 M SEL0175714 GR GR BK B K RD RD WH WH YL YL BR BR YL/GN YL/GN 12 LED LED BU RD BK CN3 WIRING DIAGRAM TR1 K2 K1 CN5 K3 CN2 CN1 B L W H YL/GN L N GND User Interface MOTOR SPECIFICATIONS POWER SUPPLY 120 VAC FREQUENCY 60 HZ POWER ABSORTION 240 W MOTOR RESISTANCE (Ω) BLUE -
Owners Manual
Page 13
... of service. Accessories Recirculation Kit (for non-vented installations only) Order Part Number W10272063 Replacement Charcoal Filters (for non-vented installations only) Order Part Number W10272068 Chimney Extension Kit (Stainless Steel) Order Part Number EXTKIT18FS Chimney Extension Kit (Black Stainless Steel) Order Part Number EXTKIT18HV Chimney Extension Kit (Anti Fingerprint Stainless Steel) Order Part Number EXTKIT28LZ 6" (15.2 cm) Makeup Air Kit (consult local building code) Order Part Number W10446915 13 If you need replacement parts If you need further assistance...
... of service. Accessories Recirculation Kit (for non-vented installations only) Order Part Number W10272063 Replacement Charcoal Filters (for non-vented installations only) Order Part Number W10272068 Chimney Extension Kit (Stainless Steel) Order Part Number EXTKIT18FS Chimney Extension Kit (Black Stainless Steel) Order Part Number EXTKIT18HV Chimney Extension Kit (Anti Fingerprint Stainless Steel) Order Part Number EXTKIT28LZ 6" (15.2 cm) Makeup Air Kit (consult local building code) Order Part Number W10446915 13 If you need replacement parts If you need further assistance...
Owners Manual
Page 28
Used under license in Canada. All rights reserved. Utilisé sous licence au Canada. W11549256A ®/™ ©2021 Whirlpool. Tous droits réservés. 08/21
Used under license in Canada. All rights reserved. Utilisé sous licence au Canada. W11549256A ®/™ ©2021 Whirlpool. Tous droits réservés. 08/21
Dimension Guide
Page 1
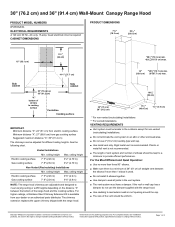
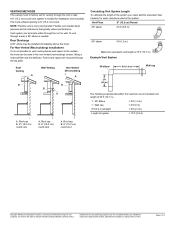
...different ceiling heights. ceiling height 7' 5" (2.26 m) 7' 8" (2.34 m) Max. The chimney extension replaces the upper chimney shipped with product. 30" (76.2 cm) and 36" (91.4 cm) Wall-Mount Canopy Range Hood PRODUCT MODEL NUMBERS WVW93UC0L ELECTRICAL REQUIREMENTS A 120 volt, 60 Hz., AC only, 15-amp, fused electrical circuit is recommended. If the roof or wall cap has a damper, do not use 4" (10.2 cm) laundry-type wall cap. ■ Use metal vent only. See the following chart. Dimensions are adjustable and designed to cooking surface Centerline Cooking surface...
...different ceiling heights. ceiling height 7' 5" (2.26 m) 7' 8" (2.34 m) Max. The chimney extension replaces the upper chimney shipped with product. 30" (76.2 cm) and 36" (91.4 cm) Wall-Mount Canopy Range Hood PRODUCT MODEL NUMBERS WVW93UC0L ELECTRICAL REQUIREMENTS A 120 volt, 60 Hz., AC only, 15-amp, fused electrical circuit is recommended. If the roof or wall cap has a damper, do not use 4" (10.2 cm) laundry-type wall cap. ■ Use metal vent only. See the following chart. Dimensions are adjustable and designed to cooking surface Centerline Cooking surface...
Dimension Guide
Page 2
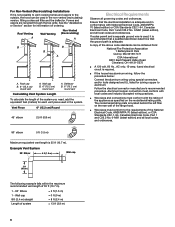
... vent cooking fumes and vapors to change materials and specifications without notice. Flexible vent creates back pressure and air turbulence that greatly reduce performance. To vent through a wall, a 90° elbow is factory set for planning purposes only. Fumes and vapors are for venting through the top grille. Roof cap B. 6" (15.2 cm) round vent A. VENTING METHODS This canopy hood is needed for each vent piece used in the system. Vent system can be installed...
... vent cooking fumes and vapors to change materials and specifications without notice. Flexible vent creates back pressure and air turbulence that greatly reduce performance. To vent through a wall, a 90° elbow is factory set for planning purposes only. Fumes and vapors are for venting through the top grille. Roof cap B. 6" (15.2 cm) round vent A. VENTING METHODS This canopy hood is needed for each vent piece used in the system. Vent system can be installed...


