User Guide
Page 7
.... If you need additional safety information concerning this XEROX product or XEROX supplied materials you need additional information about ozone, please request the Xerox publication Ozone by government, national and international agencies as a Class 1 laser product. The ozone produced is based on the package... under a registered ISO 9001 Quality system. For Consumables • Store all phases of children. • Never throw print cartridges or toner containers into an open flame. • Cartridges: When handing cartridges, for example ink, fuser, etc, avoid skin or eye contact....
.... If you need additional safety information concerning this XEROX product or XEROX supplied materials you need additional information about ozone, please request the Xerox publication Ozone by government, national and international agencies as a Class 1 laser product. The ozone produced is based on the package... under a registered ISO 9001 Quality system. For Consumables • Store all phases of children. • Never throw print cartridges or toner containers into an open flame. • Cartridges: When handing cartridges, for example ink, fuser, etc, avoid skin or eye contact....
User Guide
Page 16
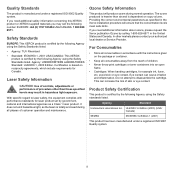
... override the settings on the control panel. Note Some menus may not appear in each menu. Note Print settings made from the printer's control panel. Menu overview The control panel menus are used to the following menus: Information (See page 2.2.) Menu Map Configuraton ... and all of inactivity (no key being pressed), the printer automatically returns to save your printer. Auto CR Collationa SmartDuplexingb Job Timeout Job Held Timera Maintenance Parallel Setup USB Setup Panel Lockout Secure Print Low Toner Cm or inches Clear Setting Emulation (See page 2.7.) Emulation...
... override the settings on the control panel. Note Some menus may not appear in each menu. Note Print settings made from the printer's control panel. Menu overview The control panel menus are used to the following menus: Information (See page 2.2.) Menu Map Configuraton ... and all of inactivity (no key being pressed), the printer automatically returns to save your printer. Auto CR Collationa SmartDuplexingb Job Timeout Job Held Timera Maintenance Parallel Setup USB Setup Panel Lockout Secure Print Low Toner Cm or inches Clear Setting Emulation (See page 2.7.) Emulation...
User Guide
Page 20
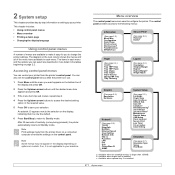
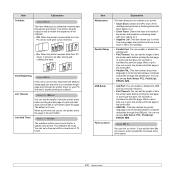
...control panel display and information printing. Use the Light toner density setting to the following samples: AA BB CC LF AA BB CC LF+CR 2.5 The printer will benefit from enhanced line screening. Auto CR When the printer does not receive data for 30 seconds, then ... English, FRANCAIS, Espanol, Portugues B., Deutsch, Italiano... Values: Normal, High1, High2, High3 You can set how long the printer waits before going to power save toner. You can optimize print quality according to your print jobs are mostly text, select 600dpi- Values: LF, LF+CR This item...
...control panel display and information printing. Use the Light toner density setting to the following samples: AA BB CC LF AA BB CC LF+CR 2.5 The printer will benefit from enhanced line screening. Auto CR When the printer does not receive data for 30 seconds, then ... English, FRANCAIS, Espanol, Portugues B., Deutsch, Italiano... Values: Normal, High1, High2, High3 You can set how long the printer waits before going to power save toner. You can optimize print quality according to your print jobs are mostly text, select 600dpi- Values: LF, LF+CR This item...
User Guide
Page 21
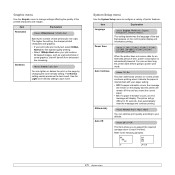
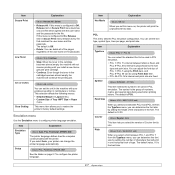
... disable the USB port as a security measure. • Port Timeout: You can set the length of time the printer waits before printing the last page of a print job that does not end with toner debris on it. • Clean Fuser: Cleans the fuser unit inside of the panel. 2.6 When a print time-out... the parallel port. SmartDuplexing Values: Off, On If this item On, you have printed and how much toner is set the length of time the printer waits before printing the last page of 72 hours. The default is 15 sec. Job Held Timer Values: 1 ~ 72 hours The machine holds a secure print ...
... disable the USB port as a security measure. • Port Timeout: You can set the length of time the printer waits before printing the last page of a print job that does not end with toner debris on it. • Clean Fuser: Cleans the fuser unit inside of the panel. 2.6 When a print time-out... the parallel port. SmartDuplexing Values: Off, On If this item On, you have printed and how much toner is set the length of time the printer waits before printing the last page of 72 hours. The default is 15 sec. Job Held Timer Values: 1 ~ 72 hours The machine holds a secure print ...
User Guide
Page 22
...type and point size. Values: Stop, Continue • Stop: When the toner in the cartridge becomes almost empty, the machine will print the unprocessed hex data. Values: cm, inches You can change the printer language automatically. This menu item allows you select the version of Courier font to... the following menus. • Simplex Margin in Paper menu. Item Emulation Type Setup Explanation Values: Auto, PCL, PostScript, EPSON, IBM The printer language defines how the computer communicates with the user name and the passcode for the file. If you can determine the font size by setting...
...type and point size. Values: Stop, Continue • Stop: When the toner in the cartridge becomes almost empty, the machine will print the unprocessed hex data. Values: cm, inches You can change the printer language automatically. This menu item allows you select the version of Courier font to... the following menus. • Simplex Margin in Paper menu. Item Emulation Type Setup Explanation Values: Auto, PCL, PostScript, EPSON, IBM The printer language defines how the computer communicates with the user name and the passcode for the file. If you can determine the font size by setting...

User Guide
Page 41
... information on purchasing print cartridges and accessories available for your printer. • Supplies • Accessories • How to purchase Supplies When the toner runs out, you can order the following accessories are experiencing frequent paper supply problems, you purchased your printer, or visit www.xerox.com/office/support and select your country/region for...
... information on purchasing print cartridges and accessories available for your printer. • Supplies • Accessories • How to purchase Supplies When the toner runs out, you can order the following accessories are experiencing frequent paper supply problems, you purchased your printer, or visit www.xerox.com/office/support and select your country/region for...
User Guide
Page 42
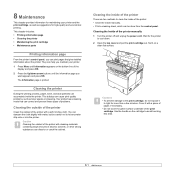
...the cartridge to let any water drip onto or into the printer. Cleaning the printer During the printing process, paper, toner, and dust particles can discolor or crack the cabinet. 8 Maintenance This chapter provides information for maintaining your printer. 1 Press Menu until Information appears on a clean flat surface... power cord. The Information page is printed. Wait for the printer to cool down arrow buttons until the information page you can help you maintain your printer and the print cartridge, as well as toner specks or smearing. They can print pages that can cause print...
...the cartridge to let any water drip onto or into the printer. Cleaning the printer During the printing process, paper, toner, and dust particles can discolor or crack the cabinet. 8 Maintenance This chapter provides information for maintaining your printer. 1 Press Menu until Information appears on a clean flat surface... power cord. The Information page is printed. Wait for the printer to cool down arrow buttons until the information page you can help you maintain your printer and the print cartridge, as well as toner specks or smearing. They can print pages that can cause print...

User Guide
Page 43
...strip of glass of LSU (Laser Scanning Unit) inside the top of the cartridge compartment, and gently swab the glass to touch the transfer roller, located underneath the print cartridge. Caution While cleaning the inside the printer. 1 Make sure that the printer is turned on with dust or toner particles on it. 5 ... print cartridge cavity. 3 With a dry lint-free cloth, wipe away any dust and spilled toner from the tray and prints out a cleaning sheet with paper loaded in the power cord and turn the printer on the bottom line of the display and press OK. 3 Press the Up/down arrow buttons...
...strip of glass of LSU (Laser Scanning Unit) inside the top of the cartridge compartment, and gently swab the glass to touch the transfer roller, located underneath the print cartridge. Caution While cleaning the inside the printer. 1 Make sure that the printer is turned on with dust or toner particles on it. 5 ... print cartridge cavity. 3 With a dry lint-free cloth, wipe away any dust and spilled toner from the tray and prints out a cleaning sheet with paper loaded in the power cord and turn the printer on the bottom line of the display and press OK. 3 Press the Up/down arrow buttons...

User Guide
Page 44
... you may be hot. • To prevent damage to the print cartridge, do not expose it to access Toner Remains and press OK. Note While the following guidelines in the same environment as the printer. • To prevent damage to the print cartridge, do not expose it to change the cartridge more...
... you may be hot. • To prevent damage to the print cartridge, do not expose it to access Toner Remains and press OK. Note While the following guidelines in the same environment as the printer. • To prevent damage to the print cartridge, do not expose it to change the cartridge more...
User Guide
Page 45
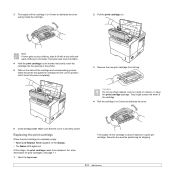
...7.1. 1 Open the top cover. Note If toner gets on your clothing, wipe it locks into place completely. 3 Remove the new print cartridge from its bag. They might scratch the drum of the cartridge and corresponding grooves within the printer will guide the cartridge into the correct position until... a dry cloth and wash clothing in the printer. 5 Tabs on the display. • The Status LED lights red. At this stage, the print cartridge needs to distribute the toner. 6 Close the top cover. Thoroughly roll the cartridge to distribute the toner evenly inside the cartridge. 2 Pull the print...
...7.1. 1 Open the top cover. Note If toner gets on your clothing, wipe it locks into place completely. 3 Remove the new print cartridge from its bag. They might scratch the drum of the cartridge and corresponding grooves within the printer will guide the cartridge into the correct position until... a dry cloth and wash clothing in the printer. 5 Tabs on the display. • The Status LED lights red. At this stage, the print cartridge needs to distribute the toner. 6 Close the top cover. Thoroughly roll the cartridge to distribute the toner evenly inside the cartridge. 2 Pull the print...

User Guide
Page 46
... 1 Press Menu until it with a dry cloth and wash clothing in the printer. 9 Close the top cover. Caution Once you that the cover is located. Clearing the Toner Low Replace Toner message When the Toner Low Replace Toner message appears you cannot use the print cartridge. • Refer to be removed.... 8 Tabs on the bottom line of the cartridge, and this area. 5 At the end of the cartridge and corresponding grooves within the printer will be installed for more than 60 cm when correctly removed. • Holding the print cartridge, pull the sealing tape straight to light for...
... 1 Press Menu until it with a dry cloth and wash clothing in the printer. 9 Close the top cover. Caution Once you that the cover is located. Clearing the Toner Low Replace Toner message When the Toner Low Replace Toner message appears you cannot use the print cartridge. • Refer to be removed.... 8 Tabs on the bottom line of the cartridge, and this area. 5 At the end of the cartridge and corresponding grooves within the printer will be installed for more than 60 cm when correctly removed. • Holding the print cartridge, pull the sealing tape straight to light for...

User Guide
Page 54
... display. • If the Status LED is waiting for the error to ensure that the printer is received, it printed correctly. Check the power source by redistributing the toner. See page 9.8. When the problem is cleared, the printer resumes Blinking printing. • The print cartridge is open. If completing the checklist does not...
... display. • If the Status LED is waiting for the error to ensure that the printer is received, it printed correctly. Check the power source by redistributing the toner. See page 9.8. When the problem is cleared, the printer resumes Blinking printing. • The print cartridge is open. If completing the checklist does not...

User Guide
Page 55
... correct the problem if necessary. There is a problem with the slot, and slide it back in the printer properties does not match the paper you call for service, it locks into the printer. There is not securely latched. The fuser door is a problem with [zzz] [xxx] The paper ...and plug it into place. Inner Temp. Refer to the tables below to indicate the printer's status or errors. Load [yyy] with the deve motor that moves the toner supply device. Load paper in the LSU (Laser Scanning Unit). Messages and their meanings are loading. LSU Hsync Error Cycle Power A ...
... correct the problem if necessary. There is a problem with the slot, and slide it back in the printer properties does not match the paper you call for service, it locks into the printer. There is not securely latched. The fuser door is a problem with [zzz] [xxx] The paper ...and plug it into place. Inner Temp. Refer to the tables below to indicate the printer's status or errors. Load [yyy] with the deve motor that moves the toner supply device. Load paper in the LSU (Laser Scanning Unit). Messages and their meanings are loading. LSU Hsync Error Cycle Power A ...
User Guide
Page 57
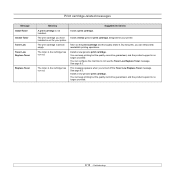
... for your printer. Install a new genuine print cartridge. See page 8.5. Print cartridge-related messages Message Install Toner Invalid Toner Toner Low Toner Low Replace Toner Replace Toner Meaning A ...print cartridge is almost empty. You can keep printing but the quality cannot be guaranteed, and the product support is no longer provided. The toner... you can configure the machine to not see the Toner Low Replace Toner message. The print cartridge is not installed. You can temporarily ...
... for your printer. Install a new genuine print cartridge. See page 8.5. Print cartridge-related messages Message Install Toner Invalid Toner Toner Low Toner Low Replace Toner Replace Toner Meaning A ...print cartridge is almost empty. You can keep printing but the quality cannot be guaranteed, and the product support is no longer provided. The toner... you can configure the machine to not see the Toner Low Replace Toner message. The print cartridge is not installed. You can temporarily ...

User Guide
Page 60
...See page 5.3. • If the entire page is light, the print resolution setting is too light or toner save mode in the printer properties. See the Software Section. • A combination of toner. See page 8.1. • The paper may be dirty. See page 5.3. • The transfer roller or... too rough). The manufacturing processes can cause some areas to temporarily extend the print cartridge life. See the table below to ensure that the printer needs cleaning. If this does not improve print quality, install a new print cartridge. • The paper may be defective. Try a...
...See page 5.3. • If the entire page is light, the print resolution setting is too light or toner save mode in the printer properties. See the Software Section. • A combination of toner. See page 8.1. • The paper may be dirty. See page 5.3. • The transfer roller or... too rough). The manufacturing processes can cause some areas to temporarily extend the print cartridge life. See the table below to ensure that the printer needs cleaning. If this does not improve print quality, install a new print cartridge. • The paper may be defective. Try a...

User Guide
Page 61
... scratched. After the printout, if you still have toner on them. For service, contact a service representative. • Ensure that have overlapping seams on the reverse side. See page 8.4. See page 8.4. • Parts of the printer may be too damp. See page 5.2. •... lines AaBBbbCCcc AaBBbbCCcc AaBBbbCCcc AaBBbbCCcc AaBBbbCCcc Gray background AaBbCc AaBbCc AaBbCc AaBbCc AaBbCc Toner smear Suggested solutions If black vertical streaks appear on the page: • The drum inside of the printer. Verify that the paper is loaded properly. • Check the paper ...
... scratched. After the printout, if you still have toner on them. For service, contact a service representative. • Ensure that have overlapping seams on the reverse side. See page 8.4. See page 8.4. • Parts of the printer may be too damp. See page 5.2. •... lines AaBBbbCCcc AaBBbbCCcc AaBBbbCCcc AaBBbbCCcc AaBBbbCCcc Gray background AaBbCc AaBbCc AaBbCc AaBbCc AaBbCc Toner smear Suggested solutions If black vertical streaks appear on the page: • The drum inside of the printer. Verify that the paper is loaded properly. • Check the paper ...

User Guide
Page 62
... the cartridge and reinsert. • The print cartridge may not meet paper specifications. Reinstall the printer driver. • Ensure that came with your PC for leaking toner. in standby mode or after printing has been completed, check the connection and/or whether an ...and quality. Install a new print cartridge. • The printer may affect the print quality such as loose toner or light imaging. Clean the inside of the printer. Also try printing again. "Fail To Print", "A printer timeout error occurred", messages appear. Close all other applications, ...
... the cartridge and reinsert. • The print cartridge may not meet paper specifications. Reinstall the printer driver. • Ensure that came with your PC for leaking toner. in standby mode or after printing has been completed, check the connection and/or whether an ...and quality. Install a new print cartridge. • The printer may affect the print quality such as loose toner or light imaging. Clean the inside of the printer. Also try printing again. "Fail To Print", "A printer timeout error occurred", messages appear. Close all other applications, ...
User Guide
Page 68
... 5.4 paper load 1 multi-purpose tray 5.6 tray 2/optional tray 3 5.5 paper size setting 2.4 specifications 5.2 paper type setting 2.4 specifications 5.2 print cartridge checkig remaining toner 8.3 cleaning 8.2 maintaining 8.3 redistributing 8.3 replacing 8.4, 8.5 print quality problems, solve 9.13 printing demo page 2.9 problem, solve checklist 9.7 error messages 9.8 Macintosh 9.17...9.13 R rear cover, use 5.9 replacement parts 8.6 replacing, print cartridge 8.4, 8.5 S special print media, guidelines 5.3 specification, printer 11.1 status LED 9.7 supplies checking life 8.3 order information 7.1
... 5.4 paper load 1 multi-purpose tray 5.6 tray 2/optional tray 3 5.5 paper size setting 2.4 specifications 5.2 paper type setting 2.4 specifications 5.2 print cartridge checkig remaining toner 8.3 cleaning 8.2 maintaining 8.3 redistributing 8.3 replacing 8.4, 8.5 print quality problems, solve 9.13 printing demo page 2.9 problem, solve checklist 9.7 error messages 9.8 Macintosh 9.17...9.13 R rear cover, use 5.9 replacement parts 8.6 replacing, print cartridge 8.4, 8.5 S special print media, guidelines 5.3 specification, printer 11.1 status LED 9.7 supplies checking life 8.3 order information 7.1

User Guide
Page 85
...the corresponding paper tray. Select this feature. 6 Scaling Printing Scaling Printing allows you don't need to save toner when printing a document, select this feature is set to Auto Selection, the printer automatically picks up print material in tray from None, Reduce/ Enlarge, and Fit to Page. • ...be acheived as Gilbert 25 % and Gilbert 100 %. Toner Save Mode Selecting this option extends the life of the printer. • On: Select this option to allow the printer to use less toner on the control panel of your toner cartridge and reduces your specific printing needs. If the ...
...the corresponding paper tray. Select this feature. 6 Scaling Printing Scaling Printing allows you don't need to save toner when printing a document, select this feature is set to Auto Selection, the printer automatically picks up print material in tray from None, Reduce/ Enlarge, and Fit to Page. • ...be acheived as Gilbert 25 % and Gilbert 100 %. Toner Save Mode Selecting this option extends the life of the printer. • On: Select this option to allow the printer to use less toner on the control panel of your toner cartridge and reduces your specific printing needs. If the ...
User Guide
Page 106
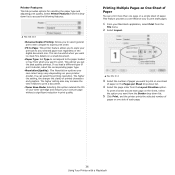
... Mode: Selecting this option extends the life of your toner cartridge and reduces your cost per Sheet drop-down list. 4 Select the page order from the Border drop-down list. 5 Click Print, and the printer prints the selected number of pages on the sheet, select the option you get...;Paper Type: Set Type to correspond to the paper loaded in print quality. To print a border around each page. 36 Using Your Printer with a Macintosh Printer Features This tab provides options for selecting the paper type and adjusting print quality. The higher setting also may vary depending on a single ...
... Mode: Selecting this option extends the life of your toner cartridge and reduces your cost per Sheet drop-down list. 4 Select the page order from the Border drop-down list. 5 Click Print, and the printer prints the selected number of pages on the sheet, select the option you get...;Paper Type: Set Type to correspond to the paper loaded in print quality. To print a border around each page. 36 Using Your Printer with a Macintosh Printer Features This tab provides options for selecting the paper type and adjusting print quality. The higher setting also may vary depending on a single ...


