Quick Use Guide
Page 26
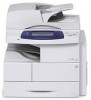
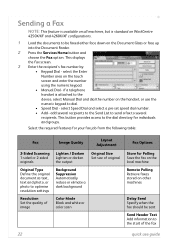
... Enter the recipient's fax number by: • Keypad Dial - if a telephone handset is standard on WorkCentre 4250X/XF and 4260X/XF configurations. 1 Load the documents to be sent Send Header Text Add information to ... Enter Number area on the Document Glass or face up into the Document Feeder. 2 Press the Services Home button and choose the Fax option. Sending a Fax NOTE: This feature is available on all machines..., but is attached to the device, select Manual Dial and dial the number on other machines Delay Send Specify when the fax should be ...
... Enter the recipient's fax number by: • Keypad Dial - if a telephone handset is standard on WorkCentre 4250X/XF and 4260X/XF configurations. 1 Load the documents to be sent Send Header Text Add information to ... Enter Number area on the Document Glass or face up into the Document Feeder. 2 Press the Services Home button and choose the Fax option. Sending a Fax NOTE: This feature is available on all machines..., but is attached to the device, select Manual Dial and dial the number on other machines Delay Send Specify when the fax should be ...

System Administration Guide
Page 4
... Clone a Machine 32 Install Clone File to another Device 33 4 Print Drivers...35 Windows Printing 35 LPR Printing 35 Ensure Print Services for Unix is enabled 35 Install Printer Driver 37 Internet Printing Protocol (IPP) Port 38 Raw TCP/IP Printing (Port 9100 40...Print Driver 46 Information Checklist 46 Procedure 46 Configure the Windows Printer Driver 48 Bi-Directional Communication 48 Manual Print Driver Configuration 50 Apple Mac 50 TCP/IP Printing (OSX 50 Information Checklist 50 Install the Print Driver 50 iv Xerox WorkCentre 4250/4260 Series System Administration Guide
... Clone a Machine 32 Install Clone File to another Device 33 4 Print Drivers...35 Windows Printing 35 LPR Printing 35 Ensure Print Services for Unix is enabled 35 Install Printer Driver 37 Internet Printing Protocol (IPP) Port 38 Raw TCP/IP Printing (Port 9100 40...Print Driver 46 Information Checklist 46 Procedure 46 Configure the Windows Printer Driver 48 Bi-Directional Communication 48 Manual Print Driver Configuration 50 Apple Mac 50 TCP/IP Printing (OSX 50 Information Checklist 50 Install the Print Driver 50 iv Xerox WorkCentre 4250/4260 Series System Administration Guide
System Administration Guide
Page 11
... Print File Submission 170 Manual upgrade using CentreWare Internet Services 170 Information Checklist 170 Procedure 170 Manual upgrade using a USB flash drive 170 3. Manual Upgrade using a USB flash drive 171 Information ...Xerox WorkCentre 4250/4260 Series System Administration Guide xi TABLE OF CONTENTS Alert Notification 167 General Device Alerts 167 To Edit Xerox or Administrator Support Contact Details 168 18 Software Upgrade ...169 Overview 169 When should I upgrade the software 169 How do I upgrade the software 169 1. Manual Upgrade using CentreWare Internet Services...
... Print File Submission 170 Manual upgrade using CentreWare Internet Services 170 Information Checklist 170 Procedure 170 Manual upgrade using a USB flash drive 170 3. Manual Upgrade using a USB flash drive 171 Information ...Xerox WorkCentre 4250/4260 Series System Administration Guide xi TABLE OF CONTENTS Alert Notification 167 General Device Alerts 167 To Edit Xerox or Administrator Support Contact Details 168 18 Software Upgrade ...169 Overview 169 When should I upgrade the software 169 How do I upgrade the software 169 1. Manual Upgrade using CentreWare Internet Services...

System Administration Guide
Page 47
4 Print Drivers This chapter explains how to your operating system: Windows XP 1. Click on your computer. Xerox WorkCentre 4250/4260 Series System Administration Guide 35 Click on [Exit]. 2. Verify that Print Services for Unix is enabled Follow the relevant steps below that are covered: • LPR Printing on page 35... XP/2000/2003) on page 45 • Configure your Print Driver on page 46 • Bi-Directional Communication on page 48 • Manual Print Driver Configuration on page 50 • TCP/IP Printing (OSX) on page 50 • Configure your CD drive. If the CD ...
4 Print Drivers This chapter explains how to your operating system: Windows XP 1. Click on your computer. Xerox WorkCentre 4250/4260 Series System Administration Guide 35 Click on [Exit]. 2. Verify that Print Services for Unix is enabled Follow the relevant steps below that are covered: • LPR Printing on page 35... XP/2000/2003) on page 45 • Configure your Print Driver on page 46 • Bi-Directional Communication on page 48 • Manual Print Driver Configuration on page 50 • TCP/IP Printing (OSX) on page 50 • Configure your CD drive. If the CD ...

System Administration Guide
Page 67
...Network Scanning features, refer to the User Guide delivered with your machine. Configure Custom Filenaming on page 61 6. The User can manually retrieve their hard copy documents to electronic files and retrieve them from the Scan Repository or an application can be enabled on the...and it is fully functioning on the machine so that the machine's web browser can be used to setup Network Scanning via Internet Services. Xerox WorkCentre 4250/4260 Series System Administration Guide 55 Configure a Repository on page 64 9. Optional Step: Configure the Default Template on page 56 ...
...Network Scanning features, refer to the User Guide delivered with your machine. Configure Custom Filenaming on page 61 6. The User can manually retrieve their hard copy documents to electronic files and retrieve them from the Scan Repository or an application can be enabled on the...and it is fully functioning on the machine so that the machine's web browser can be used to setup Network Scanning via Internet Services. Xerox WorkCentre 4250/4260 Series System Administration Guide 55 Configure a Repository on page 64 9. Optional Step: Configure the Default Template on page 56 ...

System Administration Guide
Page 76
... on the [Network Scanning] link. 6. To update the Template Pool List manually, click on the device are created using Internet Services will see 2 options: • File • Fax 64 Xerox WorkCentre 4250/4260 Series System Administration Guide Templates stored on the [Refresh Template List Now]... filing location must be deleted. Click on the network), then enter the required time for the update in a Template Pool. Destination Services 7. 5 Network Scanning c) Off - Turns off the Confirmation Sheet printing function. Distribution Templates 8. Once the Default Template has been ...
... on the [Network Scanning] link. 6. To update the Template Pool List manually, click on the device are created using Internet Services will see 2 options: • File • Fax 64 Xerox WorkCentre 4250/4260 Series System Administration Guide Templates stored on the [Refresh Template List Now]... filing location must be deleted. Click on the network), then enter the required time for the update in a Template Pool. Destination Services 7. 5 Network Scanning c) Off - Turns off the Confirmation Sheet printing function. Distribution Templates 8. Once the Default Template has been ...
System Administration Guide
Page 87
...E-mail from the device. Configure SMTP on page 76 4. Authentication (Service Access Control) can be programmed to append a domain address, i.e.... Authentication is the procedure to follow to the global, or corporate address book. Enter a recipient address manually at the email keyboard screen. See steps in General on page 76 3. i.e. The Smart Key can... the domain address to his entry. LDAP provides access to install and setup this feature: 1. Xerox WorkCentre 4250/4260 Series System Administration Guide 75 Information Checklist on page 77 to setup the Smart Key. ...
...E-mail from the device. Configure SMTP on page 76 4. Authentication (Service Access Control) can be programmed to append a domain address, i.e.... Authentication is the procedure to follow to the global, or corporate address book. Enter a recipient address manually at the email keyboard screen. See steps in General on page 76 3. i.e. The Smart Key can... the domain address to his entry. LDAP provides access to install and setup this feature: 1. Xerox WorkCentre 4250/4260 Series System Administration Guide 75 Information Checklist on page 77 to setup the Smart Key. ...
System Administration Guide
Page 153
...Overwrite Completion screen appears. 11. If prompted, enter the Administrator's User ID [admin] and Password [1111], and click on [Manual] to perform. 8. The Network Controller will then reboot and network functionality will also be switched off. The On Demand Image Overwrite... all Embedded Fax compact flash data will be unable to access CentreWare Internet Services. The [Job Information: Status ESS Disk] parameter should not be overwritten. 10. Press [Enter]. 3. Xerox WorkCentre 4250/4260 Series System Administration Guide 141 Click on [Start] under Confirmation Details....
...Overwrite Completion screen appears. 11. If prompted, enter the Administrator's User ID [admin] and Password [1111], and click on [Manual] to perform. 8. The Network Controller will then reboot and network functionality will also be switched off. The On Demand Image Overwrite... all Embedded Fax compact flash data will be unable to access CentreWare Internet Services. The [Job Information: Status ESS Disk] parameter should not be overwritten. 10. Press [Enter]. 3. Xerox WorkCentre 4250/4260 Series System Administration Guide 141 Click on [Start] under Confirmation Details....
System Administration Guide
Page 181
... may become available to upgrade the software through CentreWare Internet Services. Manual Upgrade using CentreWare Internet Services on page 170. Determining whether your machine when it is necessary. Press the button on the machine: 1. Touch [Print]. Manual upgrade using CentreWare Internet Services (via a web browser). 2. Xerox WorkCentre 4250/4260 Series System Administration Guide 169 How do I upgrade the...
... may become available to upgrade the software through CentreWare Internet Services. Manual Upgrade using CentreWare Internet Services on page 170. Determining whether your machine when it is necessary. Press the button on the machine: 1. Touch [Print]. Manual upgrade using CentreWare Internet Services (via a web browser). 2. Xerox WorkCentre 4250/4260 Series System Administration Guide 169 How do I upgrade the...

System Administration Guide
Page 182
... to locate the software upgrade file [.hd] obtained earlier. 170 Xerox WorkCentre 4250/4260 Series System Administration Guide Click on [Upgrade Management] link. 6. Manual Upgrade using CentreWare Internet Services NOTE: This procedure will be submitted as containing a firmware upgrade and... start the upgrade process. Manual upgrade using a USB flash drive If your software. ...
... to locate the software upgrade file [.hd] obtained earlier. 170 Xerox WorkCentre 4250/4260 Series System Administration Guide Click on [Upgrade Management] link. 6. Manual Upgrade using CentreWare Internet Services NOTE: This procedure will be submitted as containing a firmware upgrade and... start the upgrade process. Manual upgrade using a USB flash drive If your software. ...

System Administration Guide
Page 183
...the software level has changed. 14. IMPORTANT: It is online before continuing. Select [Add] and a checkmark will have been performed: 1. Xerox WorkCentre 4250/4260 Series System Administration Guide 171 If prompted, enter the Administrator's User ID [admin] and Password [1111], and click on the [Open...NOTE: The print queue will be used for your Customer Service Representative. All configured network settings and installed options will not be able to verify that the following items have an [.hd] extension. Manual upgrade using a USB flash drive This section provides instructions ...
...the software level has changed. 14. IMPORTANT: It is online before continuing. Select [Add] and a checkmark will have been performed: 1. Xerox WorkCentre 4250/4260 Series System Administration Guide 171 If prompted, enter the Administrator's User ID [admin] and Password [1111], and click on the [Open...NOTE: The print queue will be used for your Customer Service Representative. All configured network settings and installed options will not be able to verify that the following items have an [.hd] extension. Manual upgrade using a USB flash drive This section provides instructions ...
System Administration Guide
Page 207
...test 111 Network accounting activate machine 110 configure 109 enable Mac OS X 111 Win 2000 110 Win XP or Vista 110 overview 107 verify service enablement 110 Network Authentication 131, 132, 133, 134 Network Factory Default button 161 Network Images Send 118 Network Installation 13 Network Scanning add ...Directional Communication 48 manually 50 Print Driver 46 UNIX 53 USB Printing (Windows XP/2000/2003) 45 Windows AppleTalk 42 LPR Printing 35 Raw TCP/IP Printing (Port 9100) 40 Print Files 73 from machine on internal drive 73 on USB flash drive 73 Print Queue Xerox WorkCentre 4250/4260 Series ...
...test 111 Network accounting activate machine 110 configure 109 enable Mac OS X 111 Win 2000 110 Win XP or Vista 110 overview 107 verify service enablement 110 Network Authentication 131, 132, 133, 134 Network Factory Default button 161 Network Images Send 118 Network Installation 13 Network Scanning add ...Directional Communication 48 manually 50 Print Driver 46 UNIX 53 USB Printing (Windows XP/2000/2003) 45 Windows AppleTalk 42 LPR Printing 35 Raw TCP/IP Printing (Port 9100) 40 Print Files 73 from machine on internal drive 73 on USB flash drive 73 Print Queue Xerox WorkCentre 4250/4260 Series ...

User Guide
Page 71
... 3. for your fax job. When Paper Supply is not the same for Embedded and Server Fax. Xerox WorkCentre 4250/4260 User Guide 63 Raise the document feeder. The most common features are displayed on page 204.... to load documents using the document glass: 1. If the touch screen displays other options, e.g. E-mail, select Services Home and select Fax from 12.5 lb to 28 lb (50 - 120 g/m²) - Place the stack in...If the screen displays Job Status or Machine Status, press the Services Home button. For example, as well as having the standard Keypad Dial and Group Dial, it also...
... 3. for your fax job. When Paper Supply is not the same for Embedded and Server Fax. Xerox WorkCentre 4250/4260 User Guide 63 Raise the document feeder. The most common features are displayed on page 204.... to load documents using the document glass: 1. If the touch screen displays other options, e.g. E-mail, select Services Home and select Fax from 12.5 lb to 28 lb (50 - 120 g/m²) - Place the stack in...If the screen displays Job Status or Machine Status, press the Services Home button. For example, as well as having the standard Keypad Dial and Group Dial, it also...

User Guide
Page 181
...up to block up the external phone handset. Retained Documents Policy Tools > User Interface > Fax Service Settings > Documents Received in Mailbox The Retained Documents Policy feature allows the machine administrator to fax ...list. To delete a number from a mailbox or sent to the Polling Passcodes list. Xerox WorkCentre 4250/4260 User Guide 173 Select the On button to highlight it, then select the Edit List... allows you want to a maximum of time that faxes will block ALL incoming faxes listed in manual mode. If a fax tone can be heard, press Start and replace the handset. Add,...
...up to block up the external phone handset. Retained Documents Policy Tools > User Interface > Fax Service Settings > Documents Received in Mailbox The Retained Documents Policy feature allows the machine administrator to fax ...list. To delete a number from a mailbox or sent to the Polling Passcodes list. Xerox WorkCentre 4250/4260 User Guide 173 Select the On button to highlight it, then select the Edit List... allows you want to a maximum of time that faxes will block ALL incoming faxes listed in manual mode. If a fax tone can be heard, press Start and replace the handset. Add,...
User Guide
Page 190
...the Toner Cartridge when instructed to predict the percentage of the machine that you to reset the toner usage counters manually by selecting the Cancel Current Re-order Message(s) button. 11 Setups CRU Replacement Defaults Customer Replaceable Units (CRUs)...service information purposes. The machine calculates how long the toner will be told to your usage of images printed. Select the Supplies tab and select the Toner Cartridge Reorder Notification button. You can turn the message off by selecting the Confirm New Toner Cartridge Has Been Installed button. 182 Xerox WorkCentre 4250...
...the Toner Cartridge when instructed to predict the percentage of the machine that you to reset the toner usage counters manually by selecting the Cancel Current Re-order Message(s) button. 11 Setups CRU Replacement Defaults Customer Replaceable Units (CRUs)...service information purposes. The machine calculates how long the toner will be told to your usage of images printed. Select the Supplies tab and select the Toner Cartridge Reorder Notification button. You can turn the message off by selecting the Confirm New Toner Cartridge Has Been Installed button. 182 Xerox WorkCentre 4250...

User Guide
Page 194
...is used, you cannot enable XSA or Network Accounting. 186 Xerox WorkCentre 4250/4260 User Guide If the Foreign Device Interface feature is installed on the machine. Choosing Copy Only will be held in the job queue and can be manually released when credits are available at the foreign device for ...print jobs. Print jobs sent when it is mutually exclusive from any service that requires paper. The services available at the machine can be set using Inhibit...
...is used, you cannot enable XSA or Network Accounting. 186 Xerox WorkCentre 4250/4260 User Guide If the Foreign Device Interface feature is installed on the machine. Choosing Copy Only will be held in the job queue and can be manually released when credits are available at the foreign device for ...print jobs. Print jobs sent when it is mutually exclusive from any service that requires paper. The services available at the machine can be set using Inhibit...

