
System Administration Guide
Page 80
...the [Apply] button to the network. Click on the [Properties] tab. 4. If the metadata in the template or the metadata entered at the local UI is configured on the machine. Procedure 1. Click on the [Validation Servers] link. 7. Click on the [Add] button. 8. Click on the [Services...and/or the tasks have been set up on the network using TCP/IP and HTTP. 2. At your machine. 4. Click on [Login]. 68 Xerox WorkCentre 4250/4260 Series System Administration Guide This determines when the server will proceed. Select [HTTP] or [HTTPS] from the menu. 9. Select [Protocol] ...
...the [Apply] button to the network. Click on the [Properties] tab. 4. If the metadata in the template or the metadata entered at the local UI is configured on the machine. Procedure 1. Click on the [Validation Servers] link. 7. Click on the [Add] button. 8. Click on the [Services...and/or the tasks have been set up on the network using TCP/IP and HTTP. 2. At your machine. 4. Click on [Login]. 68 Xerox WorkCentre 4250/4260 Series System Administration Guide This determines when the server will proceed. Select [HTTP] or [HTTPS] from the menu. 9. Select [Protocol] ...

System Administration Guide
Page 173
...Status of any incomplete print or network scan jobs being processed when the Network Controller is possible to the machine via the Web UI until the Network Controller has been reset. If the System Administrator is already authenticated as an administrator the machine will cause an ...100, enter the following will not be performed. For example: If the IP Address is used to reset Network parameters to the problem. 1. Xerox WorkCentre 4250/4260 Series System Administration Guide 161 The web-browser will occur: 1. At your Workstation, open the web browser, enter the TCP/IP Address...
...Status of any incomplete print or network scan jobs being processed when the Network Controller is possible to the machine via the Web UI until the Network Controller has been reset. If the System Administrator is already authenticated as an administrator the machine will cause an ...100, enter the following will not be performed. For example: If the IP Address is used to reset Network parameters to the problem. 1. Xerox WorkCentre 4250/4260 Series System Administration Guide 161 The web-browser will occur: 1. At your Workstation, open the web browser, enter the TCP/IP Address...

System Administration Guide
Page 196
...BootP server does not respond with an IP Address, the machine will use AutoIP to bypass the proxy server for local addresses. 184 Xerox WorkCentre 4250/4260 Series System Administration Guide Ensure that the Online button is configured with a static IP Address, it has been configured with an incorrect...to establish an address. The printer has an IP Address of this: 1. If the machine is enabled within the Tools area at the UI. 4. NOTE: AutoIP (AutoNetting) When DHCP or BootP are several possible causes of 169.254.x.x. Action Incorrect TCP/IP Address In certain ...
...BootP server does not respond with an IP Address, the machine will use AutoIP to bypass the proxy server for local addresses. 184 Xerox WorkCentre 4250/4260 Series System Administration Guide Ensure that the Online button is configured with a static IP Address, it has been configured with an incorrect...to establish an address. The printer has an IP Address of this: 1. If the machine is enabled within the Tools area at the UI. 4. NOTE: AutoIP (AutoNetting) When DHCP or BootP are several possible causes of 169.254.x.x. Action Incorrect TCP/IP Address In certain ...
User Guide
Page 30
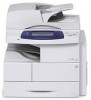
2 Getting Started Machine Overview Component Location Document Feeder, Trays 1, 2, High Capacity Feeder and Finisher Document Feeder Control Panel Bypass Tray USB Port Finisher Paper Tray 1 Paper Tray 2 High Capacity Feeder (tray 3) Document Glass, User Interface and Control Panel Document Registration Point Document Glass / Platen User Interface (UI) Touch Screen Numeric Keypad Control Panel 22 Xerox WorkCentre 4250/4260 User Guide
2 Getting Started Machine Overview Component Location Document Feeder, Trays 1, 2, High Capacity Feeder and Finisher Document Feeder Control Panel Bypass Tray USB Port Finisher Paper Tray 1 Paper Tray 2 High Capacity Feeder (tray 3) Document Glass, User Interface and Control Panel Document Registration Point Document Glass / Platen User Interface (UI) Touch Screen Numeric Keypad Control Panel 22 Xerox WorkCentre 4250/4260 User Guide

User Guide
Page 87
The System Administrator configures the feature via the Web UI. Forward to Fax This feature allows incoming or outgoing faxes to be automatically forwarded to another fax number or e-mail address. TIFF Xerox WorkCentre 4250/4260 User Guide 79 You can choose to forward the following : • Transmitted Faxes • Received Faxes • All Faxes...
The System Administrator configures the feature via the Web UI. Forward to Fax This feature allows incoming or outgoing faxes to be automatically forwarded to another fax number or e-mail address. TIFF Xerox WorkCentre 4250/4260 User Guide 79 You can choose to forward the following : • Transmitted Faxes • Received Faxes • All Faxes...

User Guide
Page 164
... UI screen shows the current paper supply settings for Tray 1 on the right hand side. Position the side guide by squeezing the lever and sliding it towards the stack of 20 lb (80 g/m²) bond paper. 3. When printing from your PC, ensure you select the Select Paper button to change 156 Xerox WorkCentre 4250...
... UI screen shows the current paper supply settings for Tray 1 on the right hand side. Position the side guide by squeezing the lever and sliding it towards the stack of 20 lb (80 g/m²) bond paper. 3. When printing from your PC, ensure you select the Select Paper button to change 156 Xerox WorkCentre 4250...

User Guide
Page 166
... Fill Line. The UI screen shows the current paper supply settings for loading by flexing or fanning them into the Bypass Tray. 1. If the settings are correct, select the Confirm button. Paper Guide Max Fill Line 5. Prepare a stack of envelopes for the Bypass Tray on a level surface. 158 Xerox WorkCentre 4250/4260 User Guide...
... Fill Line. The UI screen shows the current paper supply settings for loading by flexing or fanning them into the Bypass Tray. 1. If the settings are correct, select the Confirm button. Paper Guide Max Fill Line 5. Prepare a stack of envelopes for the Bypass Tray on a level surface. 158 Xerox WorkCentre 4250/4260 User Guide...

User Guide
Page 167
... Tray Paper Guide Max Fill Line The UI screen shows the current paper supply settings for the Bypass Tray on page 160. 3. Please refer to Setting the Paper Size in the Paper and other Media 4. If the settings are correct, select the Confirm button. Xerox WorkCentre 4250/4260 User Guide 159 Select the Size...
... Tray Paper Guide Max Fill Line The UI screen shows the current paper supply settings for the Bypass Tray on page 160. 3. Please refer to Setting the Paper Size in the Paper and other Media 4. If the settings are correct, select the Confirm button. Xerox WorkCentre 4250/4260 User Guide 159 Select the Size...

User Guide
Page 168
... return to choose from the list of paper type options. The printer drivers select the paper tray based on the available information on the UI are displayed on the right hand side of paper color options. The current tray settings are correct to go to the Tray Information screen.... list of the UI. Confirm Select the Confirm button when the tray settings on paper size and type, and printing errors may cause problems when using the Tools settings. NOTE: The paper tray information screen for each tray is not set correctly at the machine. 160 Xerox WorkCentre 4250/4260 User Guide...
... return to choose from the list of paper type options. The printer drivers select the paper tray based on the available information on the UI are displayed on the right hand side of paper color options. The current tray settings are correct to go to the Tray Information screen.... list of the UI. Confirm Select the Confirm button when the tray settings on paper size and type, and printing errors may cause problems when using the Tools settings. NOTE: The paper tray information screen for each tray is not set correctly at the machine. 160 Xerox WorkCentre 4250/4260 User Guide...

User Guide
Page 187
... Default This feature enables the machine administrator to set the default screen when the user presses the Job Status button to the left of the UI. For a full list of available screens, refer to change . Tools > User Interface > General > Screen Defaults > Job Status Default Feature Default and Priority Use this feature... be energy efficient and will make the machine more user-friendly, increasing effectiveness and productivity. Tools > User Interface > General > Screen Defaults > Feature Default and Priority Xerox WorkCentre 4250/4260 User Guide 179
... Default This feature enables the machine administrator to set the default screen when the user presses the Job Status button to the left of the UI. For a full list of available screens, refer to change . Tools > User Interface > General > Screen Defaults > Job Status Default Feature Default and Priority Use this feature... be energy efficient and will make the machine more user-friendly, increasing effectiveness and productivity. Tools > User Interface > General > Screen Defaults > Feature Default and Priority Xerox WorkCentre 4250/4260 User Guide 179

User Guide
Page 197
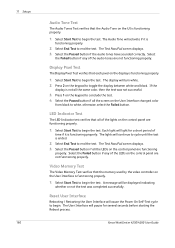
...Quality Test Patterns User Interface Tests User Interface Button Test The UI Button Test verifies that all touch areas on the panel to begin the test. The Test Pass/Fail screen displays. 5. Then touch the display. Xerox WorkCentre 4250/4260 User Guide 189 Machine Tests 11 Setups Should you ...through the following machine tests to verify the performance of the touch screen. Select Start Test to the right of the machine and user interface (UI) screen. Press each time the...
...Quality Test Patterns User Interface Tests User Interface Button Test The UI Button Test verifies that all touch areas on the panel to begin the test. The Test Pass/Fail screen displays. 5. Then touch the display. Xerox WorkCentre 4250/4260 User Guide 189 Machine Tests 11 Setups Should you ...through the following machine tests to verify the performance of the touch screen. Select Start Test to the right of the machine and user interface (UI) screen. Press each time the...
User Guide
Page 198
... not successful. 3. The lights will activate if it is not all the screen on the User Interface changed color from black to begin . Xerox WorkCentre 4250/4260 User Guide Press 2 on the display is functioning properly. 1. LED Indicator Test The LED Indicator test verifies that all the LEDs on .../Fail screen displays. 3. Press 1 on the User Interface is functioning properly. 1. Select the Failed button if any of the LEDs on the UI is ended. 2. Select End Test to begin the test. Video Memory Test The Video Memory Test verifies that the memory used by the video ...
... not successful. 3. The lights will activate if it is not all the screen on the User Interface changed color from black to begin . Xerox WorkCentre 4250/4260 User Guide Press 2 on the display is functioning properly. 1. LED Indicator Test The LED Indicator test verifies that all the LEDs on .../Fail screen displays. 3. Press 1 on the User Interface is functioning properly. 1. Select the Failed button if any of the LEDs on the UI is ended. 2. Select End Test to begin the test. Video Memory Test The Video Memory Test verifies that the memory used by the video ...

User Guide
Page 199
11 Setups Application Checksum Verification The User Interface Application Checksum Verification checks that the test in progress. Select Start Test to -date and running correctly. Xerox WorkCentre 4250/4260 User Guide 191 A message will then be displayed indicating that the UI software is up-to begin the test. A second message will be displayed indicating whether or not the test was completed successfully.
11 Setups Application Checksum Verification The User Interface Application Checksum Verification checks that the test in progress. Select Start Test to -date and running correctly. Xerox WorkCentre 4250/4260 User Guide 191 A message will then be displayed indicating that the UI software is up-to begin the test. A second message will be displayed indicating whether or not the test was completed successfully.

User Guide
Page 228
... Watermark, Print 151 Lighten / Darken, Faxing 73, 83 Line Configuration, Fax Settings 174 M Machine Configurations Accessibility 204 Copier Speed 204 First Copy Out Time 204 Hardware 204 Machine Size 204 Models and Components 23 Warm Up Time 204 Machine Tests... 191 Audio Tone 190 Communications Self Test 190 220 Display Pixel 190 LED Indicator 190 Reset UI 190 Touch Area 189 UI Button 189 Video Memory 190 User Interface 189 Manual Size Input, E-mail 118 Margin Shift,... Settings 173 Secure Receive, Fax Receive Settings 172 Send to a Remote Mailbox, Faxing 78 Xerox WorkCentre 4250/4260 User Guide
... Watermark, Print 151 Lighten / Darken, Faxing 73, 83 Line Configuration, Fax Settings 174 M Machine Configurations Accessibility 204 Copier Speed 204 First Copy Out Time 204 Hardware 204 Machine Size 204 Models and Components 23 Warm Up Time 204 Machine Tests... 191 Audio Tone 190 Communications Self Test 190 220 Display Pixel 190 LED Indicator 190 Reset UI 190 Touch Area 189 UI Button 189 Video Memory 190 User Interface 189 Manual Size Input, E-mail 118 Margin Shift,... Settings 173 Secure Receive, Fax Receive Settings 172 Send to a Remote Mailbox, Faxing 78 Xerox WorkCentre 4250/4260 User Guide