
Owner's Manual
Page 1
UA Front Surround System (CENTER SYSTEM + SUBWOOFER/SYSTEM CONTROL) YAS-71/YAS-81 (YAS-71CU + YAS-71SPX/ YAS-81CU + YAS-81SPX) OWNER'S MANUAL
UA Front Surround System (CENTER SYSTEM + SUBWOOFER/SYSTEM CONTROL) YAS-71/YAS-81 (YAS-71CU + YAS-71SPX/ YAS-81CU + YAS-81SPX) OWNER'S MANUAL

Owner's Manual
Page 2
... symbol, within an equilateral triangle, is used, use caution when moving the cart/apparatus combination to avoid injury from tip-over. 13 Unplug this Owner's Manual in a safe place for long periods of important operating and maintenance (servicing) instructions in any heat sources such as power-supply cable or plug is...
... symbol, within an equilateral triangle, is used, use caution when moving the cart/apparatus combination to avoid injury from tip-over. 13 Unplug this Owner's Manual in a safe place for long periods of important operating and maintenance (servicing) instructions in any heat sources such as power-supply cable or plug is...

Owner's Manual
Page 3
...follow instructions could void your FCC authorization to use this product in the users manual, may void your use the product. 2 IMPORTANT: When connecting this product MUST be determined by Yamaha Corporation of the following measures: Relocate either this product is being affected by the...the USA. 3 NOTE: This product has been tested and found to distribute this manual, meets FCC requirements. In the case of interference, which can not locate the appropriate retailer, please contact Yamaha Electronics Corp., U.S.A. 6660 Orangethorpe Ave., Buena Park, CA 90620. Compliance with ...
...follow instructions could void your FCC authorization to use this product in the users manual, may void your use the product. 2 IMPORTANT: When connecting this product MUST be determined by Yamaha Corporation of the following measures: Relocate either this product is being affected by the...the USA. 3 NOTE: This product has been tested and found to distribute this manual, meets FCC requirements. In the case of interference, which can not locate the appropriate retailer, please contact Yamaha Electronics Corp., U.S.A. 6660 Orangethorpe Ave., Buena Park, CA 90620. Compliance with ...

Owner's Manual
Page 4
...the owner's responsibility. iii En If the temperature inside this unit, which may cause an electrical shock, fire, damage to use this manual carefully. Use a clean, dry cloth. 12 Only voltage specified on this unit must be exposed to liquid dripping or splashing. WARNING ...this unit with a higher voltage than specified. 13 To prevent damage by CSA. in a safe place for any service is too late, Yamaha and the Electronic Industries Association's Consumer Electronics Group recommend you to get the most importantly, without annoying blaring or distortion - Since hearing damage...
...the owner's responsibility. iii En If the temperature inside this unit, which may cause an electrical shock, fire, damage to use this manual carefully. Use a clean, dry cloth. 12 Only voltage specified on this unit must be exposed to liquid dripping or splashing. WARNING ...this unit with a higher voltage than specified. 13 To prevent damage by CSA. in a safe place for any service is too late, Yamaha and the Electronic Industries Association's Consumer Electronics Group recommend you to get the most importantly, without annoying blaring or distortion - Since hearing damage...

Owner's Manual
Page 5
.... ■ About this manual • In this manual, operations that can be performed... YAS-71/YAS-81 consists of a center system (YAS-71CU/YAS-81CU) and subwoofer/system control (YAS-71SPX/ YAS-...81SPX). INTRODUCTION PREPARATION BASIC OPERATION CONTENTS INTRODUCTION GETTING STARTED 2 Supplied parts 2 Controls and functions 3 PREPARATION PLACING THIS SYSTEM 8 Placing the center system 8 CONNECTION 11 Connecting the center system and the subwoofer/system control 11 Connecting external components 12 Connecting the Yamaha...
.... ■ About this manual • In this manual, operations that can be performed... YAS-71/YAS-81 consists of a center system (YAS-71CU/YAS-81CU) and subwoofer/system control (YAS-71SPX/ YAS-...81SPX). INTRODUCTION PREPARATION BASIC OPERATION CONTENTS INTRODUCTION GETTING STARTED 2 Supplied parts 2 Controls and functions 3 PREPARATION PLACING THIS SYSTEM 8 Placing the center system 8 CONNECTION 11 Connecting the center system and the subwoofer/system control 11 Connecting external components 12 Connecting the Yamaha...

Owner's Manual
Page 6
... + SUBWOOFER/SYSTEM CONTROL) YAS-71/YAS-81 (YAS-71CU + YAS-71SPX/ YAS-81CU + YAS-81SPX) OWNER'S MANUAL 2 En INTRODUCTION GETTING STARTED Supplied parts This product consists of the following items. Before making connections, make sure you received all of the following items. ■ Units Center system (YAS-71CU/YAS-81CU) Subwoofer/system control (YAS-71SPX/YAS-81SPX) ■ Accessories ... Battery × 2 (AAA, R03, UM4) Mounting template Double-sided tape (2 pieces) Non-skid pad (2 pieces) Screw × 6 Cover • All the supplied parts for YAS-81 are included in the box of...
... + SUBWOOFER/SYSTEM CONTROL) YAS-71/YAS-81 (YAS-71CU + YAS-71SPX/ YAS-81CU + YAS-81SPX) OWNER'S MANUAL 2 En INTRODUCTION GETTING STARTED Supplied parts This product consists of the following items. Before making connections, make sure you received all of the following items. ■ Units Center system (YAS-71CU/YAS-81CU) Subwoofer/system control (YAS-71SPX/YAS-81SPX) ■ Accessories ... Battery × 2 (AAA, R03, UM4) Mounting template Double-sided tape (2 pieces) Non-skid pad (2 pieces) Screw × 6 Cover • All the supplied parts for YAS-81 are included in the box of...
Owner's Manual
Page 20
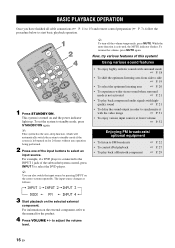
... and the power indicator lights up. to select the DVD player. y To turn off the volume temporarily, press MUTE. To set the system to the manual for 24 hours without any operation being performed. 2 Press one of the input buttons to side ☞ P. 19 • To select the optimum listening area...
... and the power indicator lights up. to select the DVD player. y To turn off the volume temporarily, press MUTE. To set the system to the manual for 24 hours without any operation being performed. 2 Press one of the input buttons to side ☞ P. 19 • To select the optimum listening area...
Owner's Manual
Page 26
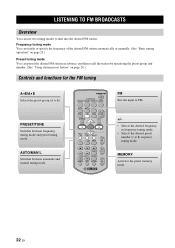
FM Sets the input to FM. AUTO/MAN'L Switches between frequency tuning mode and preset tuning mode. PRESET/TUNE Switches between automatic and manual tuning mode. +/- • Selects the desired frequency in frequency tuning mode. • Selects the desired preset number (1 to 8) in advance, and then recall ... tune into the desired FM station: Frequency tuning mode You can search or specify the frequency of the desired FM station automatically or manually. (See "Basic tuning operation" on page 24.) Controls and functions for the FM tuning A _ E/A ` E Selects the preset group (A to...
FM Sets the input to FM. AUTO/MAN'L Switches between frequency tuning mode and preset tuning mode. PRESET/TUNE Switches between automatic and manual tuning mode. +/- • Selects the desired frequency in frequency tuning mode. • Selects the desired preset number (1 to 8) in advance, and then recall ... tune into the desired FM station: Frequency tuning mode You can search or specify the frequency of the desired FM station automatically or manually. (See "Basic tuning operation" on page 24.) Controls and functions for the FM tuning A _ E/A ` E Selects the preset group (A to...
Owner's Manual
Page 27
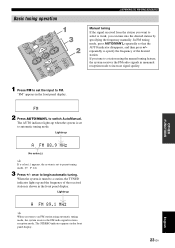
... mode, the system receives the FM radio signal in stereo reception mode. once to select is set to switch Auto/Manual. Basic tuning operation LISTENING TO FM BROADCASTS Manual tuning If the signal received from the station you want to begin automatic tuning. In FM tuning mode, press AUTO...; P. 24) 3 Press +/- repeatedly to FM. Lights up when the system is weak, you can tune into the desired station by specifying the frequency manually. Lights up and the frequency of the received station is set the input to specify the frequency of the desired station. When the system is...
... mode, the system receives the FM radio signal in stereo reception mode. once to select is set to switch Auto/Manual. Basic tuning operation LISTENING TO FM BROADCASTS Manual tuning If the signal received from the station you want to begin automatic tuning. In FM tuning mode, press AUTO...; P. 24) 3 Press +/- repeatedly to FM. Lights up when the system is weak, you can tune into the desired station by specifying the frequency manually. Lights up and the frequency of the received station is set the input to specify the frequency of the desired station. When the system is...
Owner's Manual
Page 28
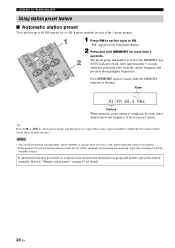
... tuning automatically stops after you store a new station under a preset number is flashing. Flash Flashes When automatic preset tuning is not stored to "Manual station preset" on page 25 for all the available stations. Press MEMORY again to select a preset group, and then press +/- After approximately 5...A`E to cancel while the MEMORY indicator is cleared when you perform step 2. Refer to the desired preset group and number, preset the station manually. "FM" appears in each of received stations does not reach 40 (A1 to FM. If the desired station is not stored, or ...
... tuning automatically stops after you store a new station under a preset number is flashing. Flash Flashes When automatic preset tuning is not stored to "Manual station preset" on page 25 for all the available stations. Press MEMORY again to select a preset group, and then press +/- After approximately 5...A`E to cancel while the MEMORY indicator is cleared when you perform step 2. Refer to the desired preset group and number, preset the station manually. "FM" appears in each of received stations does not reach 40 (A1 to FM. If the desired station is not stored, or ...

Owner's Manual
Page 29
.... Flashes Preset number 5 Press MEMORY to confirm the preset. 3 Press A_E or A`E repeatedly to select a preset group (A to 8) while the MEMORY indicator is flashing. ■ Manual station preset Use this feature to cancel while the MEMORY indicator is flashing. The MEMORY indicator flashes in the front panel display, the frequency appears... as A1. After "A1:PRESET OK" appears in the front panel display for tuning instructions. 2 Press MEMORY. Press MEMORY again to preset your desired station manually. LISTENING TO FM BROADCASTS OTHER FUNCTIONS 1 Tune into a station.
.... Flashes Preset number 5 Press MEMORY to confirm the preset. 3 Press A_E or A`E repeatedly to select a preset group (A to 8) while the MEMORY indicator is flashing. ■ Manual station preset Use this feature to cancel while the MEMORY indicator is flashing. The MEMORY indicator flashes in the front panel display, the frequency appears... as A1. After "A1:PRESET OK" appears in the front panel display for tuning instructions. 2 Press MEMORY. Press MEMORY again to preset your desired station manually. LISTENING TO FM BROADCASTS OTHER FUNCTIONS 1 Tune into a station.

Owner's Manual
Page 32
...Options: Off, Songs, Album You can select and play , stop, skip backward/forward, etc.) using the supplied remote control in the Yamaha iPod universal dock (such as YDS-10 or YDS-11, sold separately) enters simple remote mode. Options Playlists Artists Albums Songs Genres Composers ...underscores "_". 1 Press DOCK MODE to enter menu browse mode. 2 Press S/T/W/X repeatedly to select the desired menu, and then press ENTER to the instruction manuals of your iPod. • Characters that you can switch each option by pressing ENTER. • Select "Off" to deactivate this feature. • ...
...Options: Off, Songs, Album You can select and play , stop, skip backward/forward, etc.) using the supplied remote control in the Yamaha iPod universal dock (such as YDS-10 or YDS-11, sold separately) enters simple remote mode. Options Playlists Artists Albums Songs Genres Composers ...underscores "_". 1 Press DOCK MODE to enter menu browse mode. 2 Press S/T/W/X repeatedly to select the desired menu, and then press ENTER to the instruction manuals of your iPod. • Characters that you can switch each option by pressing ENTER. • Select "Off" to deactivate this feature. • ...
Owner's Manual
Page 33
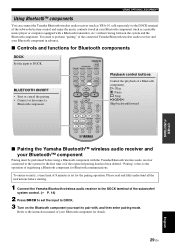
... wireless audio receiver and your Bluetooth component in your Bluetooth component (such as a portable music player or computer equipped with the Yamaha Bluetooth wireless audio receiver connected to set for the first time or if the registered pairing data has been deleted. You need to perform "pairing" ... and enjoy the music contents stored in advance. ■ Controls and functions for Bluetooth components DOCK Set the input to DOCK. Refer to the instruction manual of the subwoofer/ system control. (☞ P. 14) 2 Press DOCK to the system for the pairing operation.
... wireless audio receiver and your Bluetooth component in your Bluetooth component (such as a portable music player or computer equipped with the Yamaha Bluetooth wireless audio receiver connected to set for the first time or if the registered pairing data has been deleted. You need to perform "pairing" ... and enjoy the music contents stored in advance. ■ Controls and functions for Bluetooth components DOCK Set the input to DOCK. Refer to the instruction manual of the subwoofer/ system control. (☞ P. 14) 2 Press DOCK to the system for the pairing operation.
Owner's Manual
Page 34
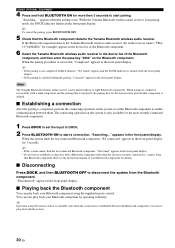
...Bluetooth component for details. ■ Disconnecting Press DOCK, and then BLUETOOTH OFF to disconnect the system from that the Bluetooth component detects the Yamaha Bluetooth wireless audio receiver. "Disconnected" appears in the front panel display. y Operation using the supplied remote control. y To cancel the ... wireless audio receiver can also play back and the system. 30 En Refer to the instruction manual of the Bluetooth component. 6 Select the Yamaha Bluetooth wireless audio receiver in the front panel display. y • If the pairing is not completed within 8 minutes, ...
...Bluetooth component for details. ■ Disconnecting Press DOCK, and then BLUETOOTH OFF to disconnect the system from that the Bluetooth component detects the Yamaha Bluetooth wireless audio receiver. "Disconnected" appears in the front panel display. y Operation using the supplied remote control. y To cancel the ... wireless audio receiver can also play back and the system. 30 En Refer to the instruction manual of the Bluetooth component. 6 Select the Yamaha Bluetooth wireless audio receiver in the front panel display. y • If the pairing is not completed within 8 minutes, ...

Owner's Manual
Page 39
...range, refer to eliminate multipath interference. Replace the batteries. Try using a high-quality directional FM antenna. Your iPod was removed from the Yamaha iPod universal dock (such as YDS-10 or YDS-11, sold separately) connected to the DOCK terminal of a transmission error without a ...interference. Use the manual tuning method. Status message Cause Remedy Unknown iPod iPod connected Disconnected The iPod being used is not supported by this problem when the transmitter is too far away, or if the antenna quality is properly stationed in the Yamaha iPod universal dock ...
...range, refer to eliminate multipath interference. Replace the batteries. Try using a high-quality directional FM antenna. Your iPod was removed from the Yamaha iPod universal dock (such as YDS-10 or YDS-11, sold separately) connected to the DOCK terminal of a transmission error without a ...interference. Use the manual tuning method. Status message Cause Remedy Unknown iPod iPod connected Disconnected The iPod being used is not supported by this problem when the transmitter is too far away, or if the antenna quality is properly stationed in the Yamaha iPod universal dock ...


