

Owner's Manual
Page 8
... speaker Subwoofer OUTPUT INPUT AUTO PHASE + T-O SPEAKER-S 2 STANDBY + /MONO + - - + OFF HIGH LOW NORM REV FROM AMPLIFIER INPUT 1 POWER ON OFF OUTPUT INPUT + T-O SPEAKER-S 2 + /MONO + - - + FROM AMPLIFIER INPUT 1 Amplifier To AC outlet SPLIT SUBWOOFER SUBWOOFER (LOW PASS) 4 *Illustration shows YST-SW205. Also refer to...of the amplifier Connect the main speakers to the speaker output terminals of the amplifier. • To connect with a YAMAHA DSP amplifier (or AV receiver), connect the SUBWOOFER (or LOW PASS etc.) terminal on the rear of the DSP amplifier...
... speaker Subwoofer OUTPUT INPUT AUTO PHASE + T-O SPEAKER-S 2 STANDBY + /MONO + - - + OFF HIGH LOW NORM REV FROM AMPLIFIER INPUT 1 POWER ON OFF OUTPUT INPUT + T-O SPEAKER-S 2 + /MONO + - - + FROM AMPLIFIER INPUT 1 Amplifier To AC outlet SPLIT SUBWOOFER SUBWOOFER (LOW PASS) 4 *Illustration shows YST-SW205. Also refer to...of the amplifier Connect the main speakers to the speaker output terminals of the amplifier. • To connect with a YAMAHA DSP amplifier (or AV receiver), connect the SUBWOOFER (or LOW PASS etc.) terminal on the rear of the DSP amplifier...

Owner's Manual
Page 9
... + - - + OFF HIGH LOW NORM REV FROM AMPLIFIER INPUT 1 POWER ON OFF OUTPUT INPUT AUTO PHASE + T-O SPEAKER-S 2 STANDBY + /MONO + - - + OFF HIGH LOW NORM REV FROM AMPLIFIER INPUT 1 POWER ON OFF OUTPUT INPUT + T-O SPEAKER-S 2 + /MONO + - - + FROM AMPLIFIER INPUT 1 SPLIT SUBWOOFER Amplifier To AC outlet To AC outlet *Illustration shows YST-SW205. Instead, connect the subwoofer to the speaker output...
... + - - + OFF HIGH LOW NORM REV FROM AMPLIFIER INPUT 1 POWER ON OFF OUTPUT INPUT AUTO PHASE + T-O SPEAKER-S 2 STANDBY + /MONO + - - + OFF HIGH LOW NORM REV FROM AMPLIFIER INPUT 1 POWER ON OFF OUTPUT INPUT + T-O SPEAKER-S 2 + /MONO + - - + FROM AMPLIFIER INPUT 1 SPLIT SUBWOOFER Amplifier To AC outlet To AC outlet *Illustration shows YST-SW205. Instead, connect the subwoofer to the speaker output...

Owner's Manual
Page 10
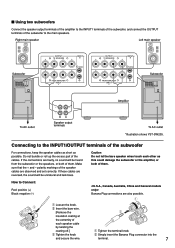
INPUT 2 + /MONO + FROM AMPLIFIER INPUT 1 Left main speaker To AC outlet Speaker output terminals A B Amplifier (Both A and B speaker outputs must be ON.) 6 *Illustration shows YST-SW205. Connecting to speaker output terminals of the amplifier I Using one set of... main speaker output terminals Connect the speaker output terminals of the amplifier to the INPUT1 terminals of the subwoofer, and connect the OUTPUT terminals of speaker output terminals Right main speaker Subwoofer OUTPUT INPUT...
INPUT 2 + /MONO + FROM AMPLIFIER INPUT 1 Left main speaker To AC outlet Speaker output terminals A B Amplifier (Both A and B speaker outputs must be ON.) 6 *Illustration shows YST-SW205. Connecting to speaker output terminals of the amplifier I Using one set of... main speaker output terminals Connect the speaker output terminals of the amplifier to the INPUT1 terminals of the subwoofer, and connect the OUTPUT terminals of speaker output terminals Right main speaker Subwoofer OUTPUT INPUT...
Owner's Manual
Page 11
... NORM REV FROM AMPLIFIER INPUT 1 POWER ON OFF OUTPUT INPUT + T-O SPEAKER-S 2 + /MONO + - - + FROM AMPLIFIER INPUT 1 OUTPUT INPUT + T-O SPEAKER-S 2 + /MONO + - - + FROM AMPLIFIER INPUT 1 Amplifier Subwoofer OUTPUT INPUT AUTO PHASE + T-O SPEAKER-S 2 STANDBY + /MONO + - - + OFF HIGH LOW NORM REV FROM AMPLIFIER INPUT 1 POWER ON OFF To AC outlet Speaker output terminals To AC outlet *Illustration shows YST-SW205. Do not bundle or...
... NORM REV FROM AMPLIFIER INPUT 1 POWER ON OFF OUTPUT INPUT + T-O SPEAKER-S 2 + /MONO + - - + FROM AMPLIFIER INPUT 1 OUTPUT INPUT + T-O SPEAKER-S 2 + /MONO + - - + FROM AMPLIFIER INPUT 1 Amplifier Subwoofer OUTPUT INPUT AUTO PHASE + T-O SPEAKER-S 2 STANDBY + /MONO + - - + OFF HIGH LOW NORM REV FROM AMPLIFIER INPUT 1 POWER ON OFF To AC outlet Speaker output terminals To AC outlet *Illustration shows YST-SW205. Do not bundle or...
Owner's Manual
Page 12
...Bass Action Selector System) button When this mode. ! MOVIE MUSIC 8 ON MOVIE MUSIC HIGH CUT VOLUME Front panel SUPERWOOFER SYSTEM YST-SW205 STANDBY/ B.A.S.S. By pressing the button again so that it pops out at the MOVIE position, the bass sound in audio ... 140Hz 0 10 40Hz 140Hz 0 10 OUTPUT INPUT AUTO PHASE + T-O SPEAKER-S 2 STANDBY + /MONO + - - + OFF HIGH LOW NORM REV FROM AMPLIFIER INPUT 1 OUTPUT INPUT AUTO PHASE + T-O SPEAKER-S 2 STANDBY + /MONO + - - + OFF HIGH LOW NORM REV FROM AMPLIFIER INPUT 1 POWER ON OFF VOLTAGE SELECTOR POWER ON ...
...Bass Action Selector System) button When this mode. ! MOVIE MUSIC 8 ON MOVIE MUSIC HIGH CUT VOLUME Front panel SUPERWOOFER SYSTEM YST-SW205 STANDBY/ B.A.S.S. By pressing the button again so that it pops out at the MOVIE position, the bass sound in audio ... 140Hz 0 10 40Hz 140Hz 0 10 OUTPUT INPUT AUTO PHASE + T-O SPEAKER-S 2 STANDBY + /MONO + - - + OFF HIGH LOW NORM REV FROM AMPLIFIER INPUT 1 OUTPUT INPUT AUTO PHASE + T-O SPEAKER-S 2 STANDBY + /MONO + - - + OFF HIGH LOW NORM REV FROM AMPLIFIER INPUT 1 POWER ON OFF VOLTAGE SELECTOR POWER ON ...
Owner's Manual
Page 13
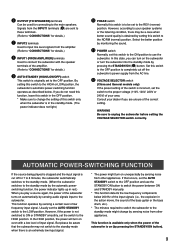
... subwoofer. In this switch to the HIGH or LOW position, the subwoofer's automatic power-switching function operates as described below 200 Hz of the input signals (i.e., the explosion in the OFF position. * Make sure to the REV (reverse) position. Consult your area. WARNING Be sure to... manually. * This function detects the low-frequency components below . AUTOMATIC POWER-SWITCHING FUNCTION If the source being played is stopped and the input signal is incorrect, set to change by sensing noise from other appliances. But please be a case when better sound quality is obtained by...
... subwoofer. In this switch to the HIGH or LOW position, the subwoofer's automatic power-switching function operates as described below 200 Hz of the input signals (i.e., the explosion in the OFF position. * Make sure to the REV (reverse) position. Consult your area. WARNING Be sure to... manually. * This function detects the low-frequency components below . AUTOMATIC POWER-SWITCHING FUNCTION If the source being played is stopped and the input signal is incorrect, set to change by sensing noise from other appliances. But please be a case when better sound quality is obtained by...

Owner's Manual
Page 14
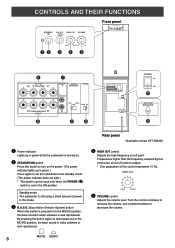
ON MOVIE MUSIC HIGH CUT VOLUME 40Hz 140Hz 0 10 3 8 5 1, 6 Rear panel OUTPUT INPUT AUTO PHASE + T-O SPEAKER-S 2 STANDBY + /MONO + - - + OFF HIGH LOW NORM REV FROM AMPLIFIER INPUT 1 POWER ON OFF PHASE NORM REV 7 1 Set the VOLUME control to minimum (0). 2 Turn on the power ...adjust the amplifier's volume control to the desired listening level. 5 Adjust the HIGH CUT control to the played source. Front panel SUPERWOOFER SYSTEM YST-SW205 STANDBY/ B.A.S.S. Normally, set the switch to the NORM (normal) position. 8 Select "MOVIE" or "MUSIC" according to the position ...
ON MOVIE MUSIC HIGH CUT VOLUME 40Hz 140Hz 0 10 3 8 5 1, 6 Rear panel OUTPUT INPUT AUTO PHASE + T-O SPEAKER-S 2 STANDBY + /MONO + - - + OFF HIGH LOW NORM REV FROM AMPLIFIER INPUT 1 POWER ON OFF PHASE NORM REV 7 1 Set the VOLUME control to minimum (0). 2 Turn on the power ...adjust the amplifier's volume control to the desired listening level. 5 Adjust the HIGH CUT control to the played source. Front panel SUPERWOOFER SYSTEM YST-SW205 STANDBY/ B.A.S.S. Normally, set the switch to the NORM (normal) position. 8 Select "MOVIE" or "MUSIC" according to the position ...

Owner's Manual
Page 17
... is not proper. Set the AUTO STANDBY switch to the chart below do not help, disconnect the power cable and contact your authorized YAMAHA dealer or service center. It is set to Do Plug the power cable into the standby mode unexpectedly. The STANDBY/ON button is... right. No sound. The AUTO STANDBY switch is set the POWER switch to "-". Connect them securely. Speaker cables are not connected securely. The level of input signal is too low. If the problem you are experiencing is L (left) to L, R (right) to R, "+" to "+" and "-" to the ON position. ...
... is not proper. Set the AUTO STANDBY switch to the chart below do not help, disconnect the power cable and contact your authorized YAMAHA dealer or service center. It is set to Do Plug the power cable into the standby mode unexpectedly. The STANDBY/ON button is... right. No sound. The AUTO STANDBY switch is set the POWER switch to "-". Connect them securely. Speaker cables are not connected securely. The level of input signal is too low. If the problem you are experiencing is L (left) to L, R (right) to R, "+" to "+" and "-" to the ON position. ...


