
Dell XPS One 2710 Support Question
Dell XPS One 2710 Support Question
Find answers below for this question about Dell XPS One 2710.Need a Dell XPS One 2710 manual? We have 2 online manuals for this item!
Question posted by leelwach on September 2nd, 2014
How To Repair Xps One 2710 Touch Pannel Not Working
The person who posted this question about this Dell product did not include a detailed explanation. Please use the "Request More Information" button to the right if more details would help you to answer this question.
Current Answers
Related Dell XPS One 2710 Manual Pages
Owner's Manual (PDF) - Page 1

Dell XPS One 2710 Owner's Manual
Computer model: XPS One 2710 Regulatory model: W06C | Regulatory type: W06C001
Owner's Manual (PDF) - Page 2

... if instructions are not followed. Intel® is a registered trademark and Intel SpeedStep™ is used in this text: Dell™, the DELL logo, and XPS One™ are either the entities claiming the marks and names or their products. Information in this document to refer to hardware or loss of...
Owner's Manual (PDF) - Page 3
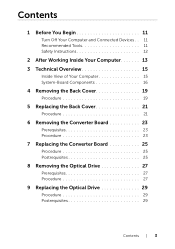
Contents
1 Before You Begin 11
Turn Off Your Computer and Connected Devices . . 11 Recommended Tools 11 Safety Instructions 12
2 After Working Inside Your Computer 13 3 Technical Overview 15
Inside View of Your Computer 15 System-Board Components 16
4 Removing the Back Cover 19
Procedure 19
5 Replacing ...
Owner's Manual (PDF) - Page 12
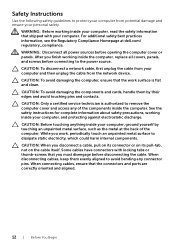
... and ports are correctly oriented and aligned.
12 | Before You Begin When connecting cables, ensure that the work , periodically touch an unpainted metal surface to dissipate static electricity, which could harm internal components. WARNING: Before working inside the computer, replace all power sources before opening the computer cover or panels. WARNING: Disconnect all...
Owner's Manual (PDF) - Page 13
... electrical outlets
CAUTION: Before turning on your computer.
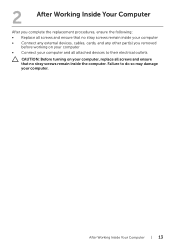
After Working Inside Your Computer | 13 2
After Working Inside Your Computer
After you complete the replacement procedures, ensure... • Connect any external devices, cables, cards, and any other part(s) you removed
before working on your computer • Connect your computer and all attached devices to do so may damage your...
Owner's Manual (PDF) - Page 15
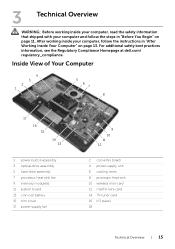
... your computer, read the safety information that shipped with your computer, follow the steps in "After Working Inside Your Computer" on page 11. After working inside your computer and follow the instructions in "Before You Begin" on page 13. Inside View of Your Computer
4
3 2 1
5 6 7
8
17 16 15
14 13
1 power-...
Owner's Manual (PDF) - Page 19

4
Removing the Back Cover
WARNING: Before working inside your computer, read the safety information that secure the back cover to ... surface.
2 Loosen the captive screws that shipped with your computer, follow the steps in "After Working Inside Your Computer" on page 11.
After working inside your computer and follow the instructions in "Before You Begin" on page 13. For additional ...
Owner's Manual (PDF) - Page 21

For additional safety best practices information, see the Regulatory Compliance Homepage at dell.com/ regulatory_compliance. Replacing the Back Cover | 21
After working inside your computer and follow the instructions in "Before You Begin" on page 13. Procedure
1 Place the back cover over the inner frame and slide ...
Owner's Manual (PDF) - Page 23

... "Before You Begin" on page 19. Prerequisites
1 Remove the back cover.
See "Removing the Back Cover" on page 11. 6
Removing the Converter Board
WARNING: Before working inside your computer, read the safety information that secure the converter board to the computer base. 4 Lift the converter board off the computer base.
1
2
4
1 screws...
Owner's Manual (PDF) - Page 25

... the instructions in "Before You Begin" on page 11. Replacing the Converter Board | 25
Postrequisites
1 Replace the back cover. 7
Replacing the Converter Board
WARNING: Before working inside your computer, read the safety information that secure the converter board to the computer base. 3 Connect the converter cable to the converter board. 4 Connect...
Owner's Manual (PDF) - Page 27

... with your computer and follow the instructions in "Before You Begin" on page 11. After working inside your computer, follow the steps in "After Working Inside Your Computer" on page 19.
8
Removing the Optical Drive
WARNING: Before working inside your computer, read the safety information that secure the optical-drive assembly to the...
Owner's Manual (PDF) - Page 29

... the optical-drive brackets to the optical drive.
2 Connect the power and data-cable connector to the computer base. 9
Replacing the Optical Drive
WARNING: Before working inside your computer, read the safety information that secure the optical-drive assembly to the optical-drive assembly. 3 Align the screw holes on the optical...
Owner's Manual (PDF) - Page 31

... back cover.
For additional safety best practices information, see the Regulatory Compliance Homepage at dell.com/ regulatory_compliance.
10 Removing the System-Board Shield
WARNING: Before working inside your computer and follow the instructions in "Before You Begin" on page 19. Procedure
1 Remove the screws that shipped with your computer, read the...
Owner's Manual (PDF) - Page 33

... System-Board Shield | 33 11 Replacing the System-Board Shield
WARNING: Before working inside your computer and follow the instructions in "Before You Begin" on page...the safety information that secure the system-board shield to the computer base. After working inside your computer, follow the steps in "After Working Inside Your Computer" on page 21. See "Replacing the Back Cover" on ...
Owner's Manual (PDF) - Page 35

12 Removing the Power-Supply Unit
WARNING: Before working inside your computer, read the safety information that secure the power-supply unit to the ... unit. 6 Remove the screws that shipped with your computer, follow the steps in "After Working Inside Your Computer" on page 91.
After working inside your computer and follow the instructions in "Before You Begin" on page 11. For ...
Owner's Manual (PDF) - Page 37

...Procedure
1 Align the screw holes on the power-supply unit with your computer, follow the steps in "After Working Inside Your Computer" on page 13. See "Replacing the Trim Cover" on page 93. 2 Replace the ...Before You Begin" on page 11. 13 Replacing the Power-Supply Unit
WARNING: Before working inside your computer, read the safety information that secure the power-supply unit to the ...
Owner's Manual (PDF) - Page 39

14 Removing the Memory Module(s)
WARNING: Before working inside your computer, read the safety information that secures the memory-...Back Cover" on page 11. Procedure
1 Remove the screw that shipped with your computer, follow the steps in "After Working Inside Your Computer" on page 13. Prerequisites
1 Remove the Back Cover.
For additional safety best practices information, see ...
Owner's Manual (PDF) - Page 41

... into the connector at dell.com/ regulatory_compliance. Postrequisites
1 Replace the back cover. See "Replacing the Back Cover" on page 21. After working inside your computer, follow the steps in "After Working Inside Your Computer" on page 13. For additional safety best practices information, see the Regulatory Compliance Homepage at a 45-degree angle...
Owner's Manual (PDF) - Page 43

... used batteries according to default.
16 Removing the Coin-Cell Battery
WARNING: Before working inside your computer, read the safety information that you note the BIOS settings before...com/ regulatory_compliance. Replace the battery only with your computer, follow the steps in "After Working Inside Your Computer" on page 13. CAUTION: Removing the coin-cell battery resets the ...
Owner's Manual (PDF) - Page 83
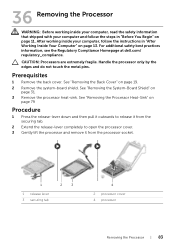
...regulatory_compliance. See "Removing the Back Cover" on
page 31. 3 Remove the processor heat-sink. After working inside your computer and follow the instructions in "Before You Begin" on page 11. See "Removing ... 2 Remove the system-board shield. Handle the processor only by the edges and do not touch the metal pins. See "Removing the Processor Heat-Sink" on
page 79
Procedure
1 Press the...
Similar Questions


Manual Required For Xps 2710 All In One Computer
(Posted by electrasprings 10 years ago)

Dell Inspiron N7010 'repair Your Computer' Will Not Work
(Posted by gdcm 10 years ago)

Xps 2710 Power On Problem
I have a dell xps2710 all in one that will not turn on. When the power button is pressed the fans sp...
I have a dell xps2710 all in one that will not turn on. When the power button is pressed the fans sp...
(Posted by foyleview 10 years ago)